
The Helium Bridge - A Thousand New Sensors

· 6 min read
Nik
Site Owner

Once you've built the world's largest LoRaWAN network, the next step is clearly to use it. Still, it can be hard to use a network that doesn't yet have an absolute boatload of sensors ready for it.

Part of this is the hardware lag cycle. It takes time to build hardware, and we're just now getting to the point where new hardware that's custom built for Helium (or any LoRaWAN) is starting to really pop into the market. I know, I know, there are a ton of shiny brochures with all kinds of fancy sensors that are ready right now.

I've bought a couple of those. With two exceptions (well done WeatherXM and DIMO!), LoRaWAN devices are usually expensive, have unreliable support, and generally don't work out of the box.

Where does that leave us in the Helium network? Firmly on the building side, but with an awful lot of light coming up on the horizon.

If we look at current (early October 2023) data usage over on the Dune OUI tracker, you'll see that between the top IoT data users, we're using about 88 million DC (1 DC = 24 bytes) per day, with the MeteoScientific Console (my publicly available console) going through ~71,000 DCs in 24 hours.

Now, 88,000,000 data credits SEEMS like a lot, but compared to what it can be? We're probably 2 orders of magnitude off. How do we get from here to there? We add sensors.

That brings us back to our original problem: Where do those sensors come from, and how do we get a TON of them cheaply?

While there are LoRaWAN sensors that'll work on Helium, the vast majority of IoT devices today weren't built for a LoRaWAN. What do you do?

Pretty obviously, you build something to allow any IoT sensor to connect to Helium. You build a bridge.

Back in April of 2023 I got a grant from the Helium Foundation to do just that. Dirk Beer and I worked on the thing over the summer, occasionally dropping updates as we got various parts of it working, and ended up with a rad little PCB design that anyone can order and then build.

This adds the potential for thousands of sensors to come on board. They could be weather stations, soil moisture sensors, air quality monitors, tire pressure sensors, people counters, traffic counters, parking sensors, or any number of different sensors. Here's a list of rtl_433 sensors that it's ready for now.

Eventually, the Bridge will receive any non-LoRaWAN radio protocol (rtl_433, Bluetooth, ANT+, WiFi, etc) then retransmit that data, either raw or processed, back out over Helium.

Let's think through a couple of scenarious just to get your mind running.

Opportunity!

First, you might (like me) have an obsession with remote weather stations. By "remote" I mean those weather stations that are beyond the range of short range wireless protocols that reach out to 100 meters at most. Almost by definition, they end up also needing to be remote from power, so they get energy from a solar panel and battery. Most of the time, remote weather stations price points are over $1,000. The KestrelMet 6000 I won at a CES raffle STARTS at $1,299!

Now, there are exceptions, like the WeatherXM Helium station that runs $400. For a commercial product, that's pretty amazing, and probably about as low as you'll get.

If, however, you were willing to do a little DIY and you had a Bridge that would receive the signals from a station that was nearby and had a short range, then re-transmit them over a much longer range, you'd be able to buy a much cheaper weather station like the $109 EcoWitt WS80.

Add the Helium Bridge, a device that costs ~$60 in parts (less if you buy in bulk) and takes about an hour to put together with the right tools and probably another hour of fiddling around the first time to program. By the time you're done with shipping for the WS80, you've spent just over $200 for a remote weather station you can customize any way you want (and that coincidentally, could be sending a ton of data!)

Now I'll grant that it's a DIY solution, and those will almost always be cheaper and more finicky than commercial solutions, but...pretty cool example of adding sensors to Helium!

It's the same thing with an air quality monitor like the WH-45 from EcoWitt; $125 for the sensor, another $60 for the bridge, call it $20 for the shipping and you're just over $200 for a totally remote capable sensor. You'll still need power, but a small solar panel and battery will be totally fine. Not that there's anything on the market that's an exact match, but just as an example, the OmniScience G-7 Wireless starts at $499.

Downsides

Ok, so the benefits of a Bridge are obvious; what are the downsides and limitations?

First, the current Bridge is still pretty DIY. Unless you're willing to do a little soldering and follow programming directions, this isn't yet a solution at scale.

Second, IoT in general isn't particularly easy, and adding in a second device that connects your IoT device to the wider world is another complication.

Still, the Bridge that currently exists is open source, meaning anyone, from you the reader to your favorite manufacturer, can read the directions then build and deploy your own, for WHATEVER sensor you want!

The Future

So, where does that leave us? At beginning of an amazing new world with still so much to be done! The rtl_433 list is a long one, but that's just one protocol.

There's ANT+ (commonly used for heart monitors and other biometric devices), Bluetooth (everywhere), WiFi, and the list goes on. If it can connect wirelessly, we can get it to connect through the Bridge. Whether you're retransmitting data from your bike computer or heart rate monitor or even a sensor that monitors your oxygen consumed as you work out (ahem, upcoming project!), the ability to bridge over information adds a ton of potential value to the Helium ecosystem.

I'd love to see what you do with it; if you have a specific sensor you're working on, please let me know in the comments and if you've got geek chops we'd LOVE to have you contribute over at the Helium Bridge Git repo.

LFG!

How To Understand The GEODNET Token System

· 4 min read
Nik
Site Owner

A common question with any DePIN project is: Where do all the tokens go? In GEODNET, 35% of all tokens emitted go to those of us deploying GEODNET base stations and providing coverage. But what about the rest of the tokens? Where do they go? How many are there? How do you KNOW?

Let's start with what GEODNET provides on their site, which is a breakdown of where the tokens are allocated. The total supply is 1 billion tokens; this is what was minted to start the project. There will be no more tokens minted; that's it. Now, just because they're minted doesn't mean those tokens are immediately emitted all at once. It just means they're created and ready to be used. The minted tokens are separated into segments to reward different participants in the project.

As you can see, the biggest section goes to those actually building the network (that's the big yellow section marked "Mining 35%".)

Where do the rest of 'em go, and how do you know?

This is one of the most powerful things about a blockchain project. You can see, on a public and immutable ledger, where all the tokens are and have been. To do that, you need two things:

  • Access to a blockchain explorer (I'll be using PolygonScan)
  • Knowing which wallets are linked to which segments.

Let's start by going to PolygonScan and looking for the GEODNET project. Here's what I saw in late August of 2022, when this was written.

You'll notice some important details, like the total supply, the contract address, the number of wallets (2,558) and then the tab we're going to hit, which is the Holders tab. Once we're here, we look for 6 important addresses:

  • Mining - 0xfa5fed5cc2b6dd8f370651d17242c52ed711b14f
  • Team - 0xca3e874bc4e830796d822f529c29df30302324b2
  • Remaining for Investors - 0x486559899e96981dfe55c4e6ebf5101a76bfadfa
  • Ecosystem - 0x3a6906e4239f9860c81035c54198df58d892653b
  • Vendor - 0x82146cf0f350c241757660fd803c73313b06d75c
  • Public Sale - 0xcecccb3ee2c208fb58a5a02499e97d4bf041ff6f

Two additional important addresses are:

Pending Burn / Revenue Buy Back - 0xc327C048d75398Da9DB5254679bb84a4a9e42010

Already Burned - 0x000000000000000000000000000000000000dead

When you search for the Pending Burn wallet (last 4 - 2010) you'll need to click on the "ERC-20 Token Txns" to see what's going on with it. Here's an example:

As you can see, it's receiving GEODNET tokens IN and immediately sending OUT USDT. This is the "buy back" aspect.

The way "buy back and burn" works is that the GEODNET Foundation takes 80% of the revenue it currently earns from paying customers, buys GEODNET tokens with that revenue, and then burns those tokens to a "dead" wallet, in this case, it's in the name: 0x000000000000000000000000000000000000dead

If you want to see how many tokens have been burned, look at the burn wallet, which can be found here. An example from August 22, 2023, is below. Note how many many tokens have been burned so far (2,290,000).

There is no way to retrieve tokens from that wallet; they are gone! It doesn't mean you can't track them, just that they're permanently out of circulation.

You can explore the various addresses as much as you want. If you'd like to learn about staking GEODs to earn 10% or deploying a miner to earn up to 14X tokens, check out this article (and now you'll know how to track it all!)

So there you have it: All the important addresses on GEODNET and a way to understand where all the tokens are, and where they've gone.

Rock 'n roll!

****Full Disclosure: Author Nik Hawks is owner of the consulting company Gold Hawks & Associates LLC, which maintains GEODNET as a client. Nothing in this article should be taken as financial advice.*****

How To Maximize GEODNET Staking

· 10 min read
Nik
Site Owner

How can you make the most of the new GEODNET staking program? Staking allows anyone to signal that they want a miner deployed in a certain area. Staking also offers larger rewards for both the staker and miners than a normal deployment. I'll assume for now you know what GEODNET is; if not, hit this article first.

In very broad strokes, there are 3 entities involved: The staker, the miner, and the GEODNET Foundation. The staker puts up a stake (either partial or full) signaling that they want a miner deployed into a specific area. Miners who deploy into that area earn a multiple on their normal rewards. The GEODNET Foundation (at least for now, August 2023), reviews the proposed stakes to make sure a staked area is healthy for the network.

The GEODNET team has released details of the beta version of their staking program, which is the first of its kind as far as using staking to incentivize real world deployments as signaled by the network. Full disclosure: The original staking proposal was written by me and Max Gold over at Gold Hawks & Associates.

Stakes cover a SuperHex (the set of magenta hexes above), which is 7 res5 hexes in a rough circle shape. GEODNET uses the Uber H3 hexagonal mapping system. Each res5 hex is about 20 km from side to side and covers an area of 250 km². A single well-placed miner can adequately cover a full SuperHex, but for redundancy, up to 3 miners may be deployed into separate res5 hexes in the SuperHex and earn enhanced rewards.

So what do you need to stake? 50,000 GEOD tokens (current price here). You can earn tokens by mining, or you can buy them on any of the DEXs (Decentralized Exchanges) like 1inch, Uniswap, etc. There is no central exchange currently listing GEODNET, and currently liquidity is pretty low, so if your'e going to buy, buy carefully. As always, this is crypto. Crypto is ultra volatile, so do your own research and make your own decisions on where/how/if you should acquire GEOD tokens.

How does it work? You can Propose a full stake (provide all 50k tokens yourself) or start a partial stake in increments of 2,000 GEOD. Partial stakes create an Available SuperHex and must reach 50k GEOD within 30 days or the stake is returned. As of today, August 20th, all Proposed Stakes must be submitted to the Foundation manually. In the near future, proposing will be allowed once you are logged in with a verified GEODNET Console account.

Once a fully funded stake is proposed and approved by the Foundation, it is considered Active. There is a 180 day period for Active stakes, during which up to 3 miners can deploy into separate res5 hexs within the SuperHex staked region and earn reward multiples. If no miners have deployed within 180 days, the stake is returned without any additional tokens (no 10% bonus if nobody deploys).

If at least one miner is deployed into the staked region within 180 days of activation, the area is considered an Producing Superhex, and the staker will receive a 10% bonus on the staked amount 1 year after the first miner deploys.

Staking Terms

  • Proposed SuperHex - A region proposed to the Foundation as a stake with any amount from 2k-50k.  An accepted Proposed stake can create one of two SuperHex variants, "Available" or "Active".
  • Available SuperHex / (partial stake) - An accepted proposed stake with any amount from 2-48k. Lasts 30 days from first partial stake.
  • Active Superhex / (full stake)  - An accepted proposed stake with 50k. Lasts 180 days or until a miner deploys, whichever happens first.
  • Producing SuperHex - SuperHex with at least one deployed miner earning the reward multiple
  • Saturated SuperHex - SuperHex with 3 miners, each in their own res5 hex

The different stakes (Available or Active) will show up on the GEODNET Console map differently. Available is green, and Active is blue.

Miner Rewards

Ok, that's cool Nik. What about the miners? What do we get? As soon as a stake is Active, the first miner deployed into any res5 hex in the SuperHex within the first 30 days will earn a 4X multiple on their mining rewards for one year from the time of the first deployment. Deployment will switch the SuperHex from Active to Producing. If you have a triple band miner (and you bloody well should, they're the highest earning miners in GEODNET), that means as of August 2023 you'll earn 48 x 4 = 192 GEOD tokens/day.

The second and third miners deployed into an empty res5 hex in the SuperHex are weighted equally for rewards: Each earn half of what the first miner earns. Once the third miner is deployed, the Superhex is considered Saturated. Any further miners deployed will earn the standard reward without any multiple.

After the first 30 days, the reward multiplier goes up by 1x and continues to go up by 1x every 15 days.

Ok, you have my attention, those rewards can get huge! But wait...where do these tokens come from? All GEODNET tokens come from a max supply of 1 billion tokens that are broken up in the following circle chart. You can see the full breakdown over on GEODNET's token page. The mining rewards tokens come from the yellow Mining section (35%). The Staking rewards will be withdrawn from the red Ecosystem section, which is 10% of all tokens.

To put this in perspective, since the inception of the project used only 9% of the Mining tokens have been distributed and we've recently halved mining rewards. The project is in very good shape there as far as total emitted rewards vs total available. You can always check current amounts of tokens in any given wallet over on PolygonScan for GEODNET, clicking on the Holders tab.

Love all the token talk, but this is the real world. Can you give an example of how and why staking works in GEODNET?

Currently, GNSS systems are complicated and expensive, requiring significant investment ($5k is a normal starting price) to deploy. GEODNET vendors like Hyfix provide easy-to-set-up and cost effective (~$700) miners that anyone with electrical power, an internet connection, and a clear 360 degree view can deploy.

Typically, a GNSS company will pay highly skilled labor to deploy and maintain a GNSS base station in a specific area. This is expensive, time consuming, and centralizes where the profits go. As an alternative, GEODNET is a more decentralized project that allows anyone, whether they are a customer, miner or just an interested third party, to signal where coverage is needed, provide that coverage, and be rewarded for providing it. Cool, right?

Where and how would that coverage be used? Let’s take two examples: The Central Valley in California, and the country of France.  

First we’ll do California.  California  is about 3/4s the size of France, and has at least one relatively small area, the Central Valley, which produces 25% of America’s fruits, nuts, and other food products.  The Central Valley is about 20,000 sq miles, which sounds big, but it’s only 1% of all US farmland. 

Agriculture is a straightforward use case for GNSS.  Modern farmers use high accuracy techniques enabled by satellite navigation to maximize crop efficiency.  Providing coverage to the Central Valley is exceptionally useful for GEODNET customers.

With staking, the Foundation or a customer or the community in general can stake areas in the Central Valley that currently have no miners.  Staking an area signals to the entire network that "this place is important, you should deploy a miner here!" This type of staking is an excellent demonstration of leveraging decentralized decision making; we're not relying on just one entity to decide where to deploy, we're relying on the network itself signaling that.

Ok, so that's agriculture. What about another example?

France is 213,000 sq miles; about ten times as big as the Central Valley.  Each GEODNET miner can provide cm accuracy for about 120 square miles.  To provide blanket coverage for France you’d need over 1,700 GEODNET miners.  However…France doesn’t need perfect blanket coverage, but it does need wide coverage, especially in certain areas.

France is also notoriously difficult to penetrate with DePIN projects. For whatever reason, the French are resistant to earning crypto for deploying hardware. Staking rewards should help overcome that resistance and encourage deployment where coverage is needed.

Who might need coverage in France, and why? Perhaps a company who wants to monitor scooter use in a city to help governments understand how scooters are being used and whether or not they should be banned or otherwise limited.  In this case, the company may not want to go about deploying base stations, and they may not need them permanently deployed, so staking offers a great opportunity to signal demand and get a return on tokens at the end of a year.

Another example is marking very precisely where land mines have been found so they can be disposed of. This is critical work though not always well funded, so a low cost highly accurate project like GEODNET is an excellent fit.  

Ok, I’m ready to go!  What do I need to know about deploying a GEODNET miner?

Every miner will need power and access to the internet.  Miners use about 10-15 GB of data a month, though it’s spread out so you don’t a particularly fast internet connection; it’s more important that it’s stable. You'll also need a clear 360 view of the sky all the way to the horizon. I've written a blog post on deploying GEODNET miners here, go take a look!

That wraps it up for the new GEODNET Staking program, if you'd like to stay up to date you can join the GEODNET Discord and you can always follow me on Twitter (X) or YouTube or sign up for email down at the bottom of this page so you get notified whenever I publish new content.

Rock 'n roll!

Disclosures: Author Nik Hawks is a consultant with Gold Hawks & Associates, which currently maintains the GEODNET Foundation as a client.

Archived Comments

Anthony Passero - 8/31/2023

What is the current status of the Internet of Things?


How To Use A Helium Integration

· 10 min read
Nik
Site Owner

Let's start with the basics: What the heck is a Helium Integration, and why would you even need one?

An "integration" is what allows the raw data that's coming from your Helium sensors to be actually used. Whether that's showing a dashboard of soil moisture, or temperature, or if you're tracking the number of people who park in a spot, you'll need an integration to actually understand that data.

Let's do a quick review of how information moves through a LoRaWAN:

It starts with the Device sending out a Packet over radio waves. That Packet is received by a Hotspot. The Hotspot sends it on to an LNS (LoRaWAN Network Server), which will typically decode the packet and send it on to an Integration.

Now, an Integration doesn't have to be a display; it could be any use of that data. Let's say you have a Helium sensor monitoring soil moisture under a sprinkler manifold. If that sensor suddenly reports that it's super wet, you may want to have your Integration just shut off any water to the manifold.

Of course, you might want to know if that soil moisture is because of a leaking pipe or just that it rained recently, so you probably want to tie in data from a local weather station, like this:

To see all that data, you need an Integration. In this case, we'll be using the MeteoScientific integration, which also has a Rules Engine that allows you to create rules and workflows around what happens when it rains, or gets too cold, or does any one of a number of things that your sensors can report on. *Full disclosure: I own and run MeteoScientific and invested in the software it runs on, which is called UplinkEngine.

For now, I'll walk you through how to connect your Console to an Integration. We'll get to actually displaying the decoded data in the next post.

The MeteoScientific App is free to sign up for, and the smallest device plan is $.50/month, which is competitive with any other integration option out there.

Integration Options

There are lots of other integration services, like Datacake, Ubidots, Tag.io, and of course, Nova's 1663 option for large commercial users. Each of them offers something slightly different, and depending on what you want, they may be a good match for you. They all will have the same general steps that we'll follow below for MetSci. You'll generate an API key, add it to your LNS, figure out how to read the incoming data, and then (for most of them), automate actions based on that data.

Relax, we won't do ALL of that in this post. :)

I'll make an assumption now in order to save us some time and space, and that's that you already have your sensor up and connected to the Helium network. If you don't, start over here with the MeteoScientific Console.

Chirpstack Device Setup - Example

Once you have a device set up, it'll look something like this weather station, which is an example from the Chirpstack LNS on console.meteoscientific.com:

You can see that the sensor is up and reporting packets consistently, and the signal strength is good enough. Now, this is just the Device. To create an Integration, start by finding your Application in Chirpstack. Click on the Application, then look for the Integration tab, like this:

Click on the Integration tab, and then hit either the "plus" button if you don't currently have one, or the pencil icon if you already do (which is the case in this example.)

Once you're in the integration, we're going to tell Chirpstack where to send the data from our sensor. This sends our data to the "Integration."

To do that, we're going to open another tab and for our Integration account. In this case, that's the MetSci (MeteoScientific) app. There we'll generate an API key, then copy and paste a few things back into the Chirpstack Integration window.

MeteoScientific App

So, over on app.meteoscientific.com, look for your account name, then API Keys, then go to the top right and hit the "Add API Key" blue button, like this:

Once there, you'll see the option to add an API key. API stands for Application Programming Interface, and it's the code that allows two programs to talk to each other.

Add the key and name it something that makes sense, then save. You'll need to add a "verification code" which will be sent to the email you signed up for the App with.

You could name it Super Duper Double Trouble Radical Wizard Key. The name doesn't really matter, it just has to make sense to you. Once you see it in your API KEYS list, we'll move on to the next step: Add the Device you have over on Chirpstack to the MetSci App, then using the API key to connect the two.

Gather your DevEUI, AppEUI, and AppKey from your Chirpstack account for the Device you want to add, then in the MetSci App, go to Core-->Devices and Add Device, like this:

It'll display a screen where you enter in all your various EUIs and keys. Fill those in, then hit Save at the bottom.

For now, don't worry about Heartbeat Interval, Public Viewing, Parameters or Position, we'll fill that in later. Hit Save, and you'll see your Device.

Look for the "How to Receive Uplinks" tab and expand that, then carefully follow the instructions. It'll look like this:

Use the copy/paste buttons to grab your "Endpoint URL" and the HTTP Headers Authorization. We'll paste those in over on the MetSci Console, back in the Integrations tab we left open from before.

Go back to Chirpstack

In Console, on the Integrations --> HTTP edit box, start by choosing JSON, then fill in the Event Endpoint URL.

Now hit the "Add Header" button, and add in a Header with a "key" of Authorization and a "value" pasted in from your app. That will start with "Bearer" and then have your API key in there. I've already done mine, but just for reference, this is what it looks like:

You're done!

That's it! You've connected your Console with an Integration using an API Key. Wait for your sensor to send a packet, and you'll see the packet show up in your MetSci app. I'll save the next step (taking the decoded data from the packet and displaying it in the app) for another post. For now, pat yourself on the back, you've made the last big connection in a long set of geeky rules, well done!

If you're digging this set of instructions, I'd love to have you as a MetSci Console and App customer. However, I'm more psyched to just have you using Helium in general, so whatever combo of LNS and Integration you use is fine with me. If you're having trouble, drop me a note in the comments below and I'll do my best to help you out!

Rock 'n roll!

Archived Comments

E.H. - 8/12/2023

Hello Nik. I am E. H. from Zenica, which is located in Bosnia and Herzegovina. Zenica is a small town with a large ironworks. It is called Željezara Zenica (You can check it on this link - you will have to translate it into English https://bs.wikipedia.org/wiki/Željezara\_Zenica) It used to employ 20,000 people. A big war happened in Bosnia and Herzegovina 30 years ago, which you probably know about. The country never recovered from that war. You can still see ruined buildings, bullet holes and rubble from explosions, unemployment is huge and corruption is flourishing. The country is still divided on national and ethnic lines. Now you are probably wondering what all this has to do with Helium and your blog. Well, I discovered helium 3 years ago. Of course when I discovered helium I also discovered your blog. And I want to tell you that you are the biggest star in the helium world! I wanted to use Helium to monitor the level of air pollution in my city. I wanted to set up measuring stations all over the city that would post real-time data to a website or app so people could check the air quality before going outside. They would also finally have data that would be collected over a period of time so that they would have evidence that the steel plant is poisoning my city. I already wrote to you that corruption is flourishing, the Mittal Steel company that bought the ironworks does not comply with any regulations, it emits huge amounts of dust and smoke into the air at night when it is less visible (I can send you pictures if you want), local corrupt politicians assure us that the pollution does not originate from the steel factory but from people who use coal for heating. Mostly a long and sad story, and in the meantime, people die en masse from cancer. And back to helium, I ordered two hotspots 3 years ago. One sensecap and one bobcat. I installed them, I even installed one sensor similar to what you wrote in this article. You can check it at the following link: https://app.datacake.de/pd/ec69f339-95b6-4279-93e8-04d49ca24a8d One of the hotspots was added to the denylist a year ago for some unknown reason. You can check it at this link: https://www.crowdspot.io/hotspots/112jFvxA6VL3eofEsTMA9f8Ge2KF85VYhXx9zGmWWiFbB2KARGMm?submissionId=5561 Of course, I immediately reported the incorrectly added hotspot on Crowdspot, sent pictures and coordinates of my setup, and since then a year has passed and nothing has happened. It still says status pending. What can I do? The cost of a new hotspot is about the same as my monthly salary. I can't just buy a new hotspot. I haven't even paid off the two hotspots I bought yet. Please help. You can contact me at [redacted] Sincerely, E.H.


Nik - 8/12/2023

Hi EH, Thanks for writing in and sorry to hear about Zenica's issues. It definitely sounds like Helium could help with providing coverage for air quality monitors, love that idea! As far as the Crowdspot issue, I don't have any control over that. It's currently an issue being debated and addressed by the community at large in the Discord server. The most you could probably do is rally your Helium friends to vote it out of the denylist, but that's not a guarantee either. Sorry I don't have better news!


How To Use Helium for Parking Sensors

· 7 min read
Nik
Site Owner

One of the great opportunities of a ubiquitous wireless network like Helium's LoRaWAN is in monitoring parking. While parking may seem slightly less interesting than day-old oatmeal to most of us, the more you know about parking the more you wonder why we don't pay far more attention to it.

Let's start with the business cases for it. Any given city government typically lays out various types of parking options; 2 hour parking, 72 hour parking, 15 minute parking, commercial loading, taxis, etc. These are applied to a city layout in order to promote the efficient use of street space and support citizens and businesses as they go about their day. The city of San Diego has 55,000 parking spaces in downtown alone; that's a lot of potential data!

As a quick example, you might want 2 hour parking on most of the "main strip" of any given small town, with spots for businesses to load or unload, taxis to pickup, or people to have a reliable place to leave their car when they run short errands like mailing a package or buying something from a restaurant.

So far, so good, right? Think about the following three questions: First, how do you know the current layout is working? Second, how do you make sure people are following the rules? Third, how might you turn parking violations into a significant profit center until citizens clean up their act?

Most cities in the US have very little "real time" idea of how citizens are parking. In one sense that's great; I don't really want to be under constant parking surveillance. In another sense it's one of the craziest things you can think of. We literally build a city, hope we got it right, and measure almost nothing to make sure.

Imagine doing that in school! "Hey students, here's a test where if you get an answer wrong you're going to owe a small amount of money. I want you to take the test. When you're finished, crumple it up and throw it into the trash can from wherever you're sitting. I'm going to take a nap while you take the test. If I wake up, I may try to catch some of the crumpled up balls of paper that were your test when you throw them. If I catch anything, I'll grade you on a few random answers. If you got them wrong, I'll charge you. If I don't look at your test then you pass."

Why not just grade the test? Well, up until very recently, "grading the test" was very expensive and technically difficult.

Helium has changed half of that by making it easy for anyone to deploy a sensor measuring parking wherever they want, and the world of sensor manufacturers is spinning up production to meet the burgeoning demand. As we get to scale, prices begin to come down, and we get to actually "grade the test."

Of course, waiting to get to scale and for prices to come down and for local government to embrace new technology isn't a good formula for getting shit done, and GSD is my happy place, so...I went ahead and bought then deployed a few parking sensors.

I'll give you the bad news up front: Out of the 3 sensors I bought (they run just under $200 each when you're buying low volume), 2 of them broke within a week or so from cars driving over 'em. The company has acknowledged the problem and is working on a better enclosure, and will send me the upgraded version when they're ready. I'm cool with that; I expect things to break in these early days.

Now, those two were "surface mount", meaning that they just fasten straight to the surface of a street, like this:

It's not like the in-ground one is much larger, here are both types on my carpet in the office:

So, what's it like to install the in-ground one?

https://youtu.be/76HAjnuqDPk

Ok, with that as the current state (1 working, 2 broken), what's next? I'll spend the next few weeks while I wait for the 2 replacements working on how I want to visualize the data. Remember, I want to give our city the ability to "grade" how well parking is working. I think it might look something like this:

I could be wrong and they just want a boring old spreadsheet, but let's take a swing at the elephant in the room:

A parking violation here in San Diego runs about $53. A parking meter enforcement officer (PMEO) earns $19.64/hour. Now, I'm not going to get into wage debates here, but it doesn't take much more than a 5th grade education to see that a PMEO who can quickly see where they should ticket is, at least until people learn not to violate the parking signs willy-nilly, a profit center.

I know, I know, a couple of you will be fucking howlers and complain about your rights being infringed because you shouldn't have to live in an Orwellian state. That's ridiculous, you know it, and all you have to do is follow the signs or vote in better rules. There is an entirely different (and much stronger) case to be made that governments are fairly bad at spending money, but for now, let's just imagine we could improve things by gathering data.

Look, we're getting closer to a world where more things are measured, and in the measuring the world gets benefits like making data-driven decisions to improve an operation. The jackwagon in the '67 Camaro might have nice taste in old cars, but she doesn't get to park 4 hours in a 15 minute zone without a consequence. Other people can use that space, businesses rely on traffic flow, and thinking that the signs apply to everyone else but not you is a recipe for a world that is less fair and fun.

Ok, so that's how you might use data from street parking in a punitive way, how could a small business constructively use a parking sensor to improve sales?

One way is to indicate to customers that a parking slot in a specific area is free for them to use; that's an easy Helium fix. If the parking space is occupied, there's an integration that turns a light in front of the business red, to indicate parking 'round back is full. If the parking space is available, the light is green.

The business sends out emails and tells walk-in customers to look for the light, which is a fun story to tell and lets customers know that the business cares about 'em and is willing to explore cutting edge technology. As more people are able to park and walk in and spend, the business generates more profit by providing a better experiences. Winning all 'round!

Now, these are just 2 options to explore in the world of just parking sensors; imagine how much is left to develop across the entire IoT space?! I'd love to hear how you think YOU might use IoT in your business, whether it's parking sensors, cold chain monitoring, buoy tracking, or counting how many people walk by the front door versus come inside to track how your signage is working.

The possibilities for exploration and improvement are damn near endless, I can't wait to hear how you're using 'em!

Rock on!

Sunsetting Helium Console - The End of an Era

· 7 min read
Nik
Site Owner

As any project progresses from a good idea to first implementations and moves closer and closer to commercial viability, the nature of access to the project will change. Typically you start off by giving away access for free, just so people can try the thing out. Helium's LoRaWAN (as all DePIN projects do) went a step further, and issued tokens for those who were willing to put up a gateway, in Helium parlance called a "Hotspot".

If you put up ("deployed') a Hotspot and provided LoRaWAN coverage, you earned a token called HNT. In the early days of the network, earning HNT is what drove the explosive growth from zero to about a million Hotspots in the course of around 2 years, as both the amount of HNT earned and the value of that HNT in dollars on the open market made deploying Hotspots a very lucrative endeavor.

If you think of HNT earnings as being like a giant pie, where early adopters got huge slices and many others looked on those slices and made their own lambo plans, you can see where it ends up going. Like any tasty pie, as more and more people claimed their slice, the slices got thinner and thinner, and at this point (June 2023) there isn't a huge financial incentive solely for providing coverage.

So, that leaves the real work of Helium still ahead: Allowing people to use this network that a community of strangers has built, and as part of that, allowing for and encouraging the support of businesses that build on top of the Helium ecosystem. I should say here before going any further that while I believe building a business on Helium is a reasonable bet, if you're considering running a business on Helium you should do your own risk analysis and research.

With that out of the way, let's talk about what will need to happen in order for Helium as a system to build a project with long term sustainability. We should start with a brief review of how the Helium LoRaWAN works, as it's slightly different than other LoRaWANs in two important aspects.

First, the technical aspect of having an additional step in the journey of a packet of data as it makes its way from a sensor to its final destination of being useful information. This step, through the "HPR", or Helium Packet Router, causes additional technical hurdles that are surmountable but must be understood by businesses considering using Helium.

Second, the personnel aspect of many people who would never before have thought about touching a LoRaWAN suddenly gaining access to high technology as a revenue stream. In this case I'm thinking of those businesses that might use a service like MeteoScientific (full disclosure, MetSci is a Gristle King Inc offering) for their own use or to upsell clients on a subscription model.

Here's a quick visual on the flow of data, from left to right, as a "packet" of information leaves a sensor and travels through to its final destination.

Along every step of the way is an associated cost. The sensor is a physical object that costs money to buy, a Gateway costs money to deploy, the Helium Packet Router costs money to operate, as do the LoRaWAN Network Server (LNS) and an Integration, which is where you see and use the data from the sensor.

In this article, we're going to focus on the LNS options, as this is currently hindering the growth of a decentralized system.

Currently, the Helium Foundation, a non-profit organization with the mission to be a steward of ecosystem development, network governance, and public education, runs a free version of an LNS, called "Helium Console". Anyone can sign up for it and run up to 10 devices on it, paying the "base rate" of data credit costs, which is $.00001/DC.

If you wanted to run your own LNS, you'll need to buy an OUI (think of it as a license to run an LNS) which currently costs $900, and you'll need to host your LNS on servers. Yes, you could scrap together hardware and do this on the cheap. However, for any serious business use, servers in the cloud with a reasonable uptime guarantee will cost at minimum a few hundred dollars a month to run. If you were to hire an expert (like I've done) to run servers using the OUI you've bought, you can expect your costs to start around $1,800/month.

Staying in business is straightforward; if you can buy the thing for 1 and sell it for 2, you're in business. Simple in concept, business is deceptively tricky in practice as you face not only the challenge of finding and keeping customers but also the competitive nature of others trying to run their own business. If you enjoy that kind of challenge it's extremely engaging, but you do want to make sure as much of the deck as possible is stacked in your favor.

That includes making sure there is no reasonable competition that can undercut your prices and sustain their operations.

Having a free option run without a profit motive stifles competition. For example, why would you use the MetSci Console, which charges $.0001/DC, when you could use the HF Console, which charges $.00001/DC?

Of course, there are other significant advantages to using the MetSci Console. On MetSci there is no practical limit on devices, we are constantly adding new decoders and support, it integrates with the MetSci app, and while there's currently no SLA, we have kept up with a 24 hour response time to all requests.

There is currently no business support for the HF Console and the Foundation has said that they will eventually sunset this Console, although with no date given.

Still, this is about more than just one LNS, this is about developing a decentralized system that supports businesses trying to build on it. In a system where the central player does not have pressure to turn a profit and offers a free alternative, the incentives to build competition are artificially suppressed.

Now, the argument can be made that no one will think of building a business on a model that only allows 10 devices and has no support, and that's reasonably fair, but the question is: Why offer it all? Why not just get out of the way of the businesses who are trying to build on the network, let them compete on a price/quality basis without unfair competition, and assume that will build a far healthier system?

With that in mind, I've proposed that the Helium Foundation shut down public access to their Console instance along with all current accounts with 10 or less devices in order to open up the playing field for a healthy and spirited competition between vendors willing to invest long term in Helium.

I could be wrong about this, and I'd love to hear how and why a better solution exists, so feel free to drop comments below, or comment on the HIP if it gets accepted, or head over to the GK server and join the discussion there.

Citizen Science: The Next DePIN Frontier

· 3 min read
Nik
Site Owner

Now that Helium has shown the world how to deploy a global network of physical devices at a low capex, and Hivemapper, GEODNET, and WeatherXM (among many others) following suit, what should we expect to see in the next year?

My guess is we'll see the rise of DePIN/CS, for Decentralized Physical Infrastrucutre Networks/Citizen Science.

Many of these projects already exist, supported by enthusiasts around the world who already build and deploy sensing devices. It could be the Raspberry Shake project monitoring earthquakes, or Birdnet tracking birdsong, or Sky360 keeping an eye on what goes on up above us. All of these projects show an average person how to employ technology to gather data about the world around them, then share that data to the global community.

Here's a page from my Birdnet instance, showing what birds were heard about my backyard. You can listen to these birds (or ones closer to you) over on the BirdWeather app.

With hundreds of thousands of people introduced to the idea that they can move slightly above the average understanding of how to employ technology (deploying almost a million LoRaWAN gateways around the world in Helium's case), there is a distinct hunger for setting up a data-capture device that improves our understanding of the world and capturing some of the value from that data stream.

What will really accelerate this is figuring out the dual paths of DIY devices as well as manufactured hardware. Outside of Helium (and they only did it for a short while), very few projects have explored DIY options, mostly due to security reasons. The question remains: How do you make sure the data flow you're getting is real, accurately asserted, and correct when there is a financial incentive to provide it?

Now, all of that is down the road a bit. For now, I'd suggest checking out a few of these projects and just getting your hands dirty. I recently took a Raspbery Pi4 and put it into service as a Birdnet, including building the custom microphone for it.

The project required basic soldering skills, the ability to follow instructions, and the ability to purchase a few things on the internet. Not hard, and very promising as far as a low barrier to entry for radically improving our sense of the world. I used an old Helium outdoor enclosure to house the Pi, and in about an hour of assembly had a rad little device that I'm helping contribute to bird knowledge with.

Do you have a favorite "citizen science" project? I'd love to hear about it and with any luck, build a node and put my shoulder to the wheel of science.

Rock on!

Improving Chirpstack for Helium

· 4 min read
Nik
Site Owner

The most important person reading this may be non-technical. While technical expertise is critical to accomplish the goals set out below, much of the initial work done will be "imagination work", trying to figure out how we as a community want to work with, in, and around a new form of access into Helium.

Let's start with laying out how the system works, from the sensor sending out a packet all the way until you see that information displayed on a screen.

The sensor emits a packet, the packet is received by a Helium Hotspot (also known as a "gateway"), that Hotspot sends it to the Helium Packet Router. The Helium Packet Router figures out which LNS to route the packet to and sends it there. At the LNS the packet is received and decoded, then sent out to an Integration, usually to be displayed in a dashboard or sometimes as an alert or notification. Whew!

Now, currently that "LoRaWAN Network Server" can be either the Helium Foundation Console, or, as in the image, a Chirpstack Console. Either one is considered an LNS.

This flow is different than a "normal" LoRaWAN network because of the addition of the Helium Packet Router. Now, the HPR is required for this whole thing to work; it coordinates the 400,000 Hotspots across the world. No other LoRaWAN out there has anything close to this amount of Hotspots, so they don't have this problem.

In fact, a typical LoRaWAN deployment might have just 2 or 3 Hotspots (they'd call 'em Gateways) and would look like this:

So the big difference is REALLY big: 2 or 3 (or maybe 2-3 dozen) Hotspot/Gateways versus 400,000! That's why at Helium we need the HPR.

Ok, so here's the rub (well, one of a few rubs). Chirpstack wasn't built for a network like Helium. The way it displays information to the LNS owner is based on the idea that an LNS will maybe 3 dozen gateways.

By the way, if you want to see and use an actual Chirpstack instance on Helium, please check out the MeteoScientific Chirpstack Console, which I'm running to help normal people use this fancy technology. It's free to sign up for an account, and you get a couple hundred DC when you do, which is enough to add your first sensor to the network and see how it works for yourself.

When you first sign into the Chirpstack Console, this is what you see:

That's fantastic if you only have a handful of gateways and you're really focused on Device Data Rate, but...that ain't us, which means that out of the 4 displays (Device, Gateways, Data Rate Usage, and Gateway Map) we only see 2, and really, only 1 of those is useful to most of us.

So, what should we do?

Since Chirpstack is open source (you can read all about it here and check out their Github account here), I think we build a better option. This is either a commercial opportunity (you design a dashboard and sell access to it) or something that the Helium Foundation would be delighted to see a grant application for.

As a general thing to start with, I'd like to see something like this, where the LNS owner gets to see data about the fleet of Hotspots & Devices they're running.

Now, that probably won't be what it ends up with, and I'd love to hear what YOU would want to see! It might be cool to see most recent device onboarded, or a per device DC burn window, or an alert for any device that goes out of some pre-set parameters.

Whatever it is, I'm looking forward to seeing who is going to build what. It is entirely possible I'll have one built for the MeteoScientific Console just to see how it works, so consider me in the running for helping improve this. Now, this'll work best if we all put our shoulders to the wheel together, so if there is anything I can do to help you along the way, please reach out, I'd love to collab on this and improve the system for everyone.

Rock on!

Riding The Downlink - A Rough Guide To Browan Tabs

· 8 min read
Nik
Site Owner

What is a downlink, why would you want one, and how can you use 'em? With Helium being a permissionless network, we're going to have a ton of people who are not LoRa wizards trying to use a LoRaWAN, including downlinks. I thought I'd write up a few articles on how to solve some of the frustrating obstacles you might find as you continue your Helium journey. This should help the average user get a hold of one lever in this high technology world called "the downlink". We'll start off with some background, explain a little about how it works and give some examples of how you might use it.

LoRaWAN is not something the average person is familiar with, and almost all manuals available are written for people who already understand what's going on. That's fantastic if you got a EE degree and then a Masters in wireless communication. It's less useful if you're a plumber who wants to level up their game and is curious about technology (i.e. an excellent candidate to use the Helium network).

Let's start with a few sensors from Browan, a company that's been in the LoRaWAN business since 2016, and the wireless business since 2002. Browan was kind enough to send me samples so I could share them with you.

Browan famously makes the Object Locator Tabs, which were some of the first devices ever on Helium, and make up many of the devices BFGNeil uses over at Trackpac. While most of us know Tabs as trackers, the Tab form factor (the little hexagonal shape) is used to house a number of sensors, 3 of which I'll talk about here. Browan also makes the MerryIoT line, which produced a Helium Hotspot for a while and continues to sell LoRaWAN sensors.

Here are a few examples of different Tabs. You can find all of 'em over on Browan's website.

Onboarding these sensors will give you a good idea of the potential and the limitations that they come with. The potential is the bigger of the two; by combining these you can figure out an awful lot about a space; from whether the cat came in (motion sensor in a cat tunnel) knocked over the water bowl and then left, all the way out to determining whether or not you should open the windows when you're welding in your garage workshop.

I'll leave the imagination part up to you and dig into some of the practicalities you might run up against if you're still new to the whole LoRaWAN & Helium thing.

We'll start at the basic level: Every sensor has 3 "keys" to it: The DevEUI, the AppEUI, and the AppKey. There are others, but as a basic Helium user, those are the three you need.

In many sensors you can change those keys to suit you. That might be important if you're security minded, or if you have an internal identification scheme for the sensors in your business.

With Browan Tabs, you don't have to worry about changing keys. You can't reprogram the DevEUI, AppEUI, or AppKey. It's simple: What they ship with is what you've got. You'll either receive the key-set in an email, or they may be printed on a slip of paper or sticker in the box. Don't lose 'em, as you won't have an easy way to retrieve them. I know of one case where the keys for over 300 Tabs were lost and they got thrown out. Don't let that be you!

Now, every device on a LoRaWAN has a "decoder", also called a "codec". This is a set of instructions that deciphers the data the sensor sends out (in an uplink) and turns it into something we can read and use, like a temperature or air quality reading. Decoders are vital to actually using the network, but they're not always easy to find or to write for a specific device.

The Tabs all share one decoder, which is kind of cool. This means that in Chirpstack (which you can try here), you just set up a Device Profile and then create multiple Applications for it. In the Helium Console, you'd just set up one Function, then run all the Devices through that Function.

Ok, so that's all the basic stuff. What happens if you want to change something on the device? There isn't a way to connect a programming cable to Tabs, so you have to do it wirelessly, through something called a downlink.

A downlink is a command you send over the air once the sensor is activated and has joined the network. A downlink is received by the sensor AFTER the sensor uplinks. If your uplink interval (the interval at which your sensor sends data) is only once a day, you'll only have one shot per day to send back a downlink.

A downlink might tell the sensor to send out packets on a different interval (every 5 minutes vs every hour), or it might tell the sensor when to actually report something. For example on the Indoor Air Quality sensor, you might only want to pay attention to temperature changes of over 5 degrees; you don't need to know if the room went from 72F to 73F.

Downlinks are tricky for new users. Conceptually easy, they are finicky in practice. If you don't get every detail correct, they don't work. Let's go through a few examples of common pitfalls that you can avoid.

Let's start by checking out the Browan manual for the IAQ Sensor, you can find it here. On page 14, you'll see the the Appendix for Configuration of Downlink Commands.

The first thing to look for is what port to send the downlink on. In this case, it's 204.

Next, figure out what parameter you want to change. If you want to change multiple parameters and see what happens after each change, consider changing your uplink intervals to be frequent so you have multiple fast options for sending back downlinks, then setting the uplink interval back to whatever you'll use long term.

So, how do we write an downlink and then send it? Every device is slightly different, and reading the manual helps. In general, you'll have to do some translation between what you want to say (Hey, only tell me if the temp changes 10 degrees) and what you send (0x10 in the case of a Browan IAQ tab). Usually you can find example payloads that'll guide you, like this:

I've found that most of the time, the examples seem simple but can be really confusing. Are you supposed to send 01 02 or 0x02? Or something else?

Usually, the engineer who wrote the firmware on the device has done some little tweak that totally makes sense to her, but can catch ya out if you're not paying attention. In the example image above, note that the "Unit" of time is 5 minutes. They also don't refer to a "uplink interval", they call it a "Keep alive value".

Finally, you may notice that they use a format called hexadecimal, which you'll need to translate to. In the IAQ index delta example above, 50 is the number you as a human would read, but you'll need to send 32. You can convert Decimal to Hexadecimal here.

The easiest way to get the right command is to use Browan's Downlink Translator, which I've made available in a Google sheet you can view and copy by hitting the button below.

Browan Downlink Translator

Here's what it looks like; use the tabs on the bottom to find the sensor you're using, then choose the Config value you want and then copy/paste the Downlink Command Payload. You can choose to configure all of 'em at once as well (as you can see in the screenshot below.)

Oh, and one more thing. There's a trick to popping off the shell so you can replace the battery; here's how to do it:

https://youtu.be/jOMi0DIaDz0

Archived Comments

V - 10/30/2024

Hi Nik Your blog helped me set Ambient Light Sensor. Thank you!


Frédéric Bosc - 10/25/2025

It is refreshing to read something written by a human in these days. Great day to you !


A Rough Guide to Chirpstack on Helium

· 13 min read
Nik
Site Owner

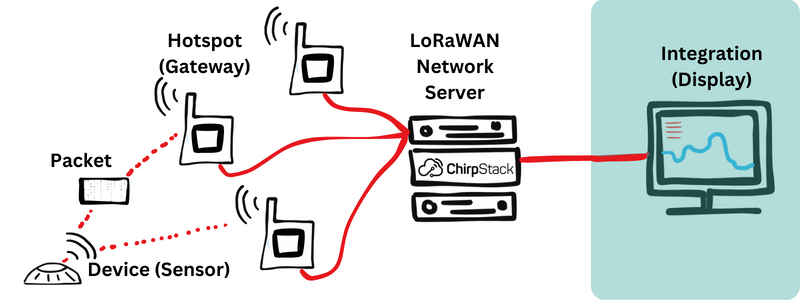
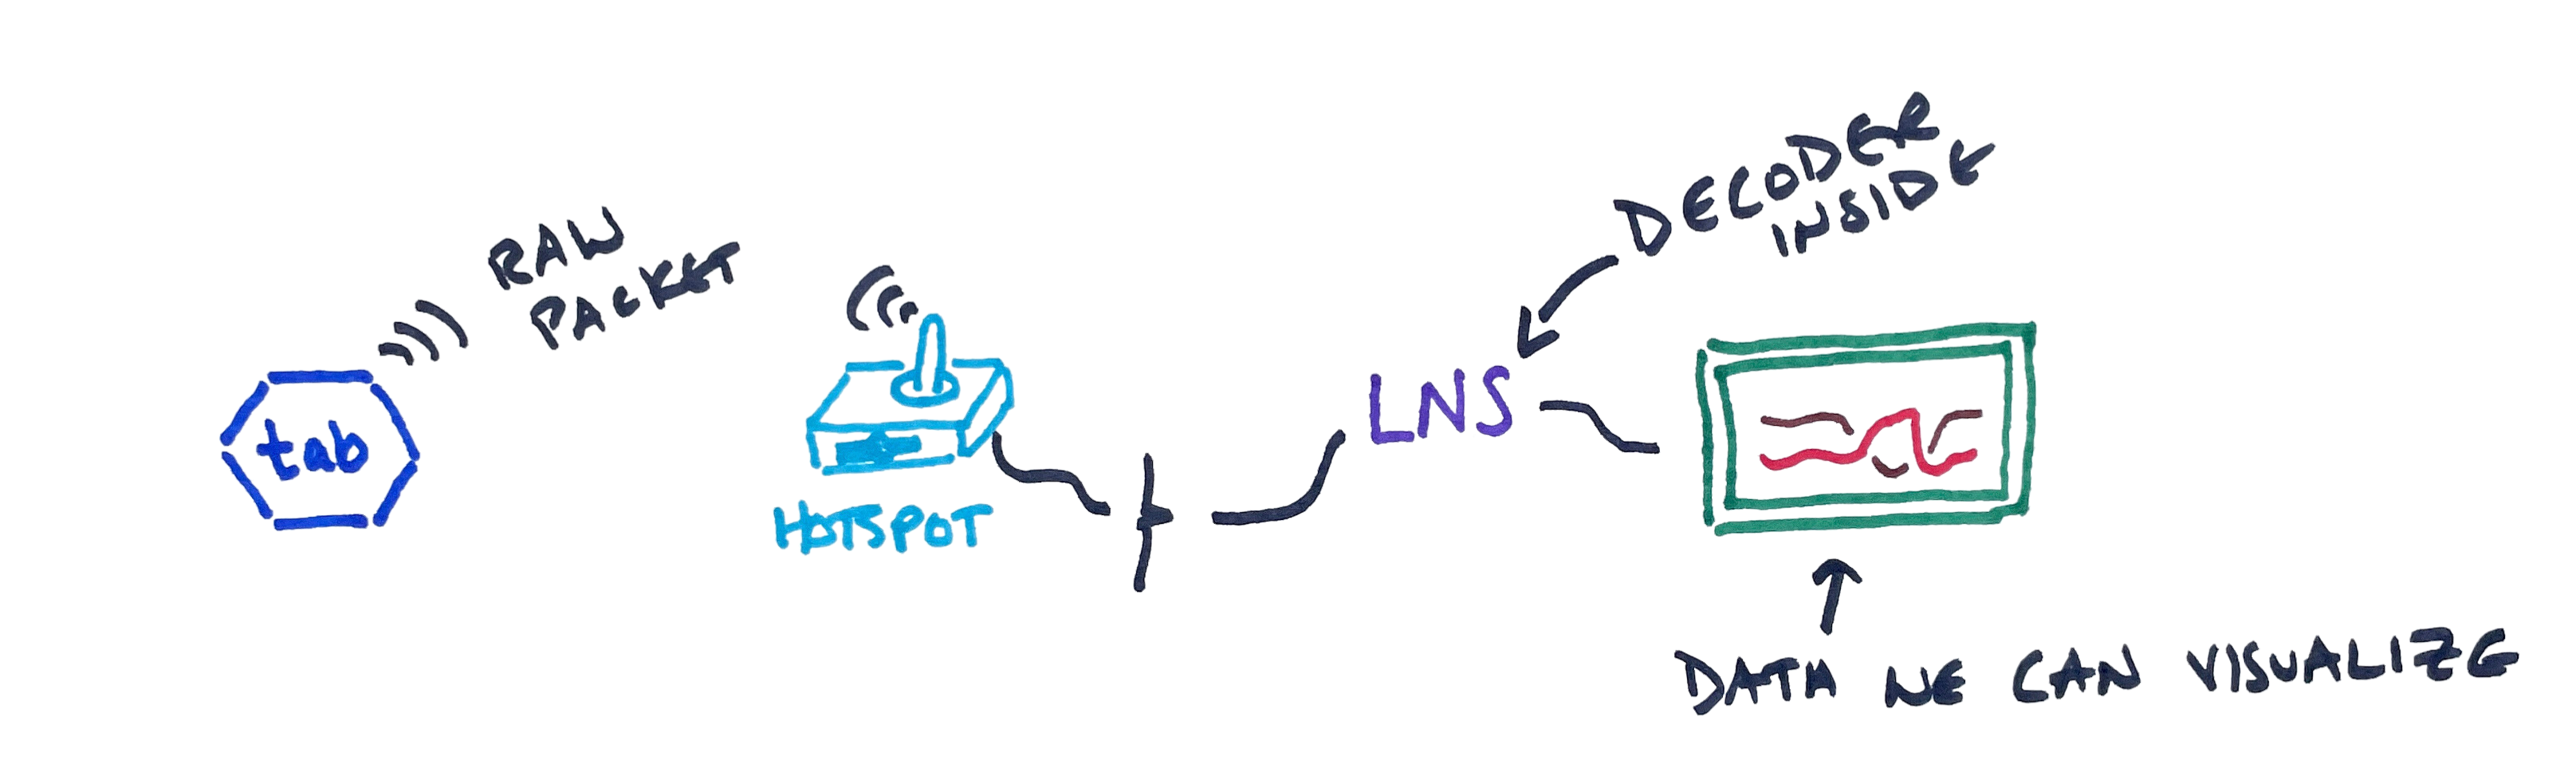
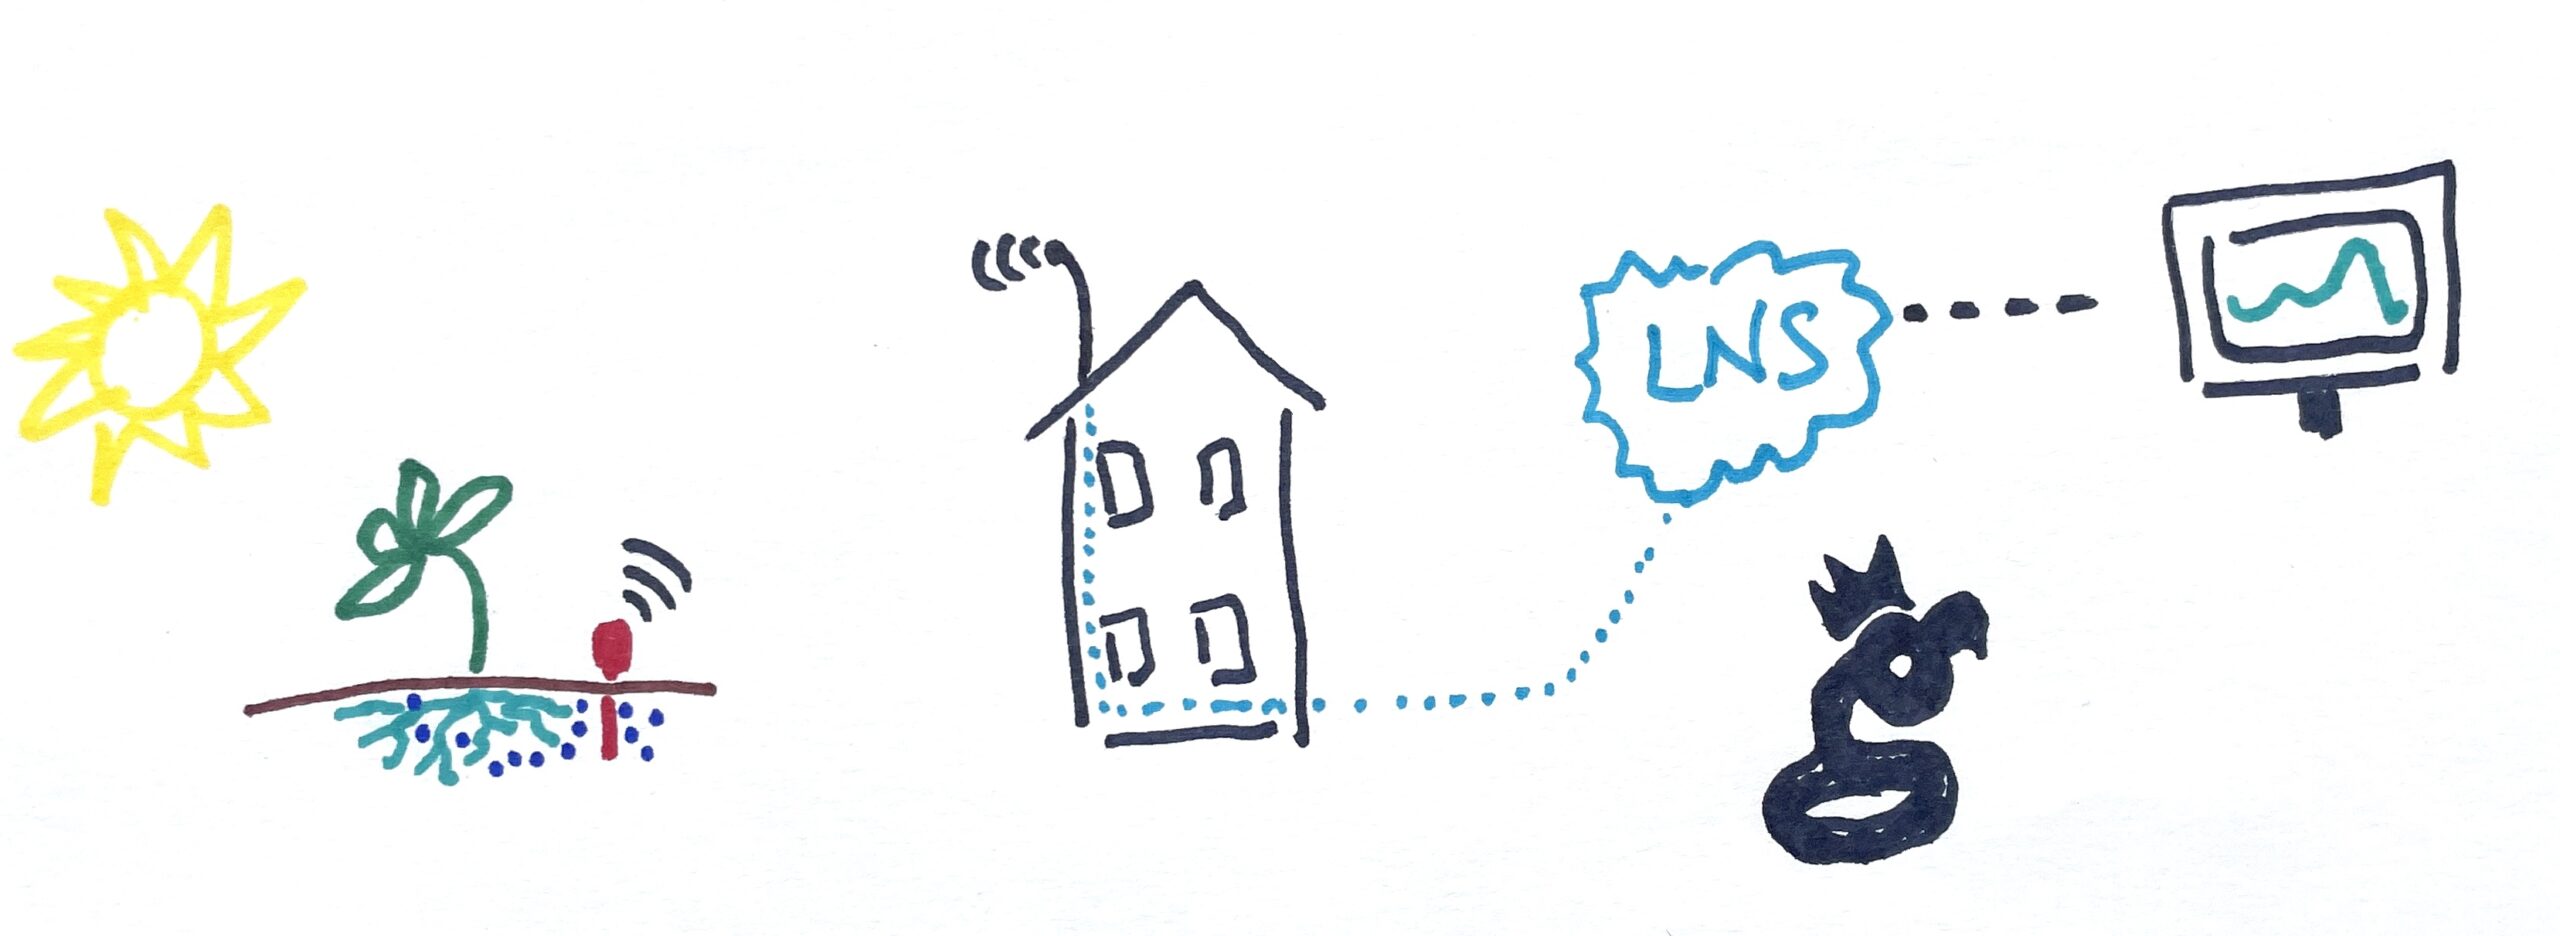
At the beginning of Helium's LoRaWAN, the ability to route a packet from a device through the Hotspot network to wherever you wanted it to go was a service provided either Helium Inc or eventually, the Helium Foundation. That routing happened through the Helium Console, which was a custom built LNS (LoRaWAN Network Server). An LNS is the thing that manages all the packets of data on a LoRaWAN.

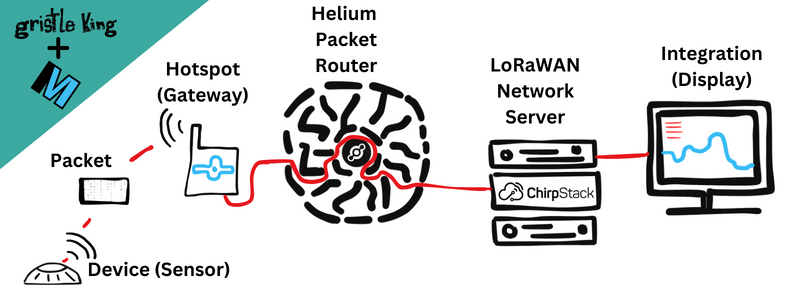
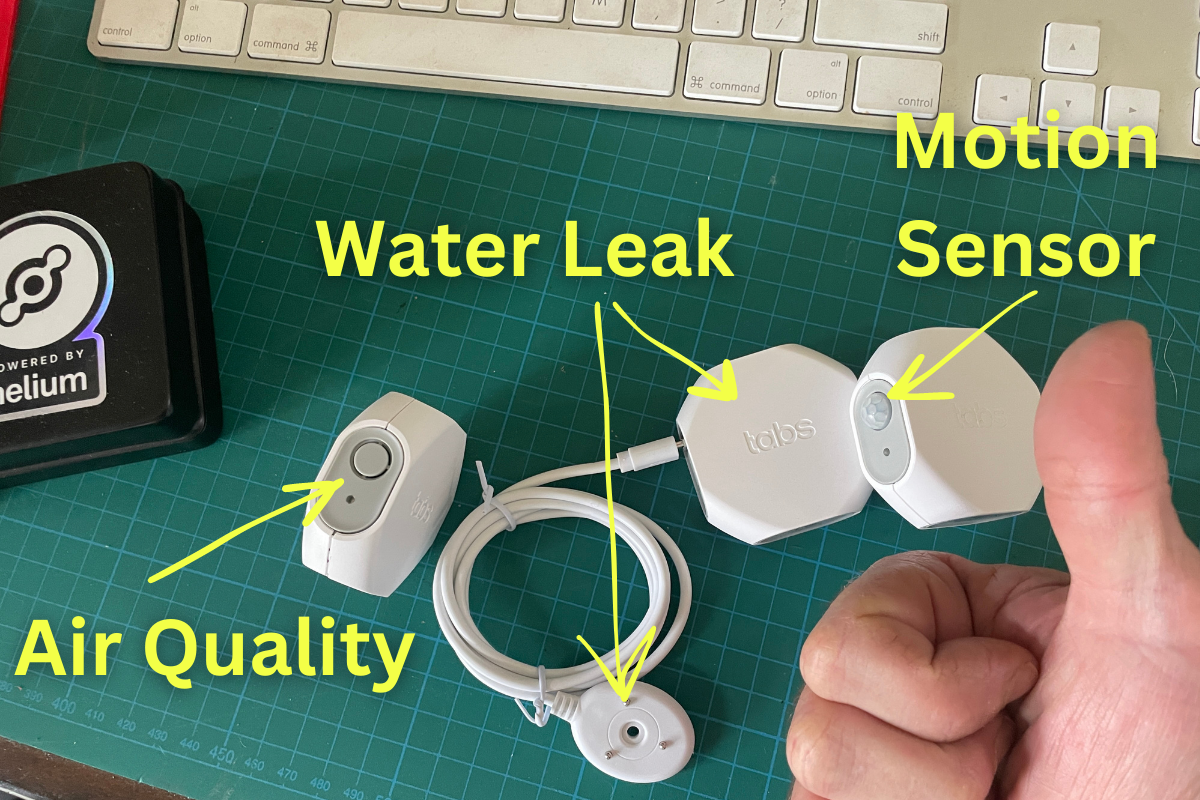
Devices sense the data and transmit it, Hotspots receive the data and pass it to an LNS, the LNS routes the data to the entity who pays for it and keeps track of who sent what where and when. That's a lot of w's.

Helium Console had a few limitations. First, for a normal user you could only have 10 devices on it. It was always only ever meant to be a demonstration or "intro to Helium" tool.

Second, it was very expensive for the Helium Foundation to run. This was fine to cover in the early days, but in order for the network and market to fully mature, solutions provided by the market need to evolve. In order for those to evolve, there can't be a "free" competitor. That explains why the Helium Console is being phased out a long while from now (my guess is end of 2024) to make room for anyone to run an LNS to run their sovereign LoRaWAN applications. (Thanks to Abhay for the improvement on that statement!)

Short version? The Helium ecosystem is ready for businesses to be built.

So, as a network user, where does that leave you?

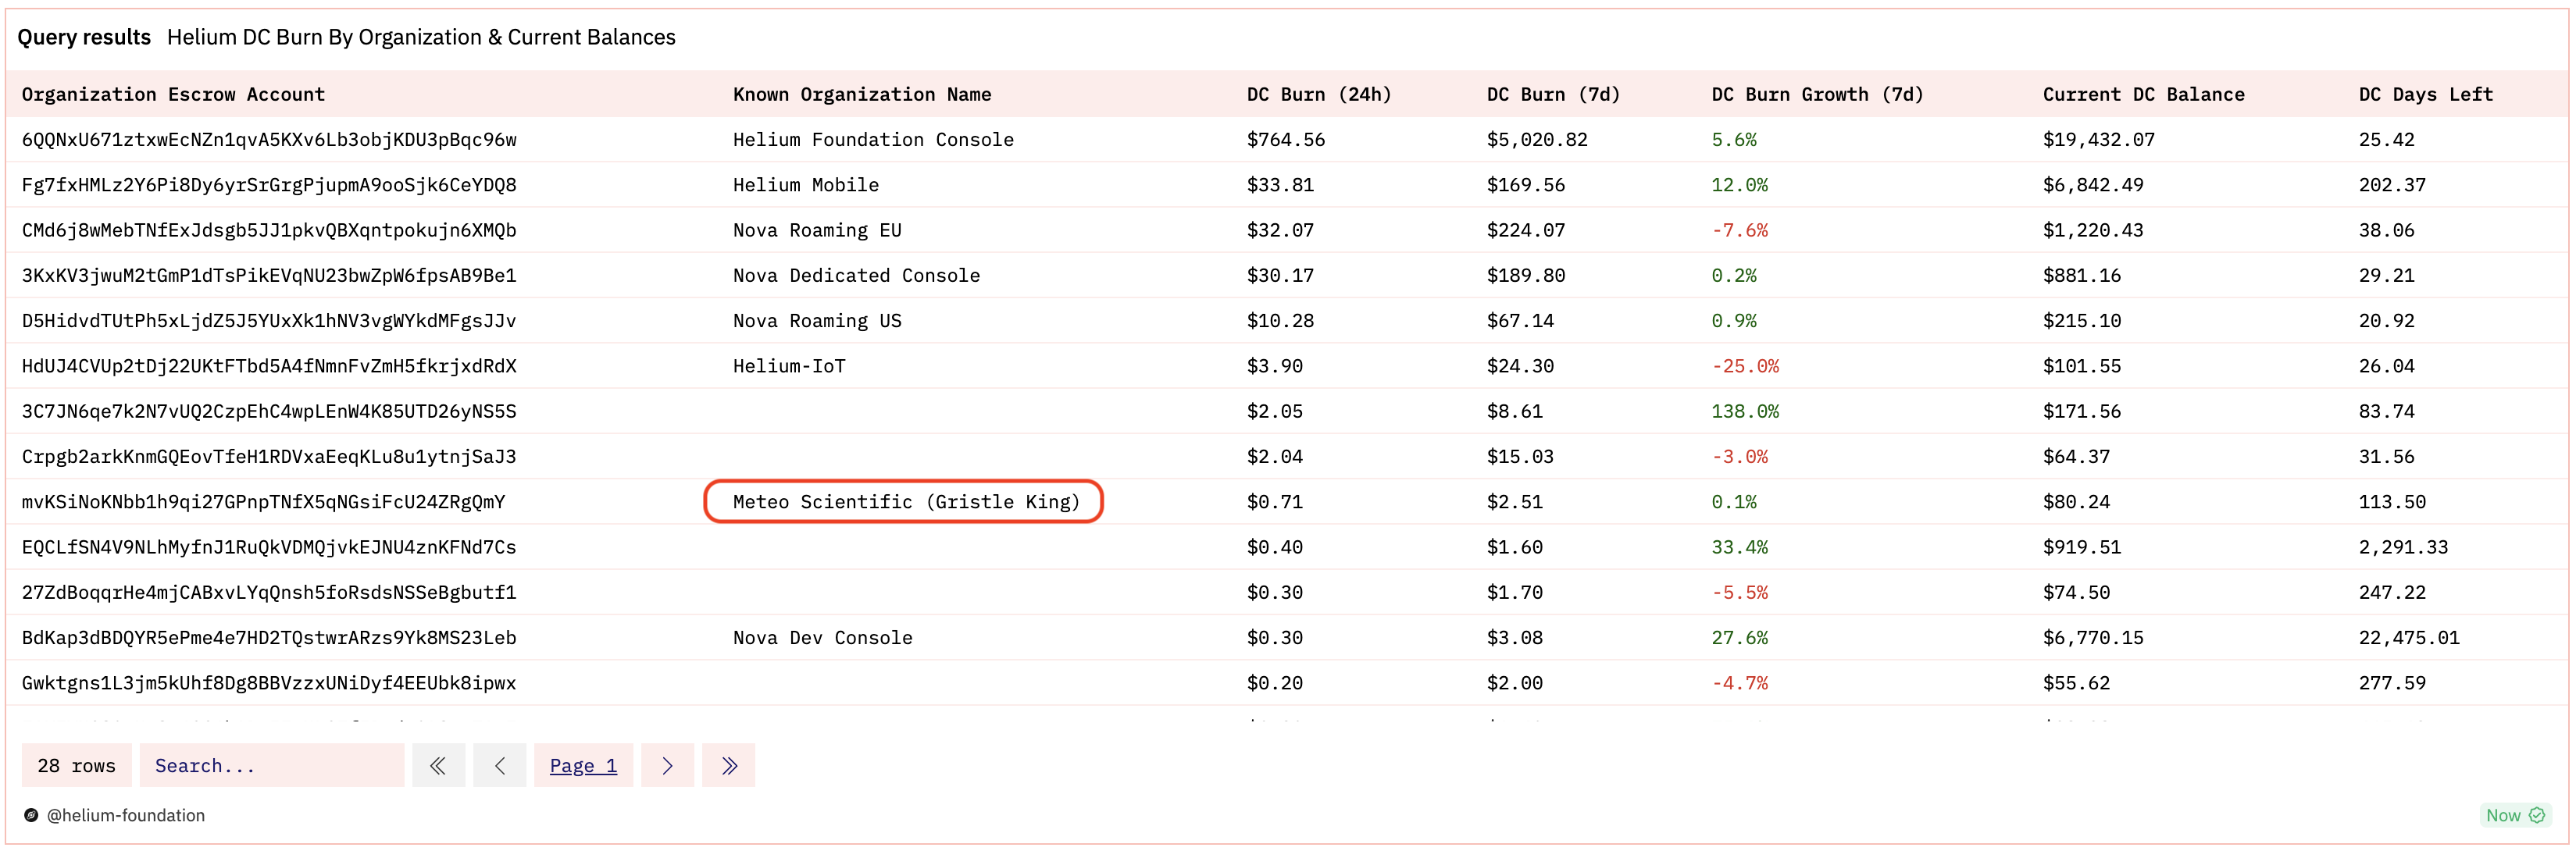
The first option is Chirpstack, and using Paul Pinault's (disk91 on Discord) technical expertise, I'm running one that you can try. The LNS is being run under the MeteoScientific name as part of my "how to run a Helium business" series.

It's free to create an account, and you get a few hundred data credits for free when you sign up so you can test drive it. After that, data credits cost $.0001 each. If you had a device that sent 3 parameters (say, temperature, humidity, and air pressure) once an hour, that would cost you [.0001 x 3 x 24 x 365] about $2.63/year.

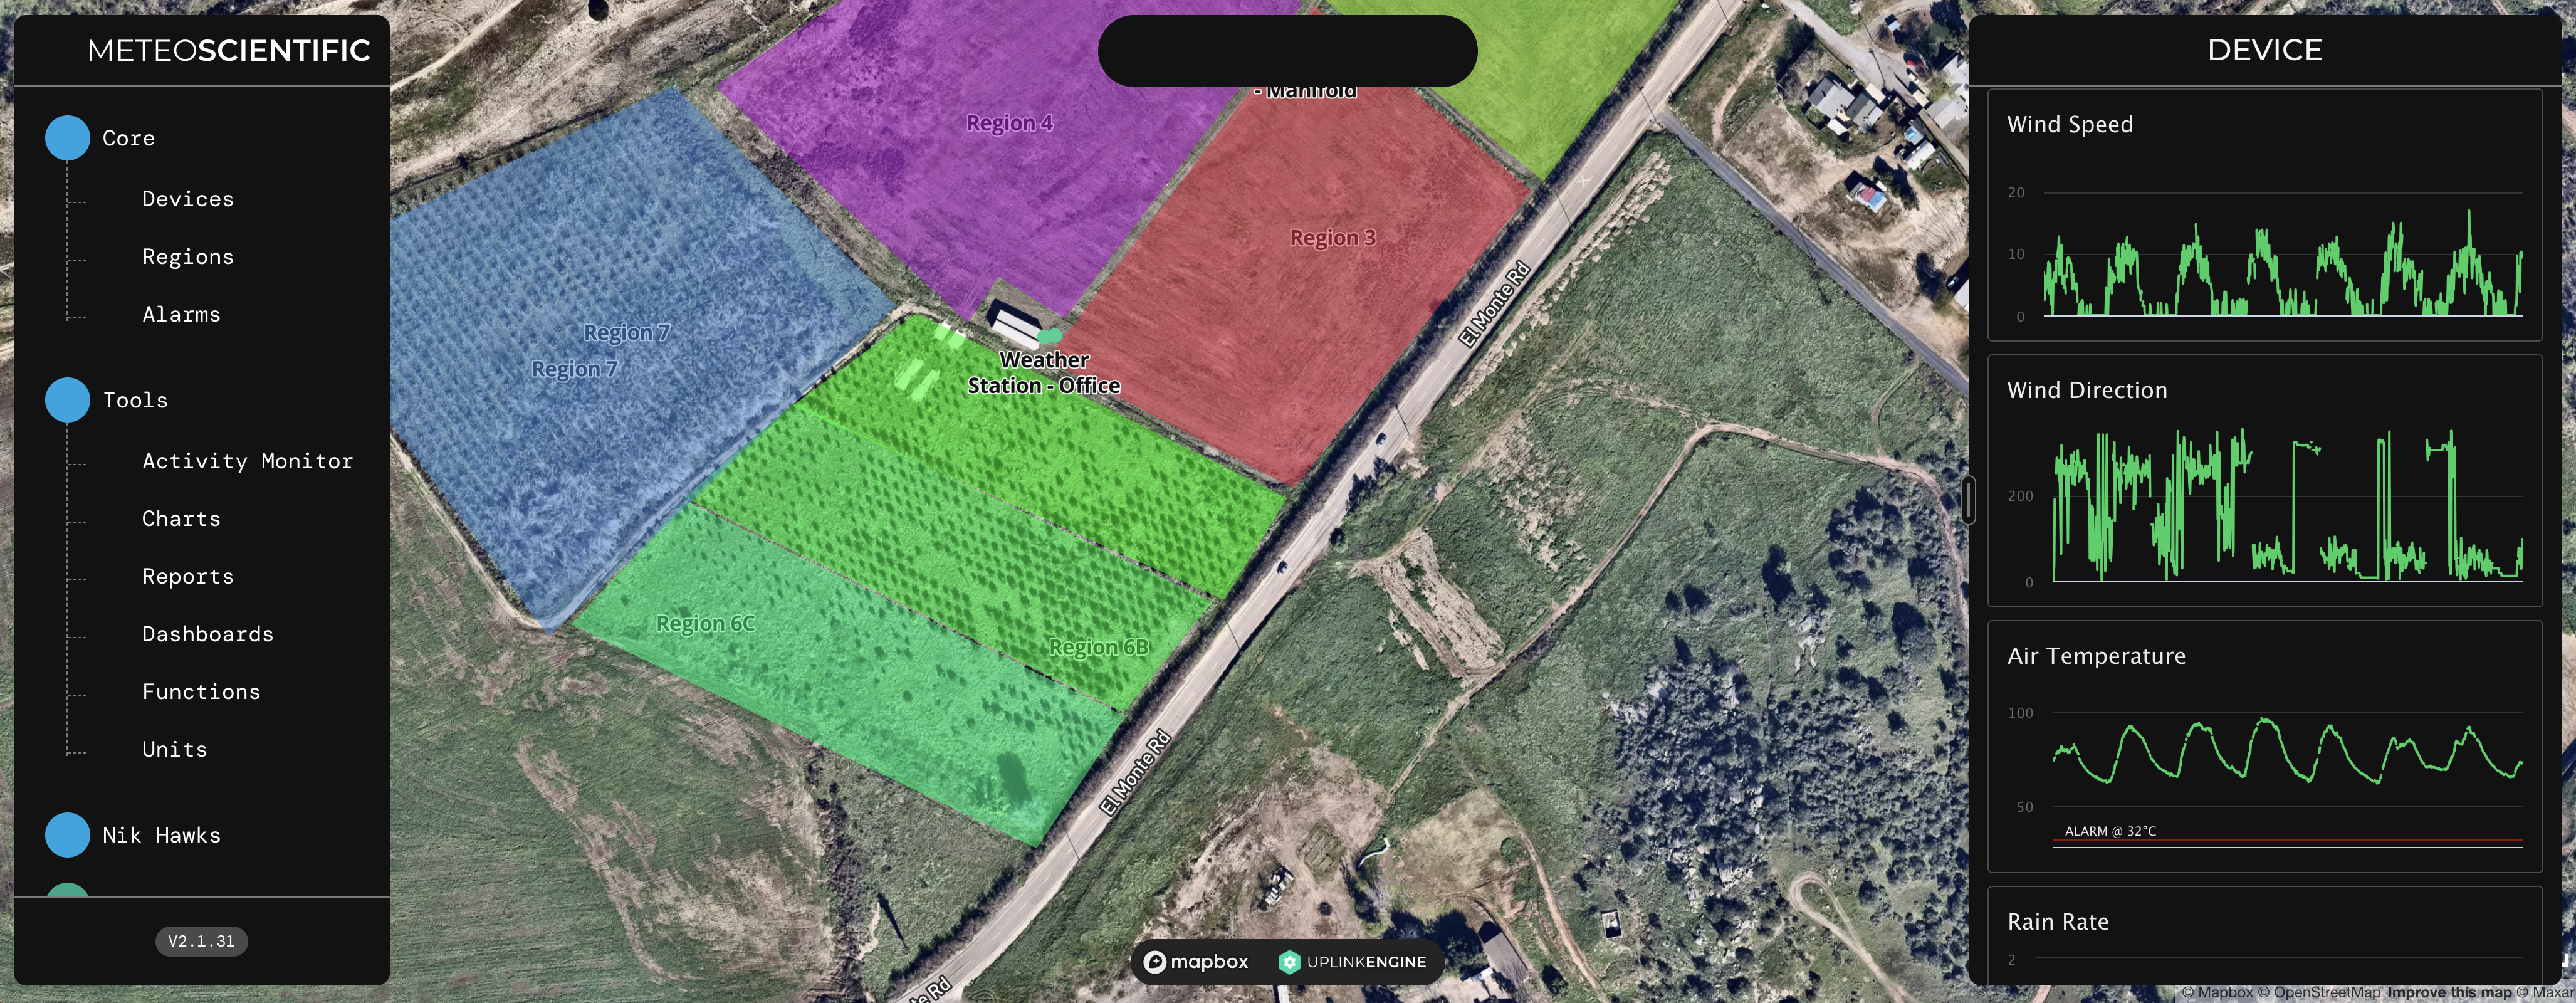
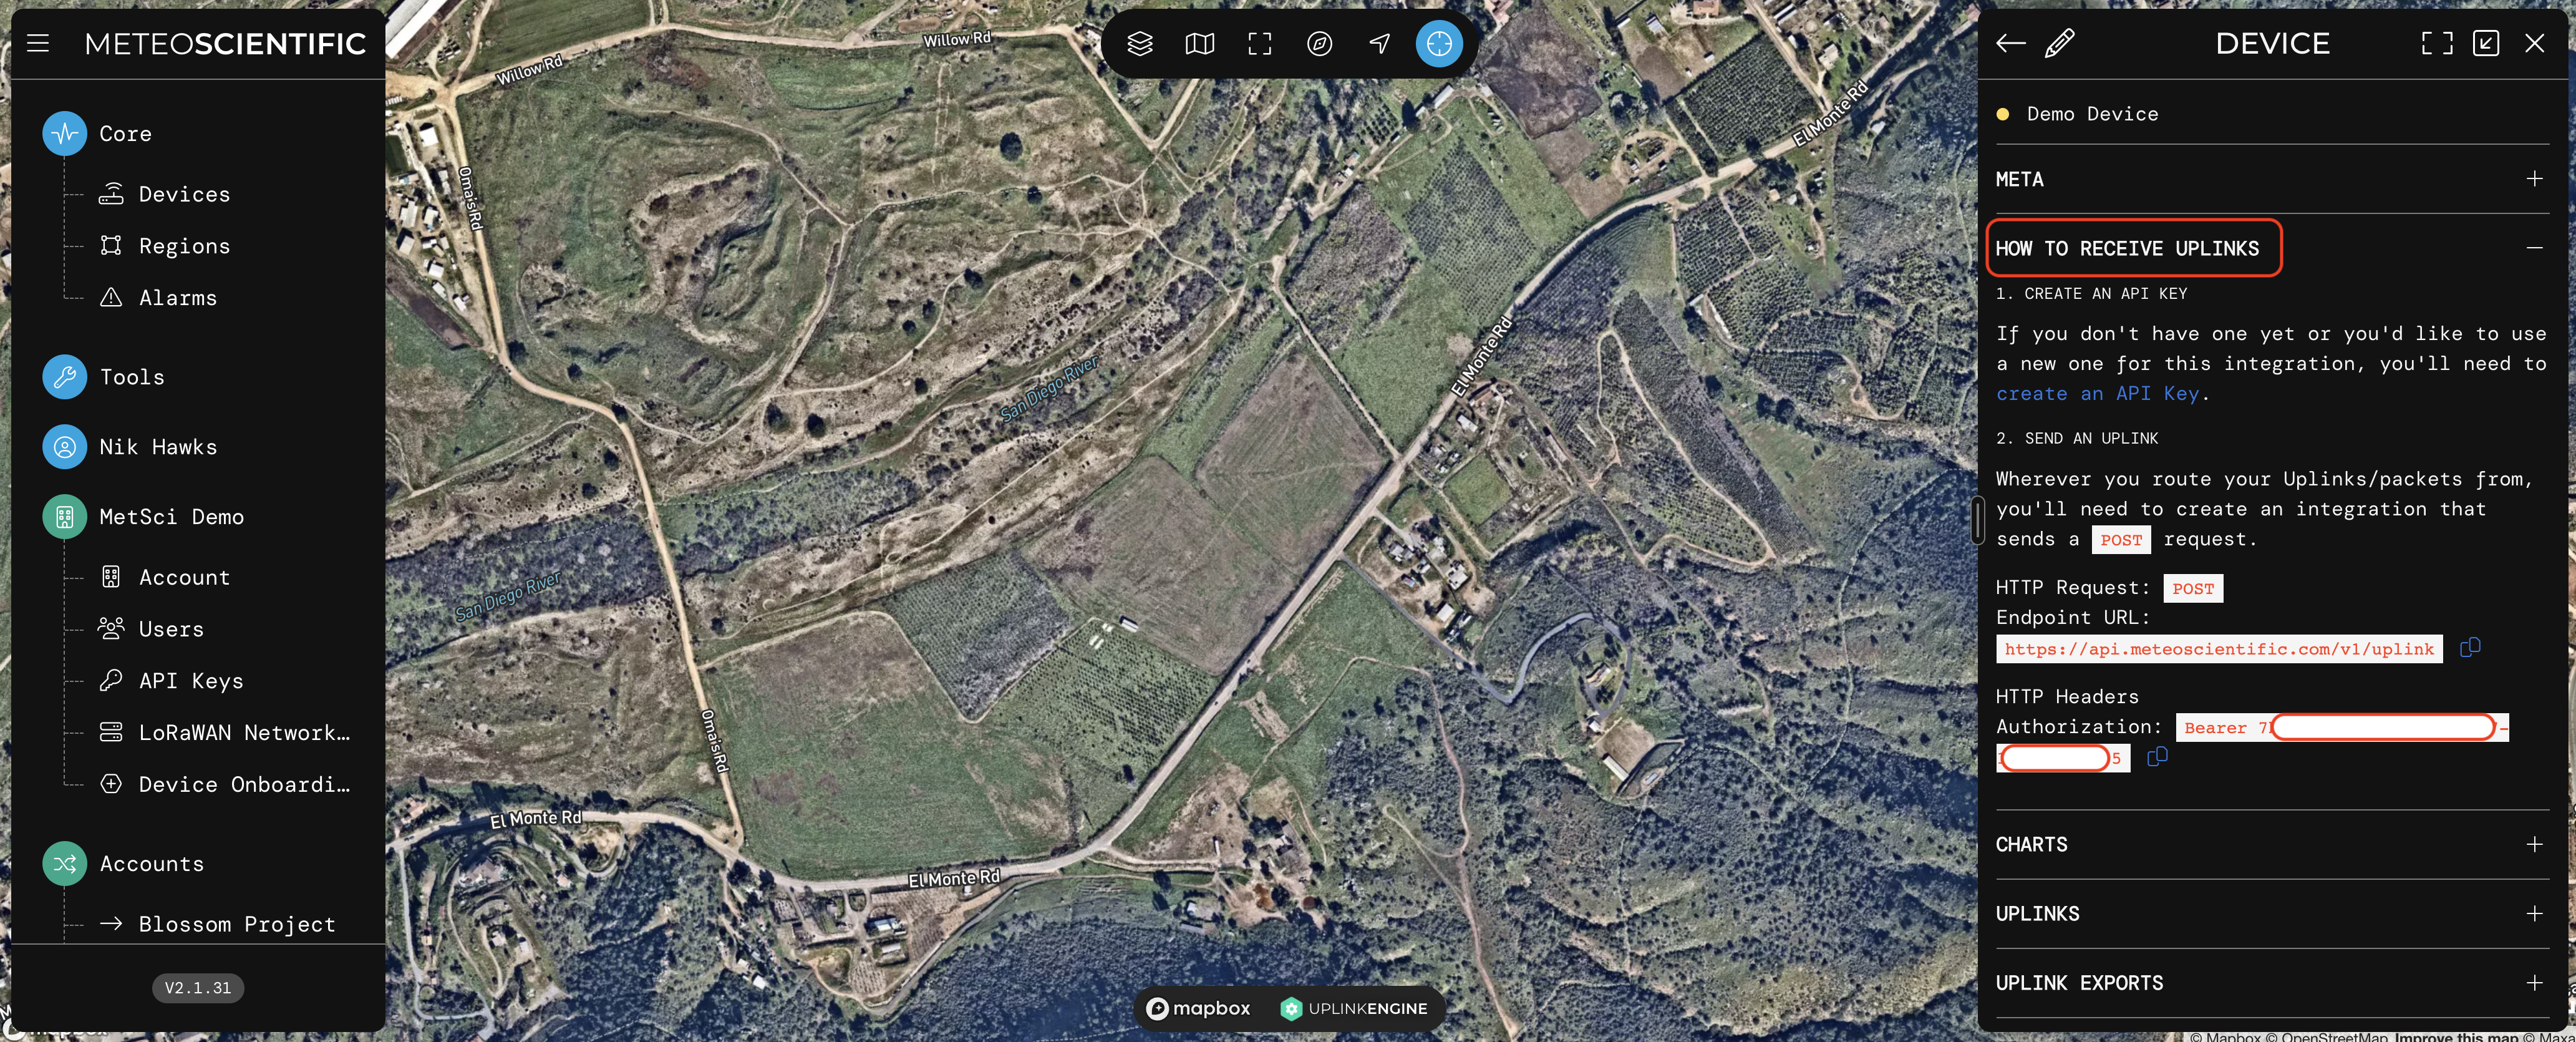
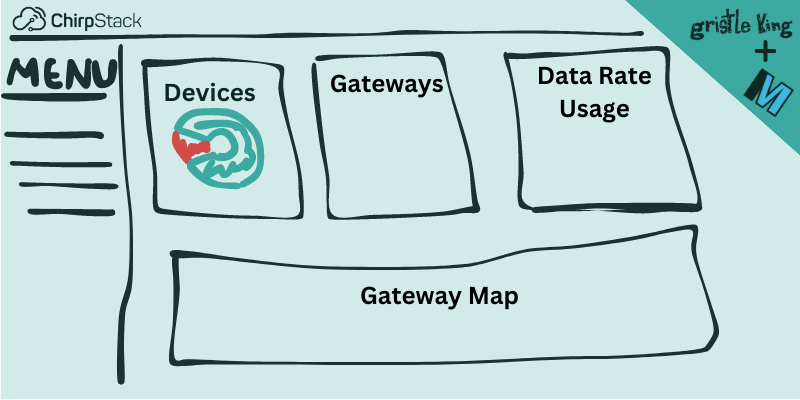
Want to try it out? Let's get started. First, go to console.meteoscientific.com and create an account. Once you've signed up and you're in, look to the left, where you'll see the basic menu.

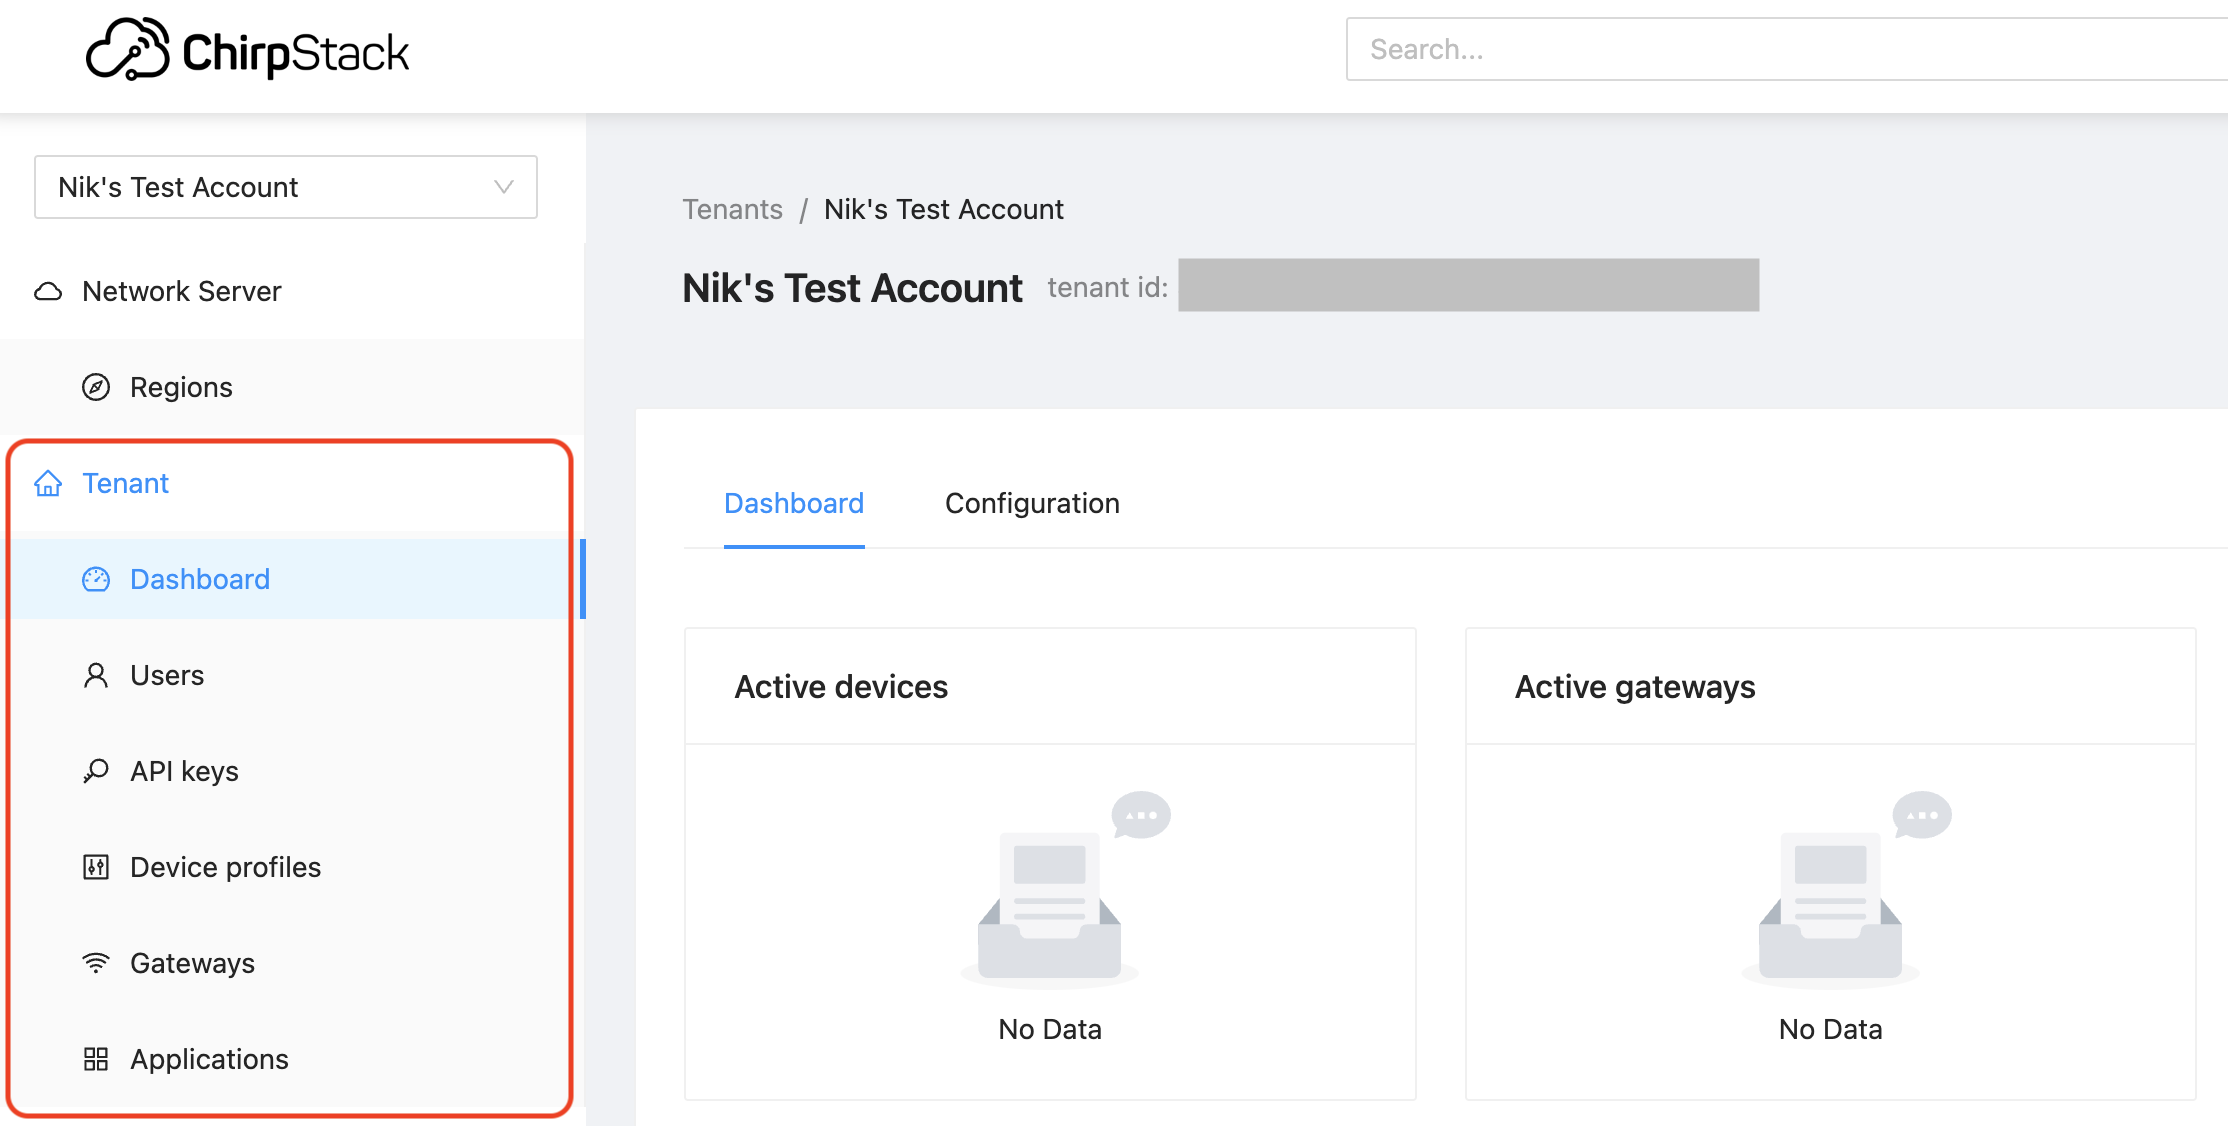
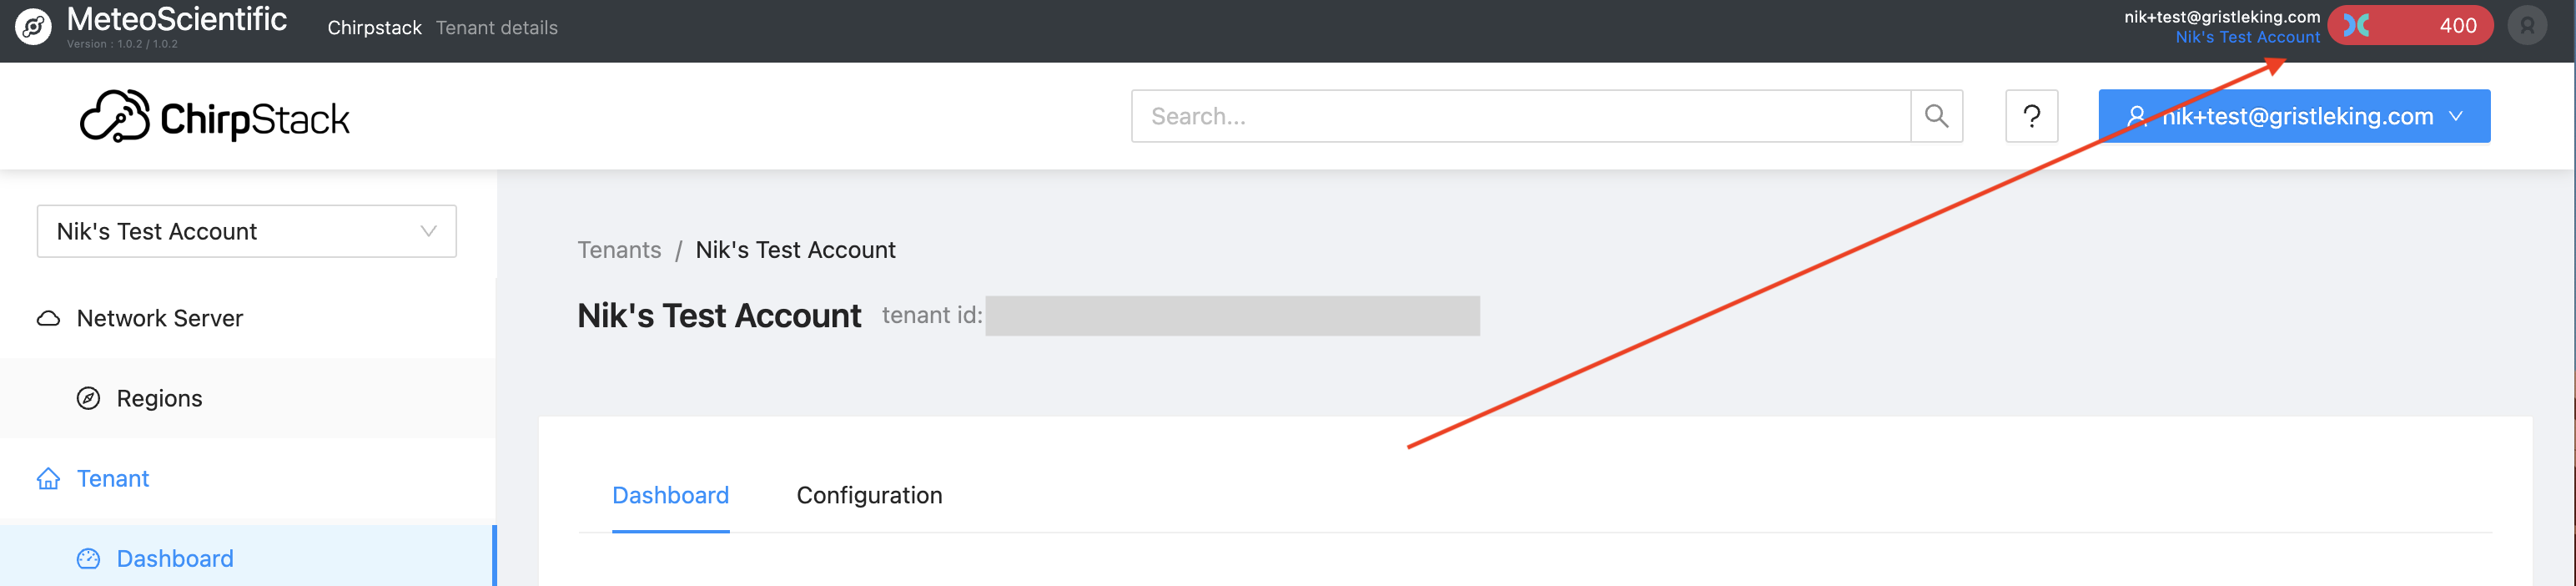
This is a little different than the old Helium Console, but don't panic, I'll walk ya through it. For now you should see a couple hundred credits up in the top right of your screen, that's plenty to get a device on and get started.

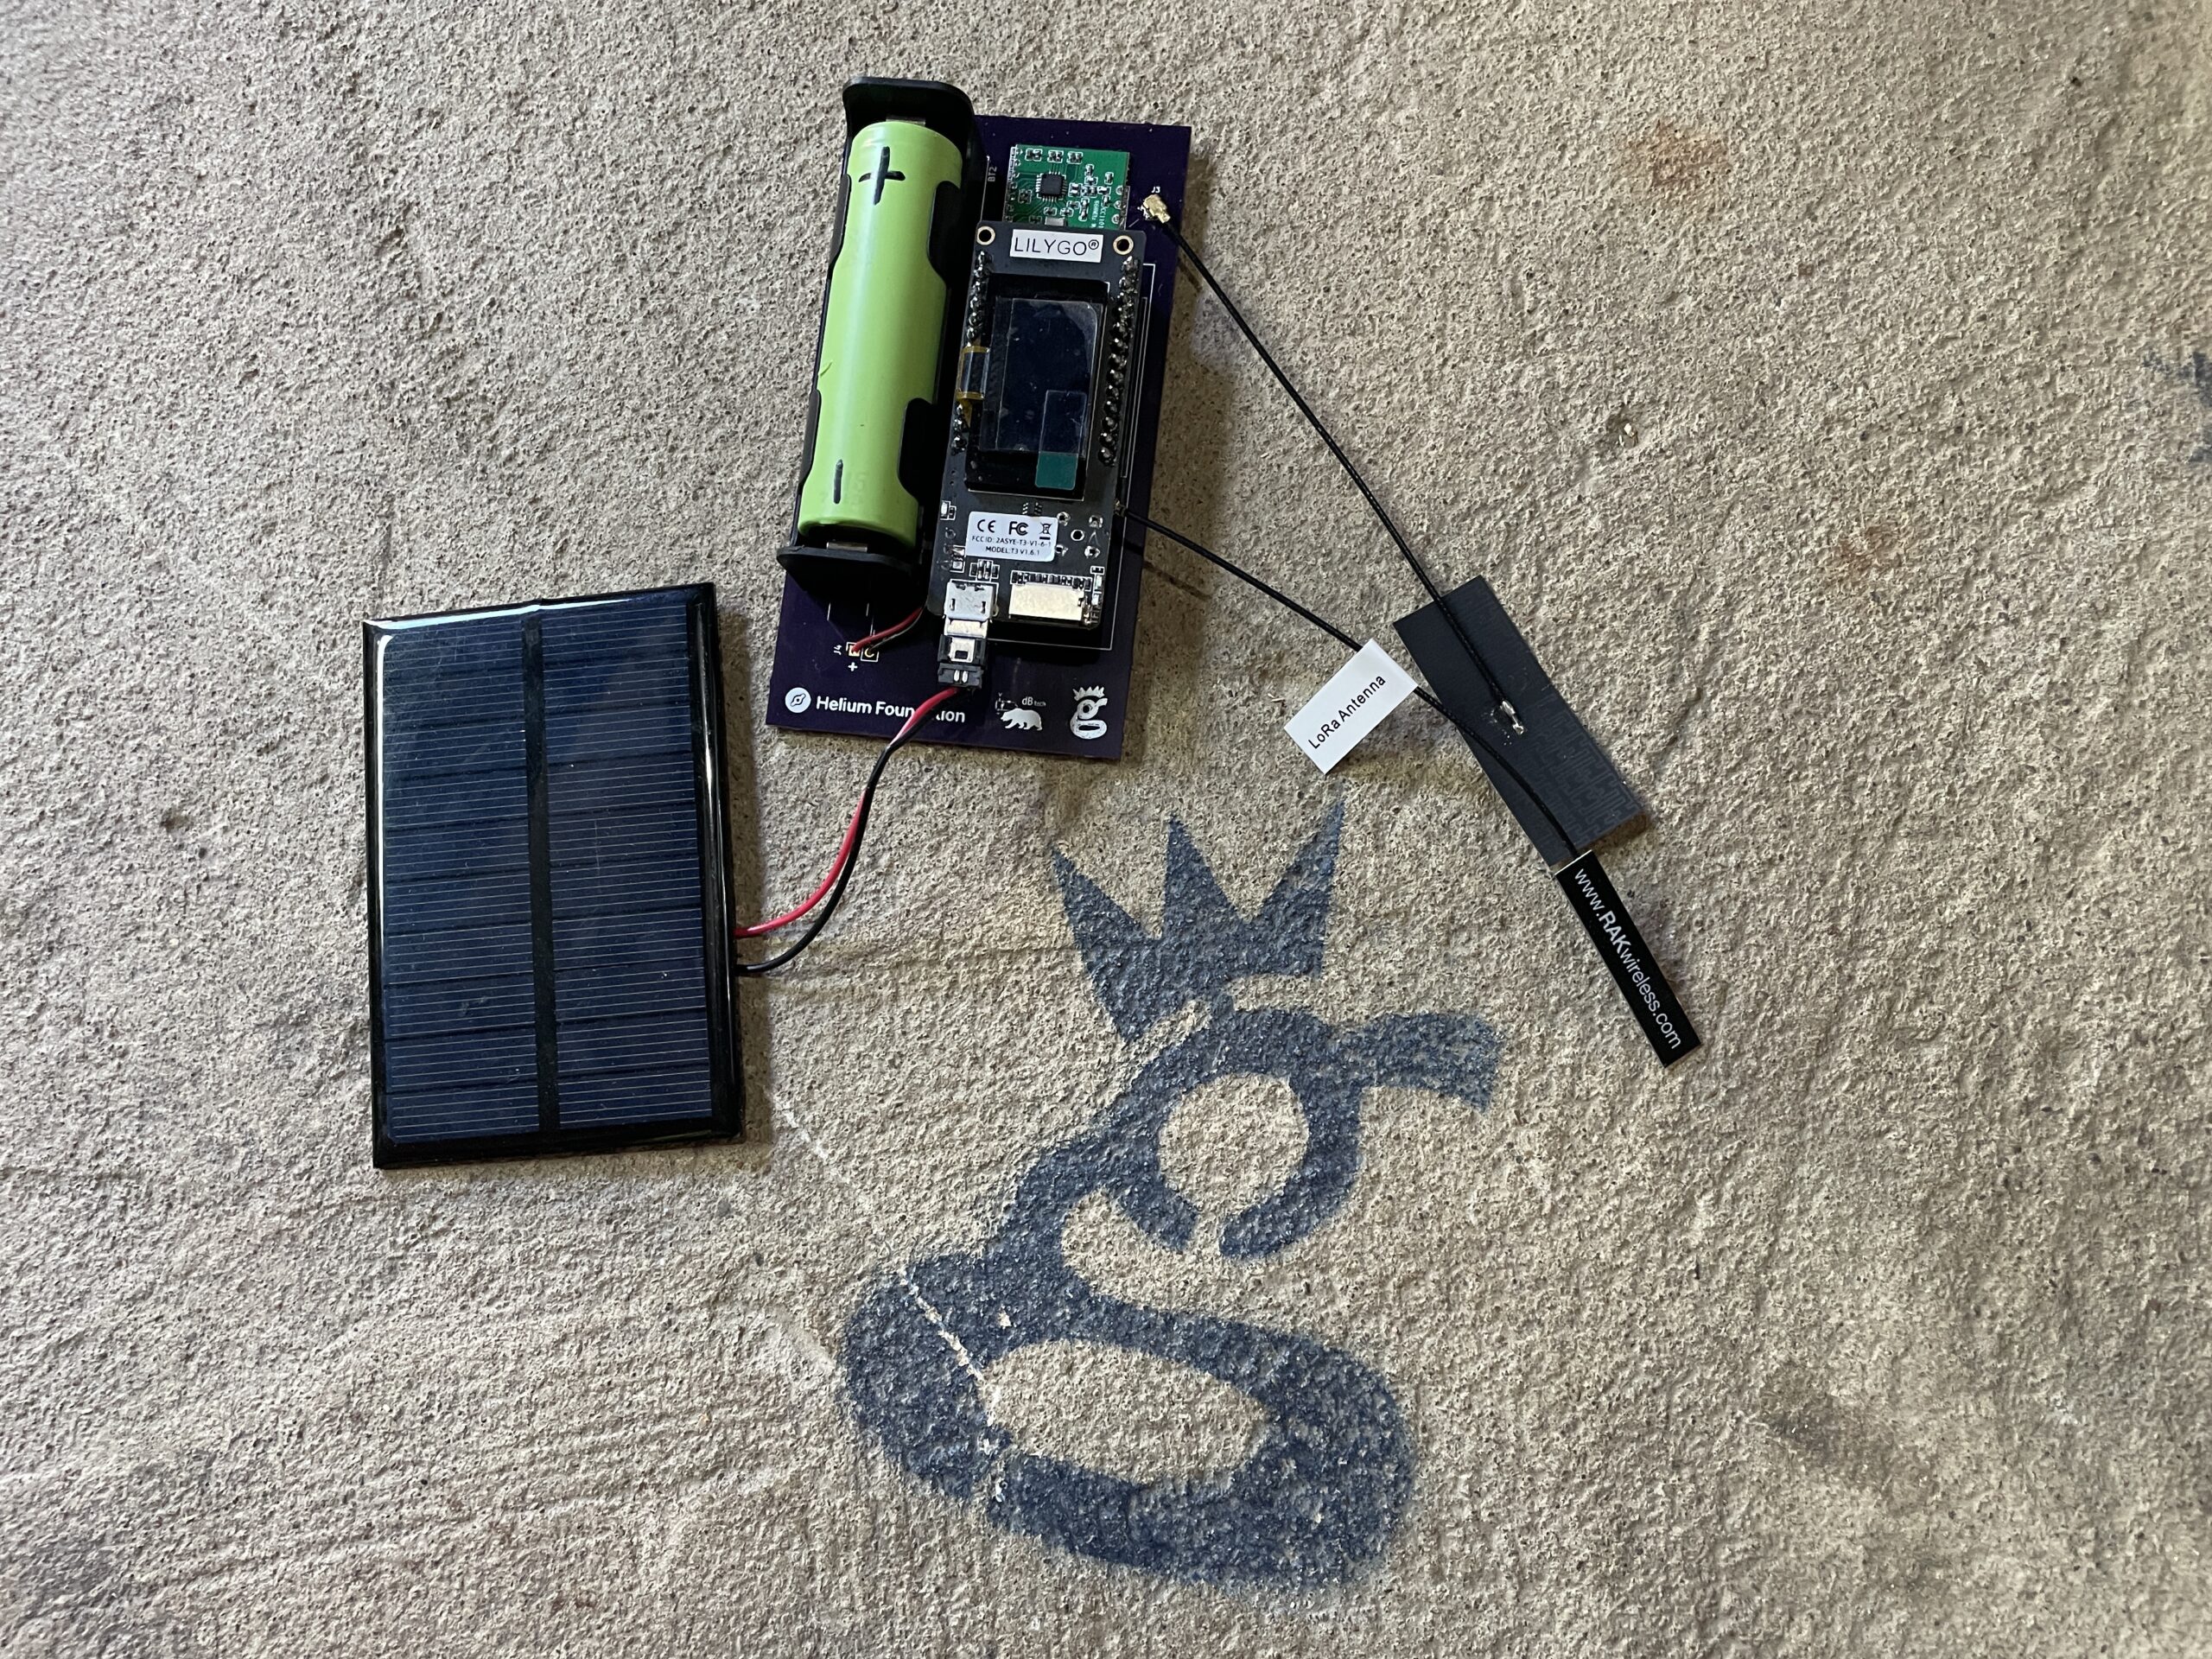
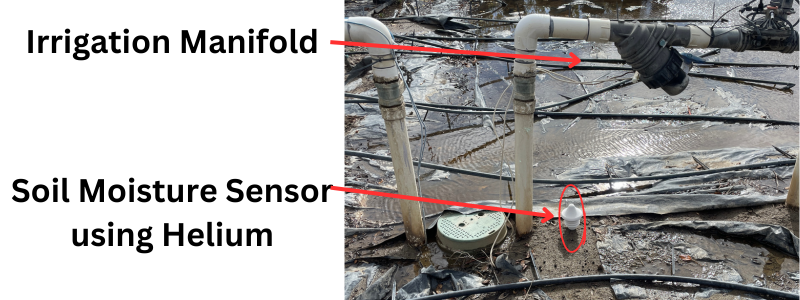
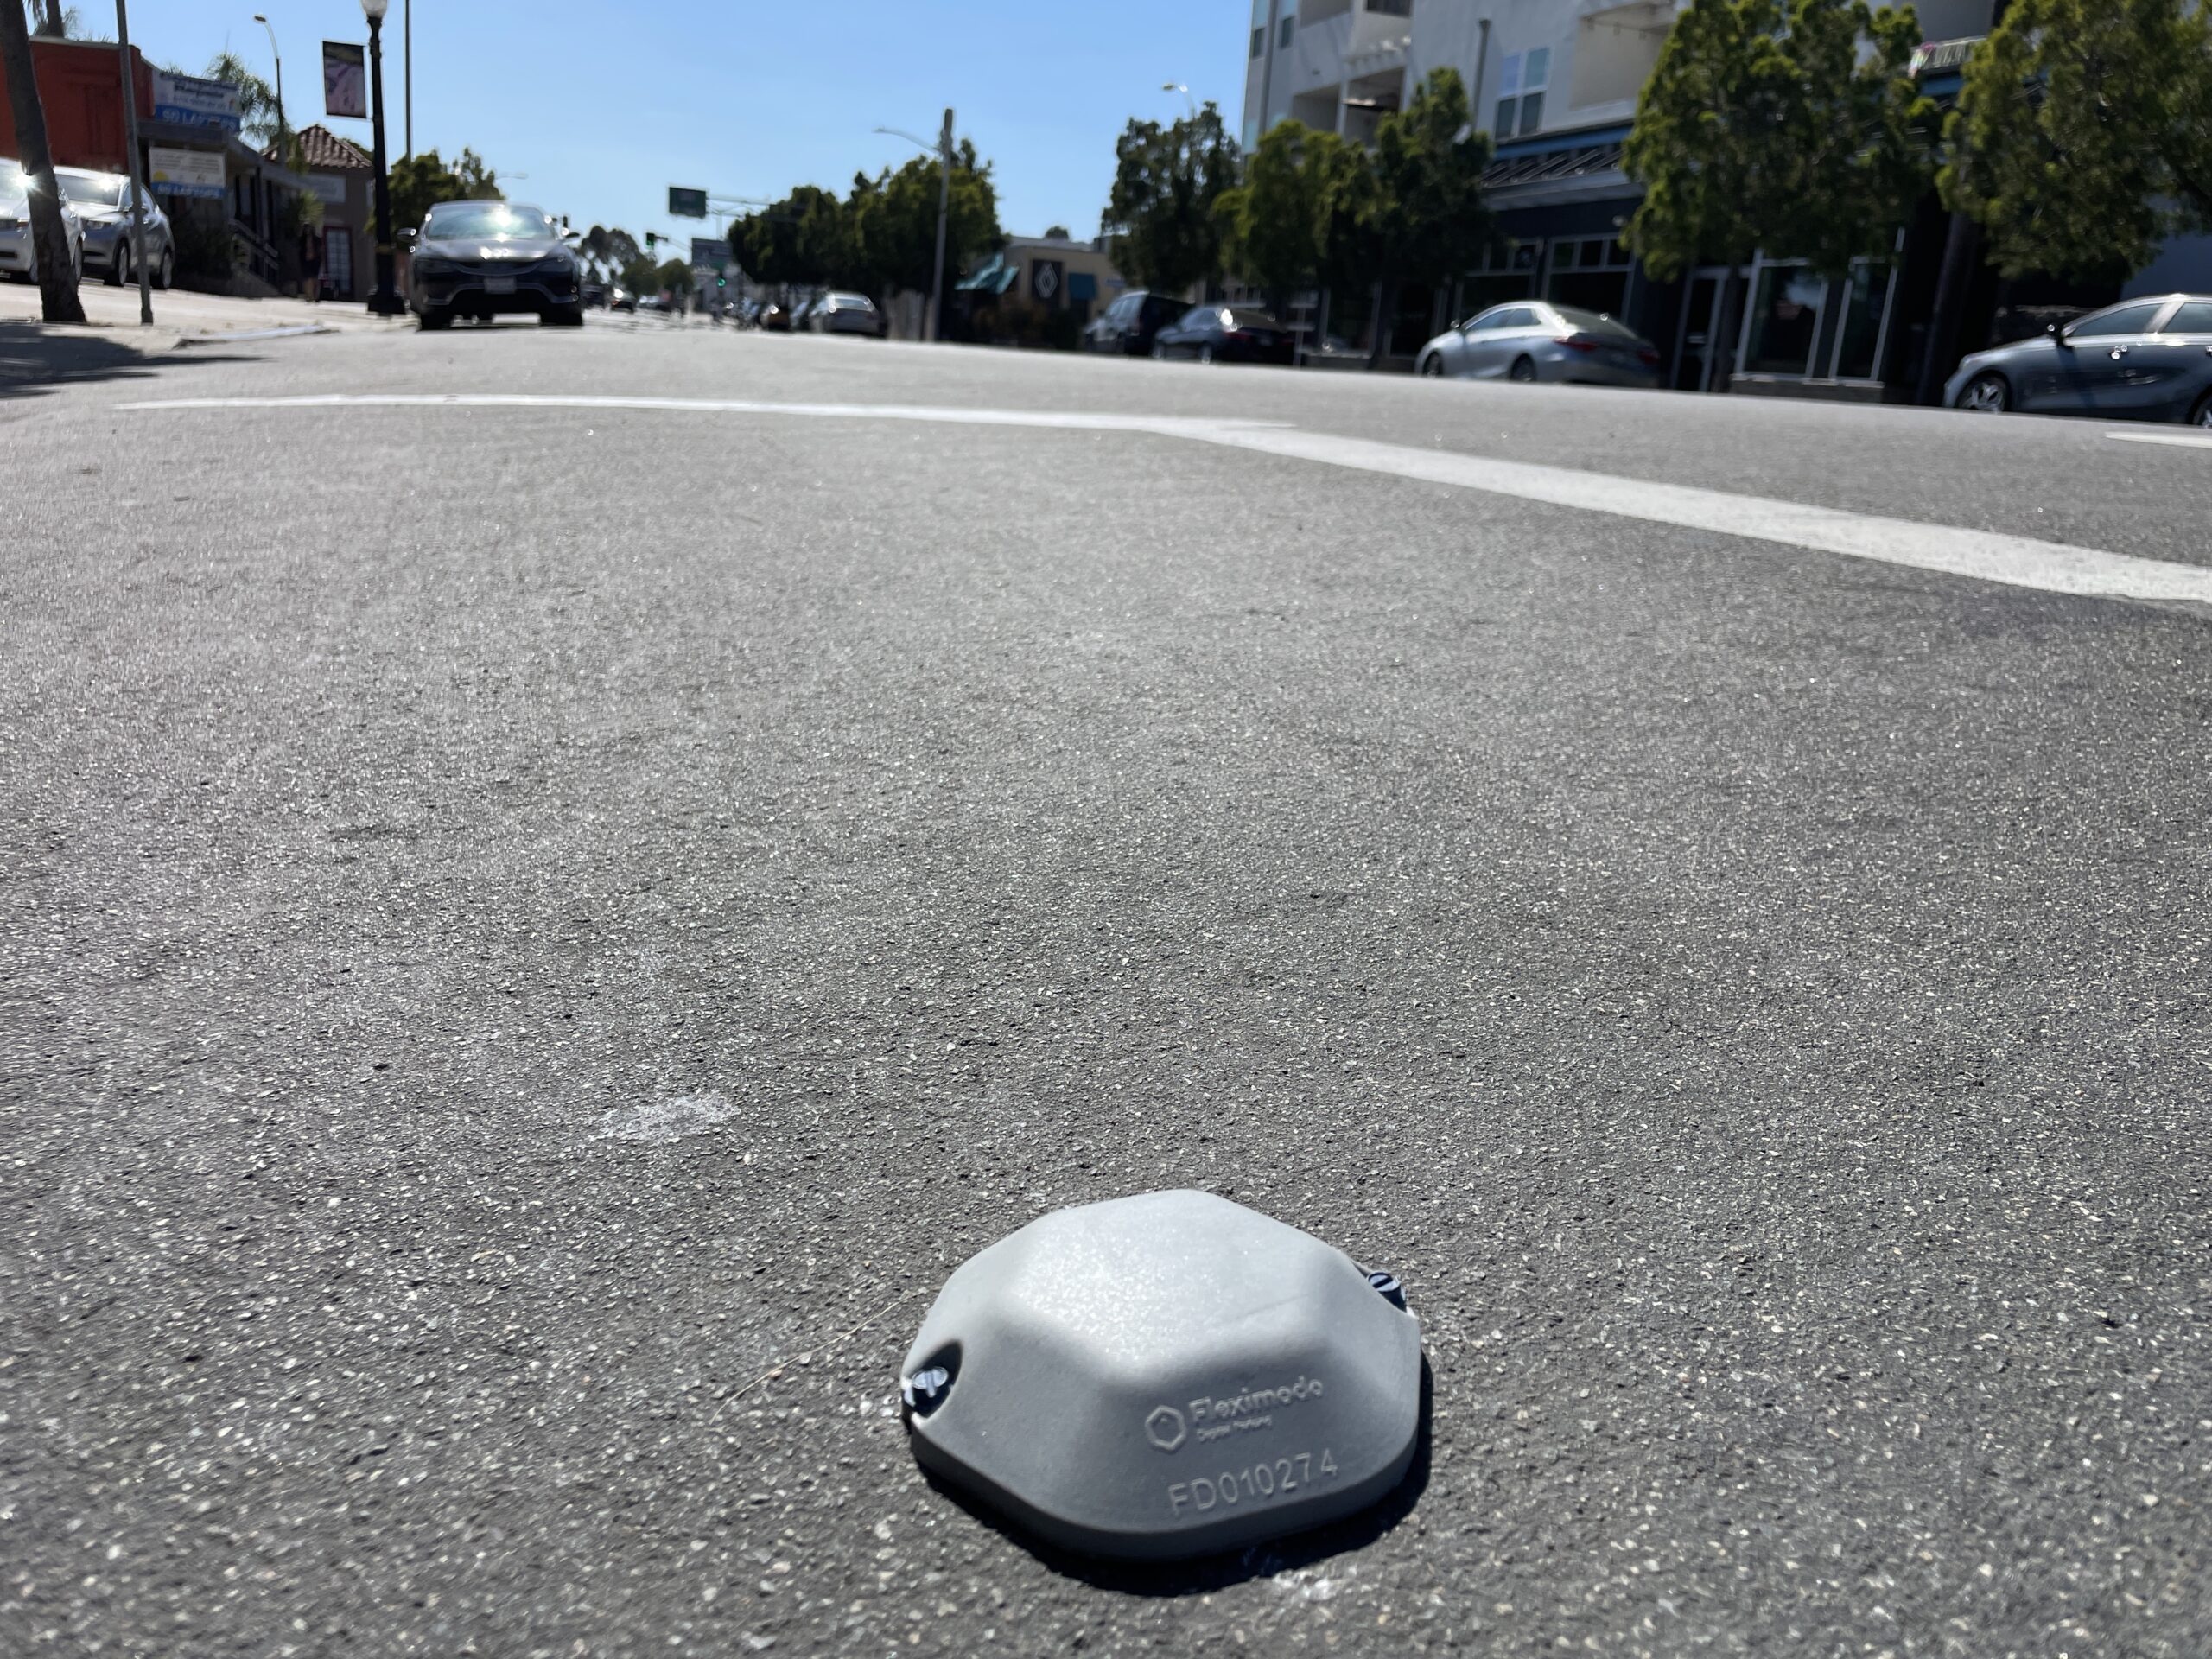
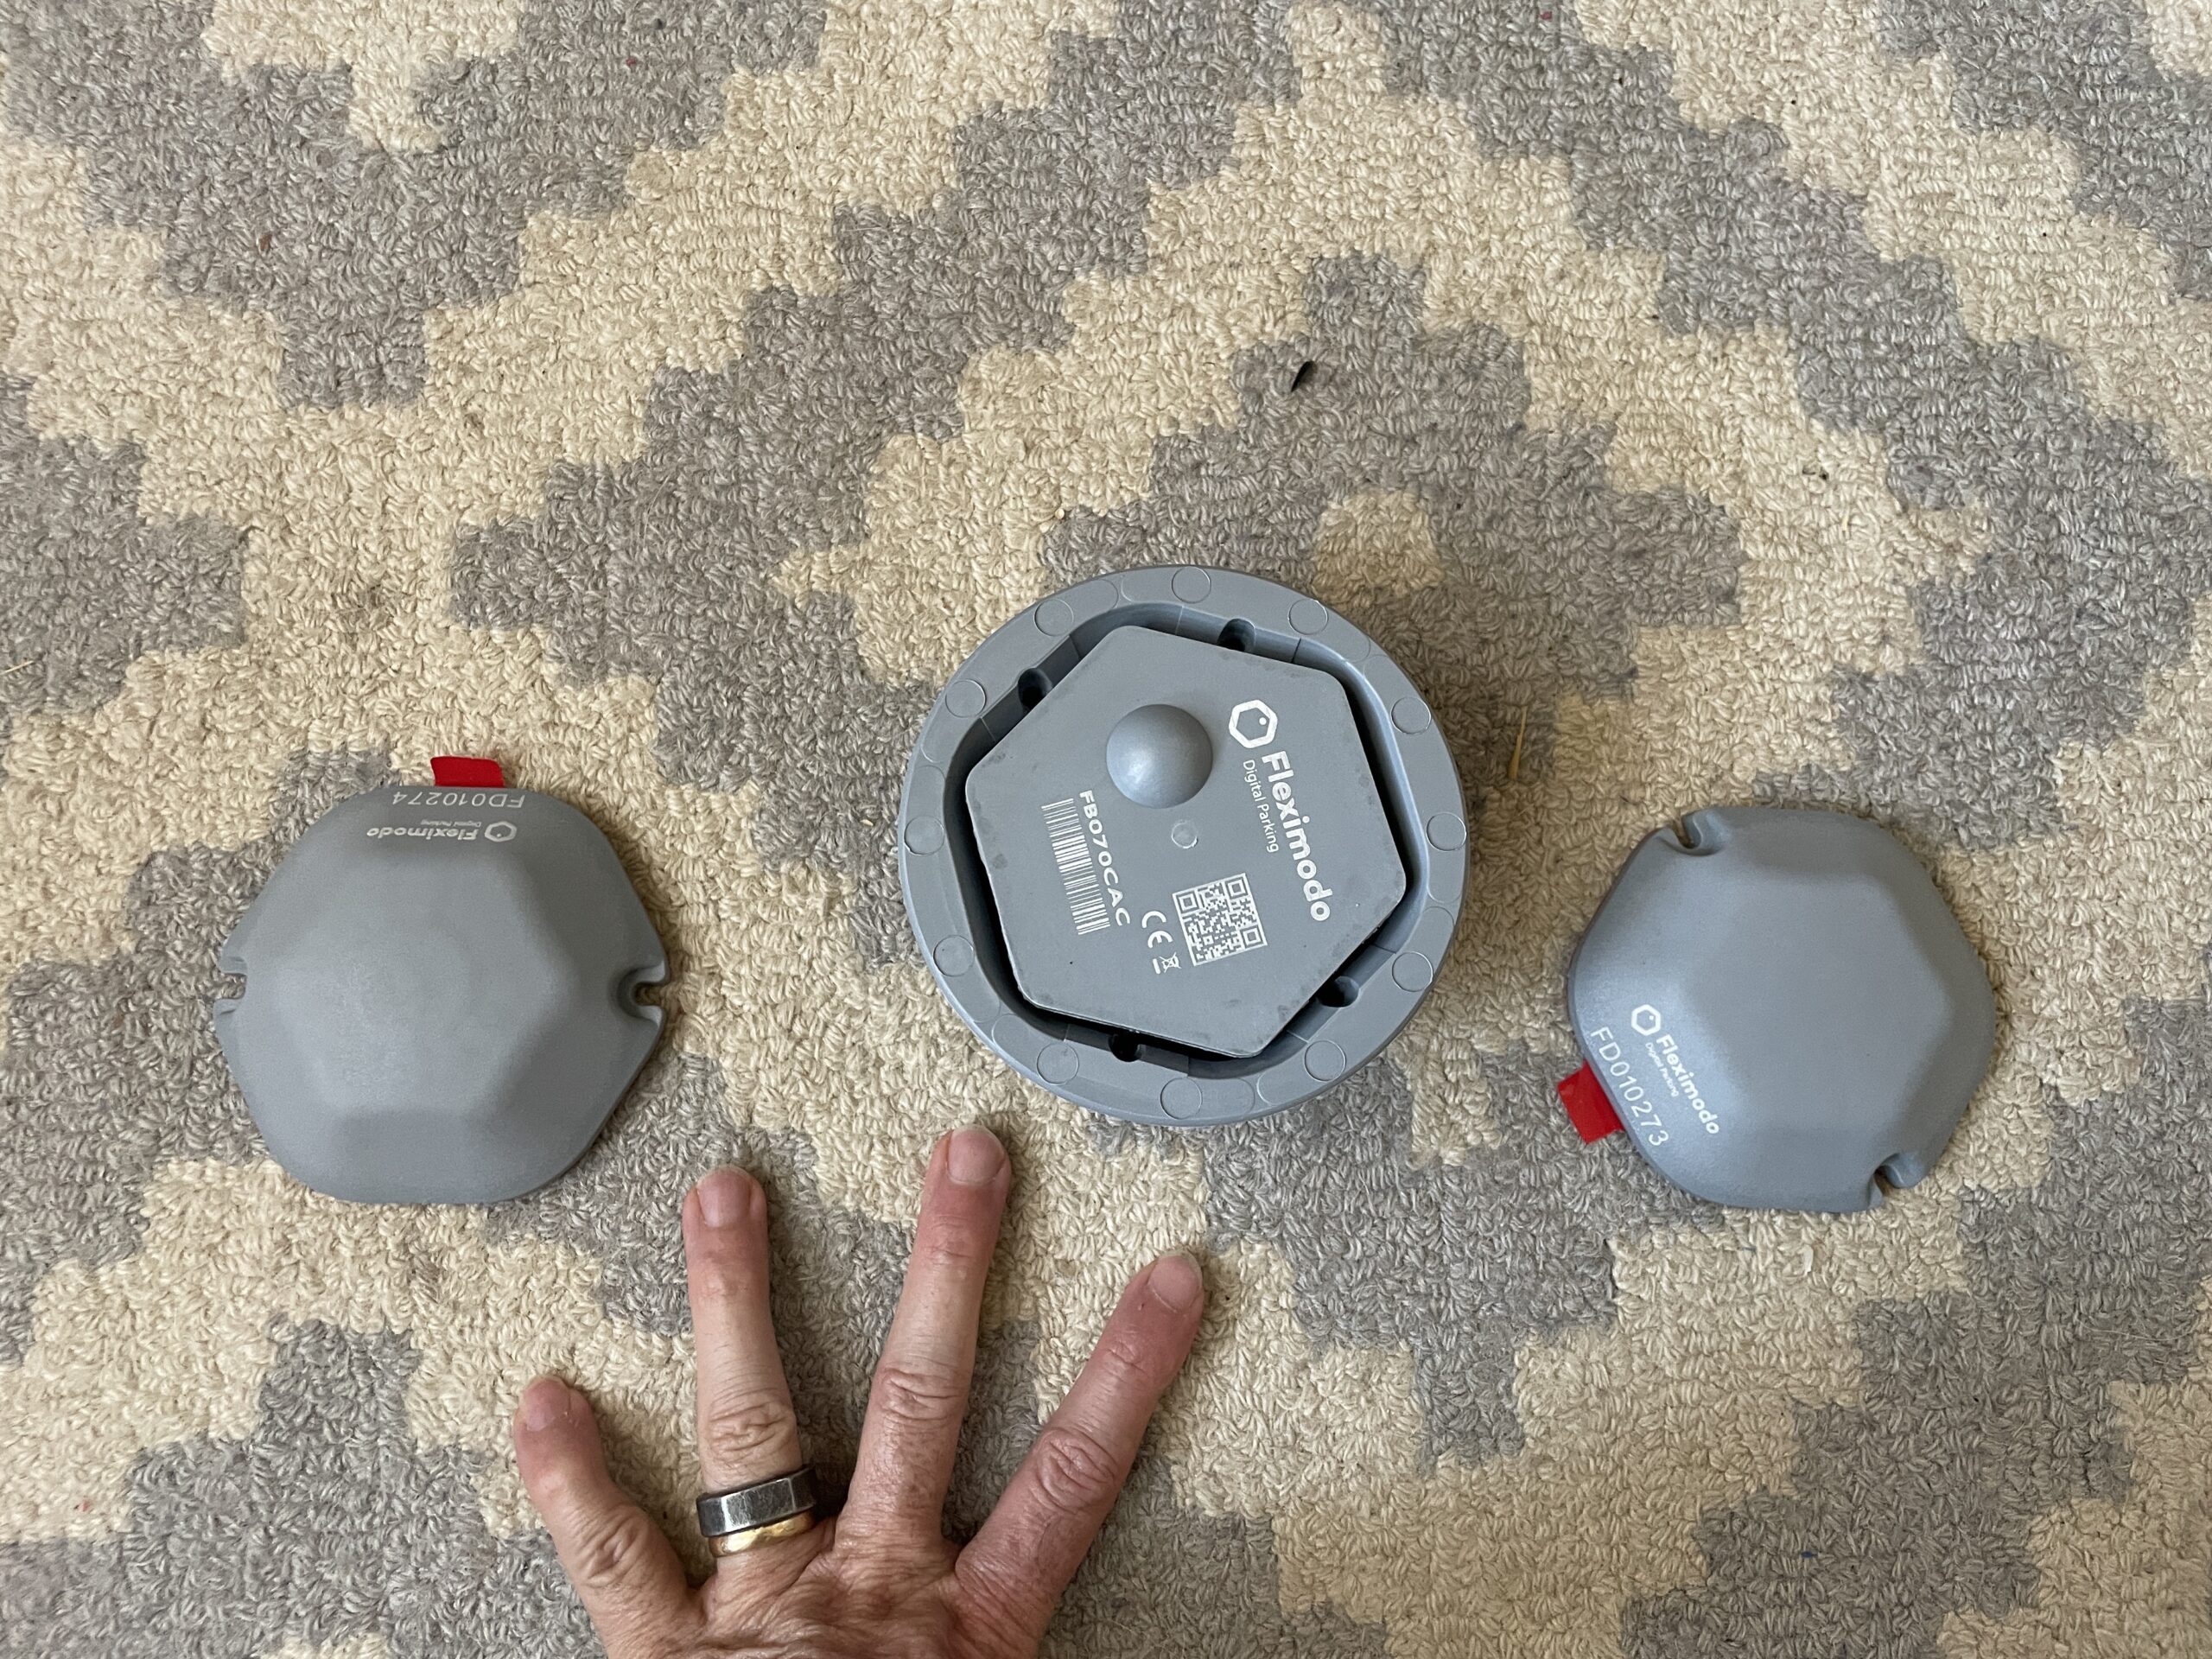
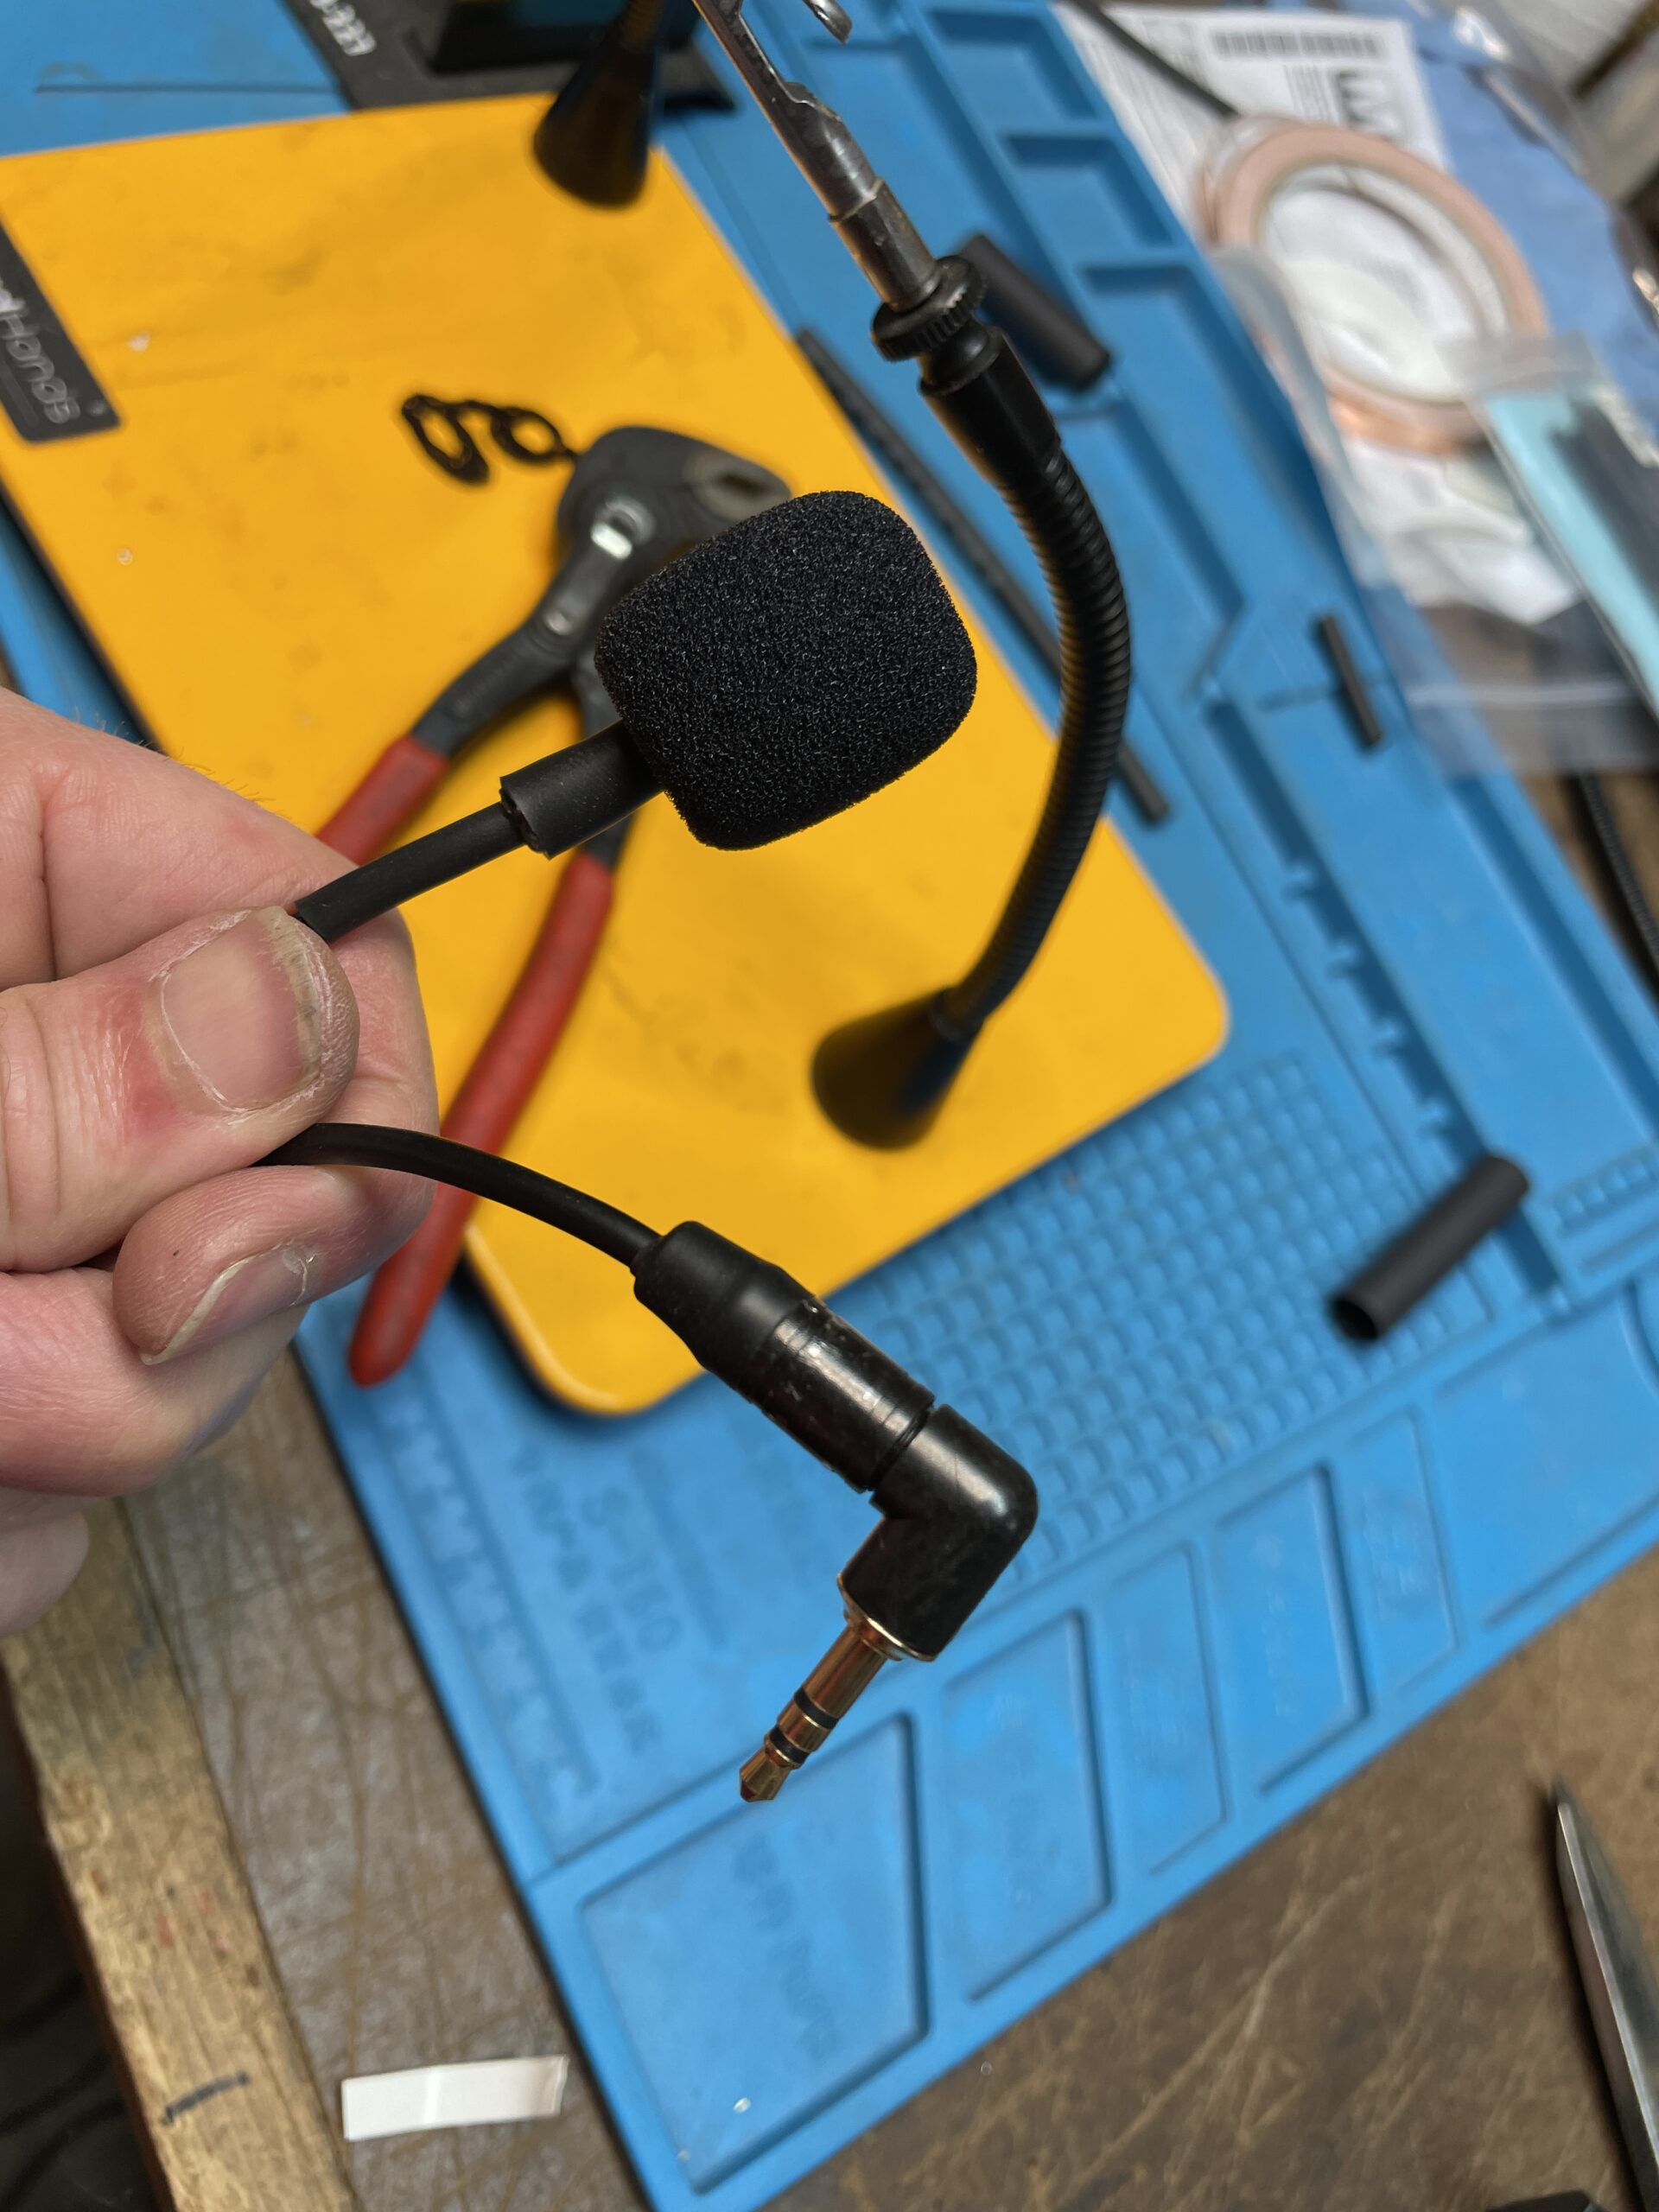
The first thing you'll want to do is decide what device you're going to onboard. In my case, I'll be using the MakerFabs LoRaWAN Soil Moisture Sensor, which you can buy here. I've written about how I'm using it, how to print a 3D enclosure for it, and it's predecessor all on this blog, feel free to review any of those links if you need to. It looks like this:

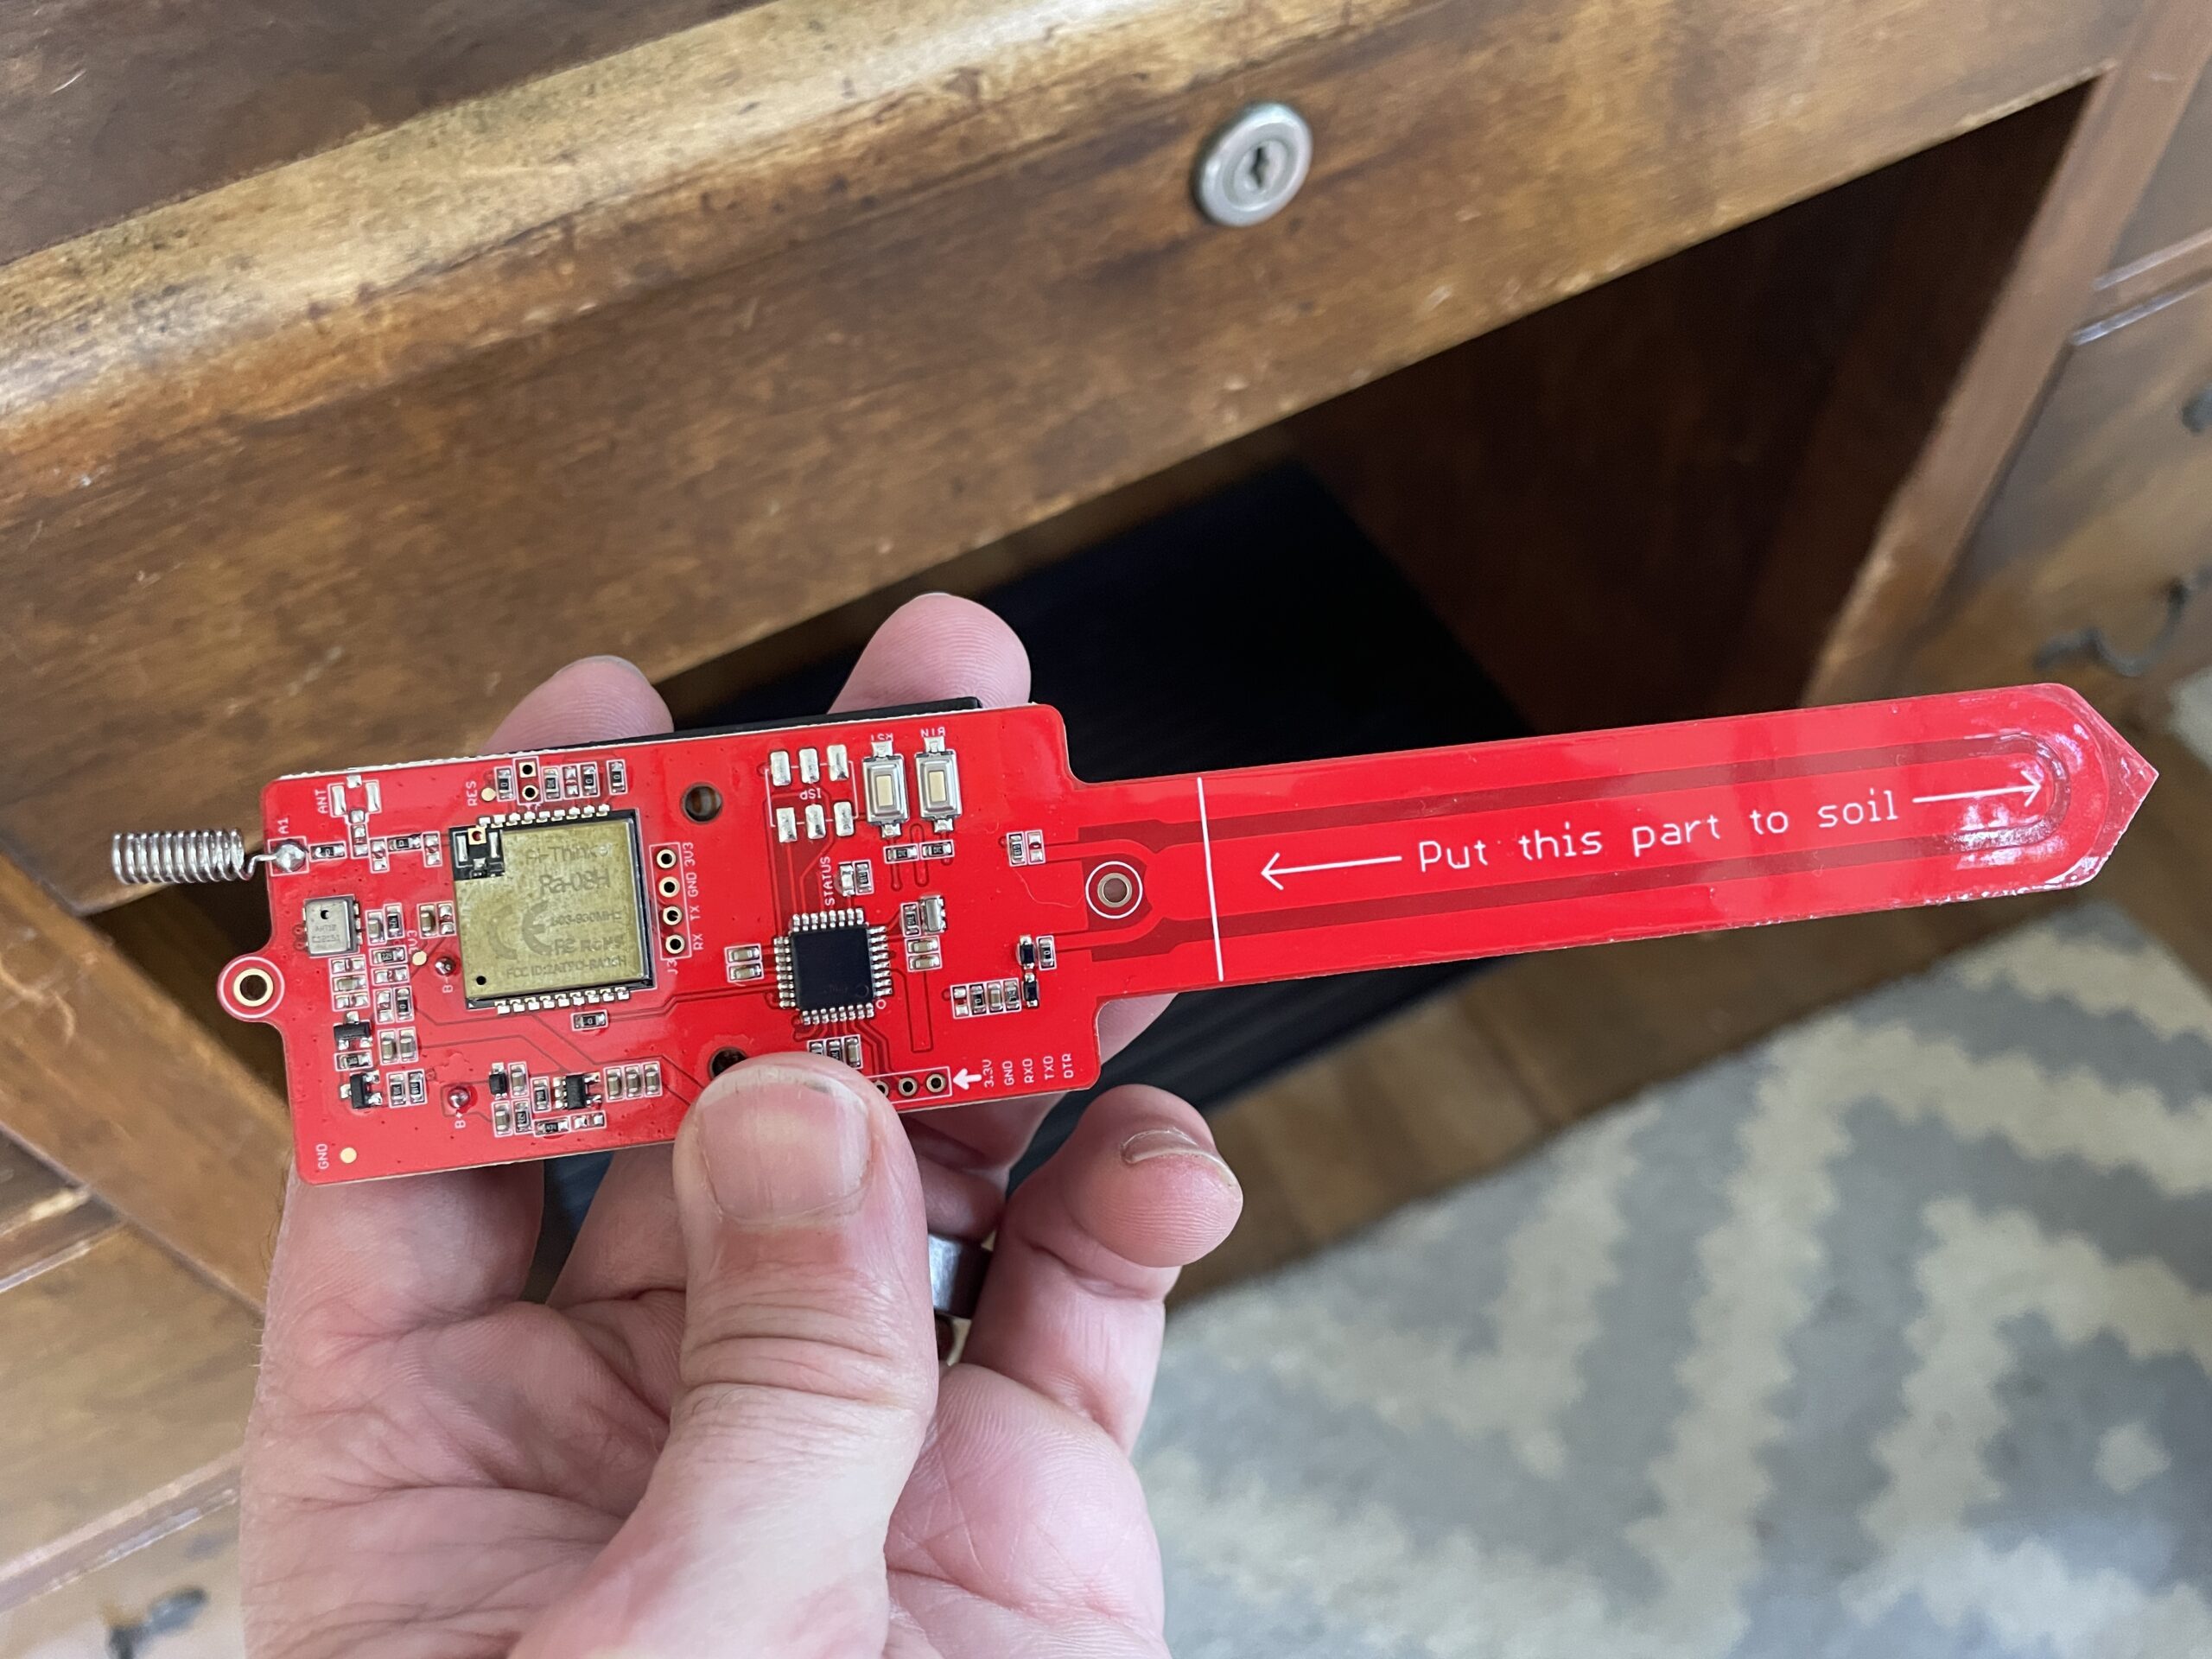
Pretty simple, right? Now, if you've gotten a sensor on Helium before you may be tempted to skip ahead and "just figure it out", which you can do if you know 2 things. First, Chirpstack doesn't use AppEUIs. Second, Chirpstack doesn't have a menu item for Devices; those are found in Applications. You can muddle through it from there if you'd like, or you can continue following along step by step.

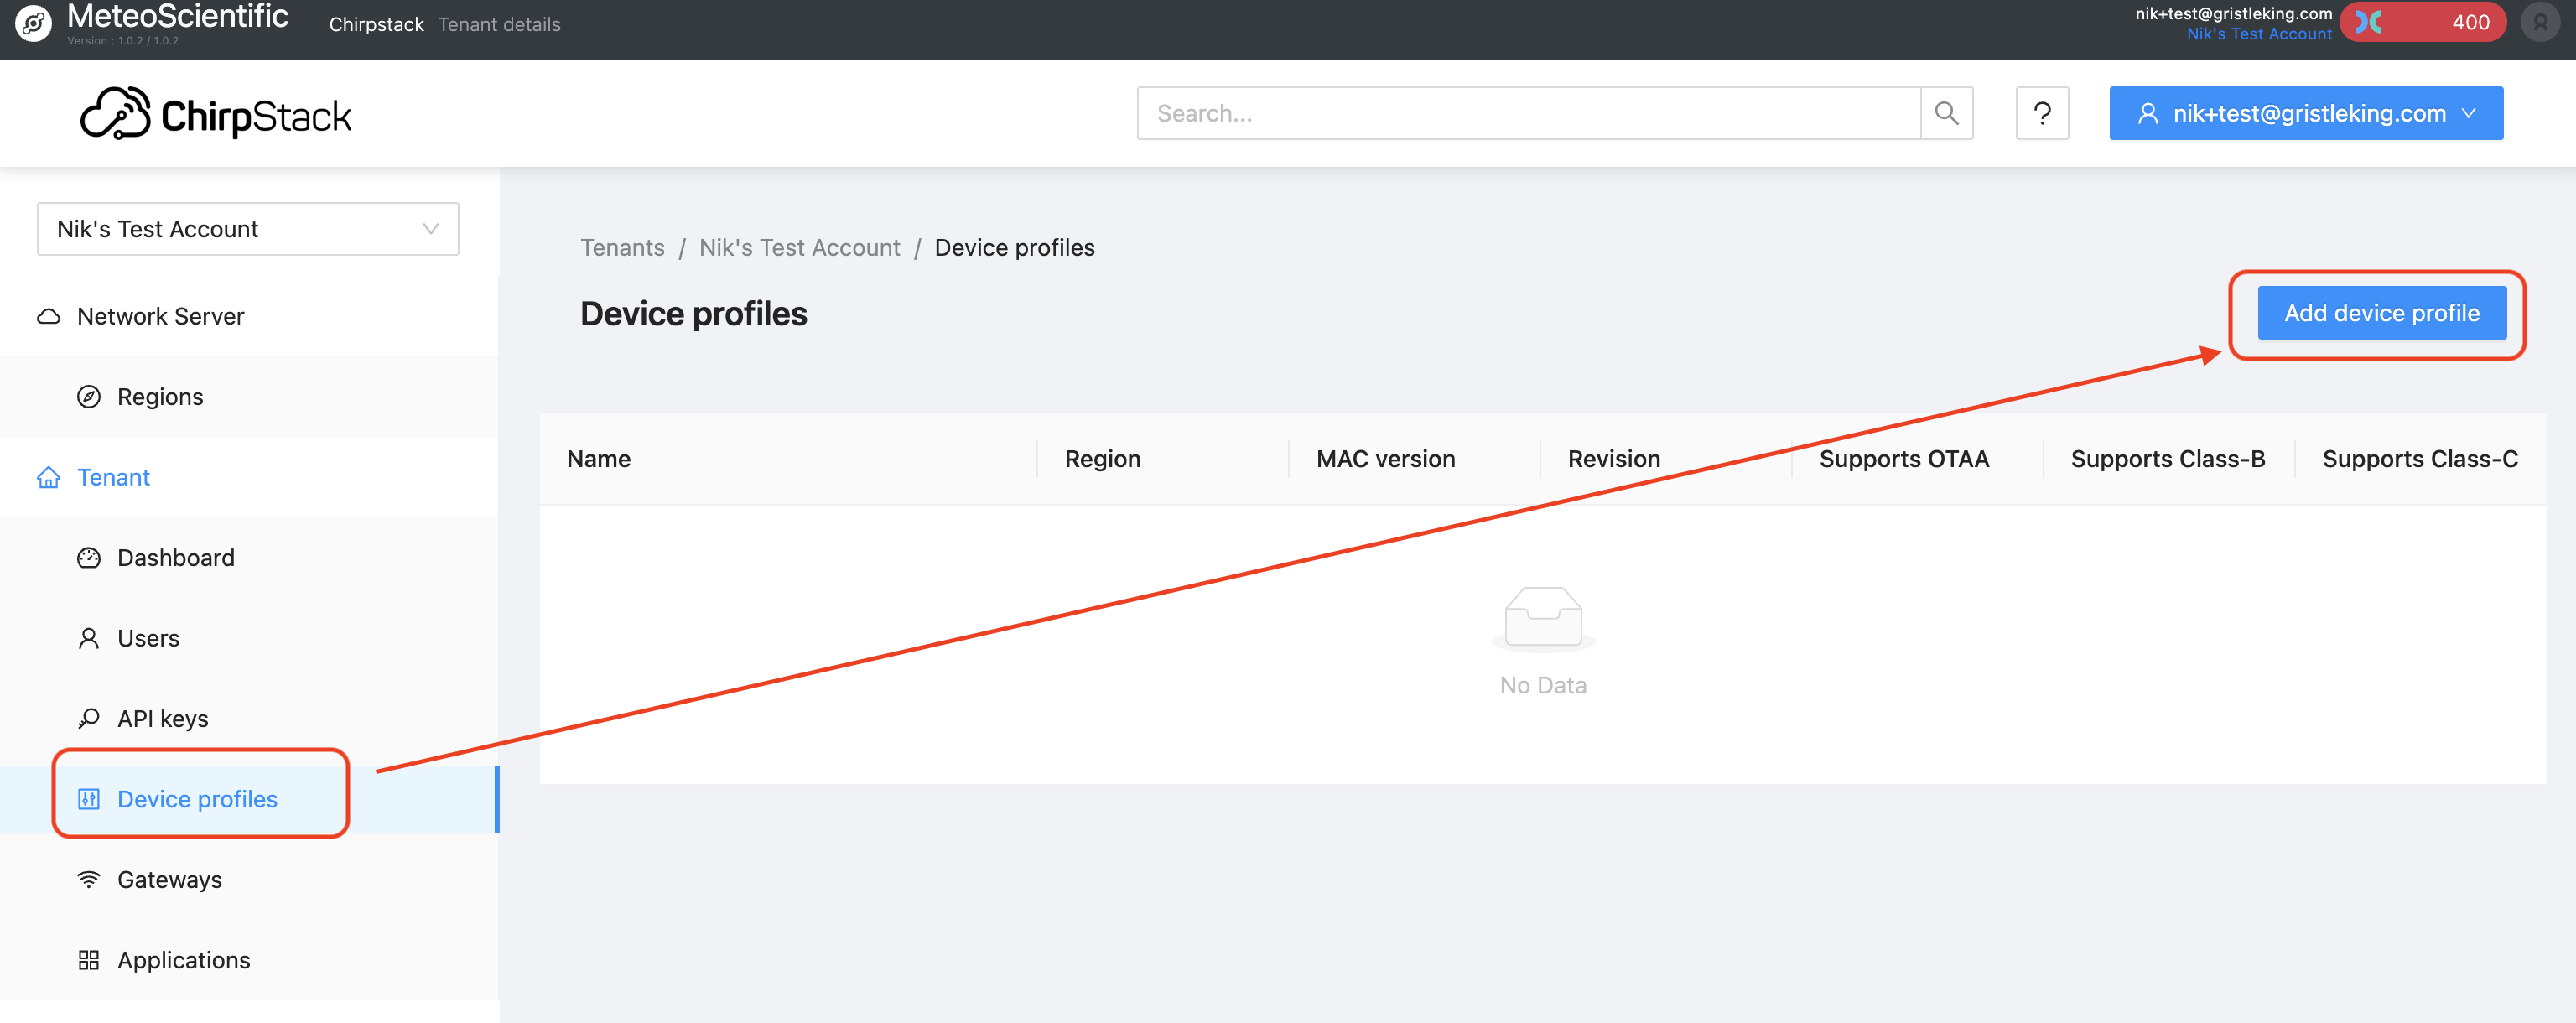
Step 1: Create a "Device Profile". Chirpstack (and I) make this super easy in this case by already having a template in the MetSci (short for MeteoScientific) LNS. You can find it by going to "Device profile" in the menu and hitting the "Add Device profile" button on the top right.

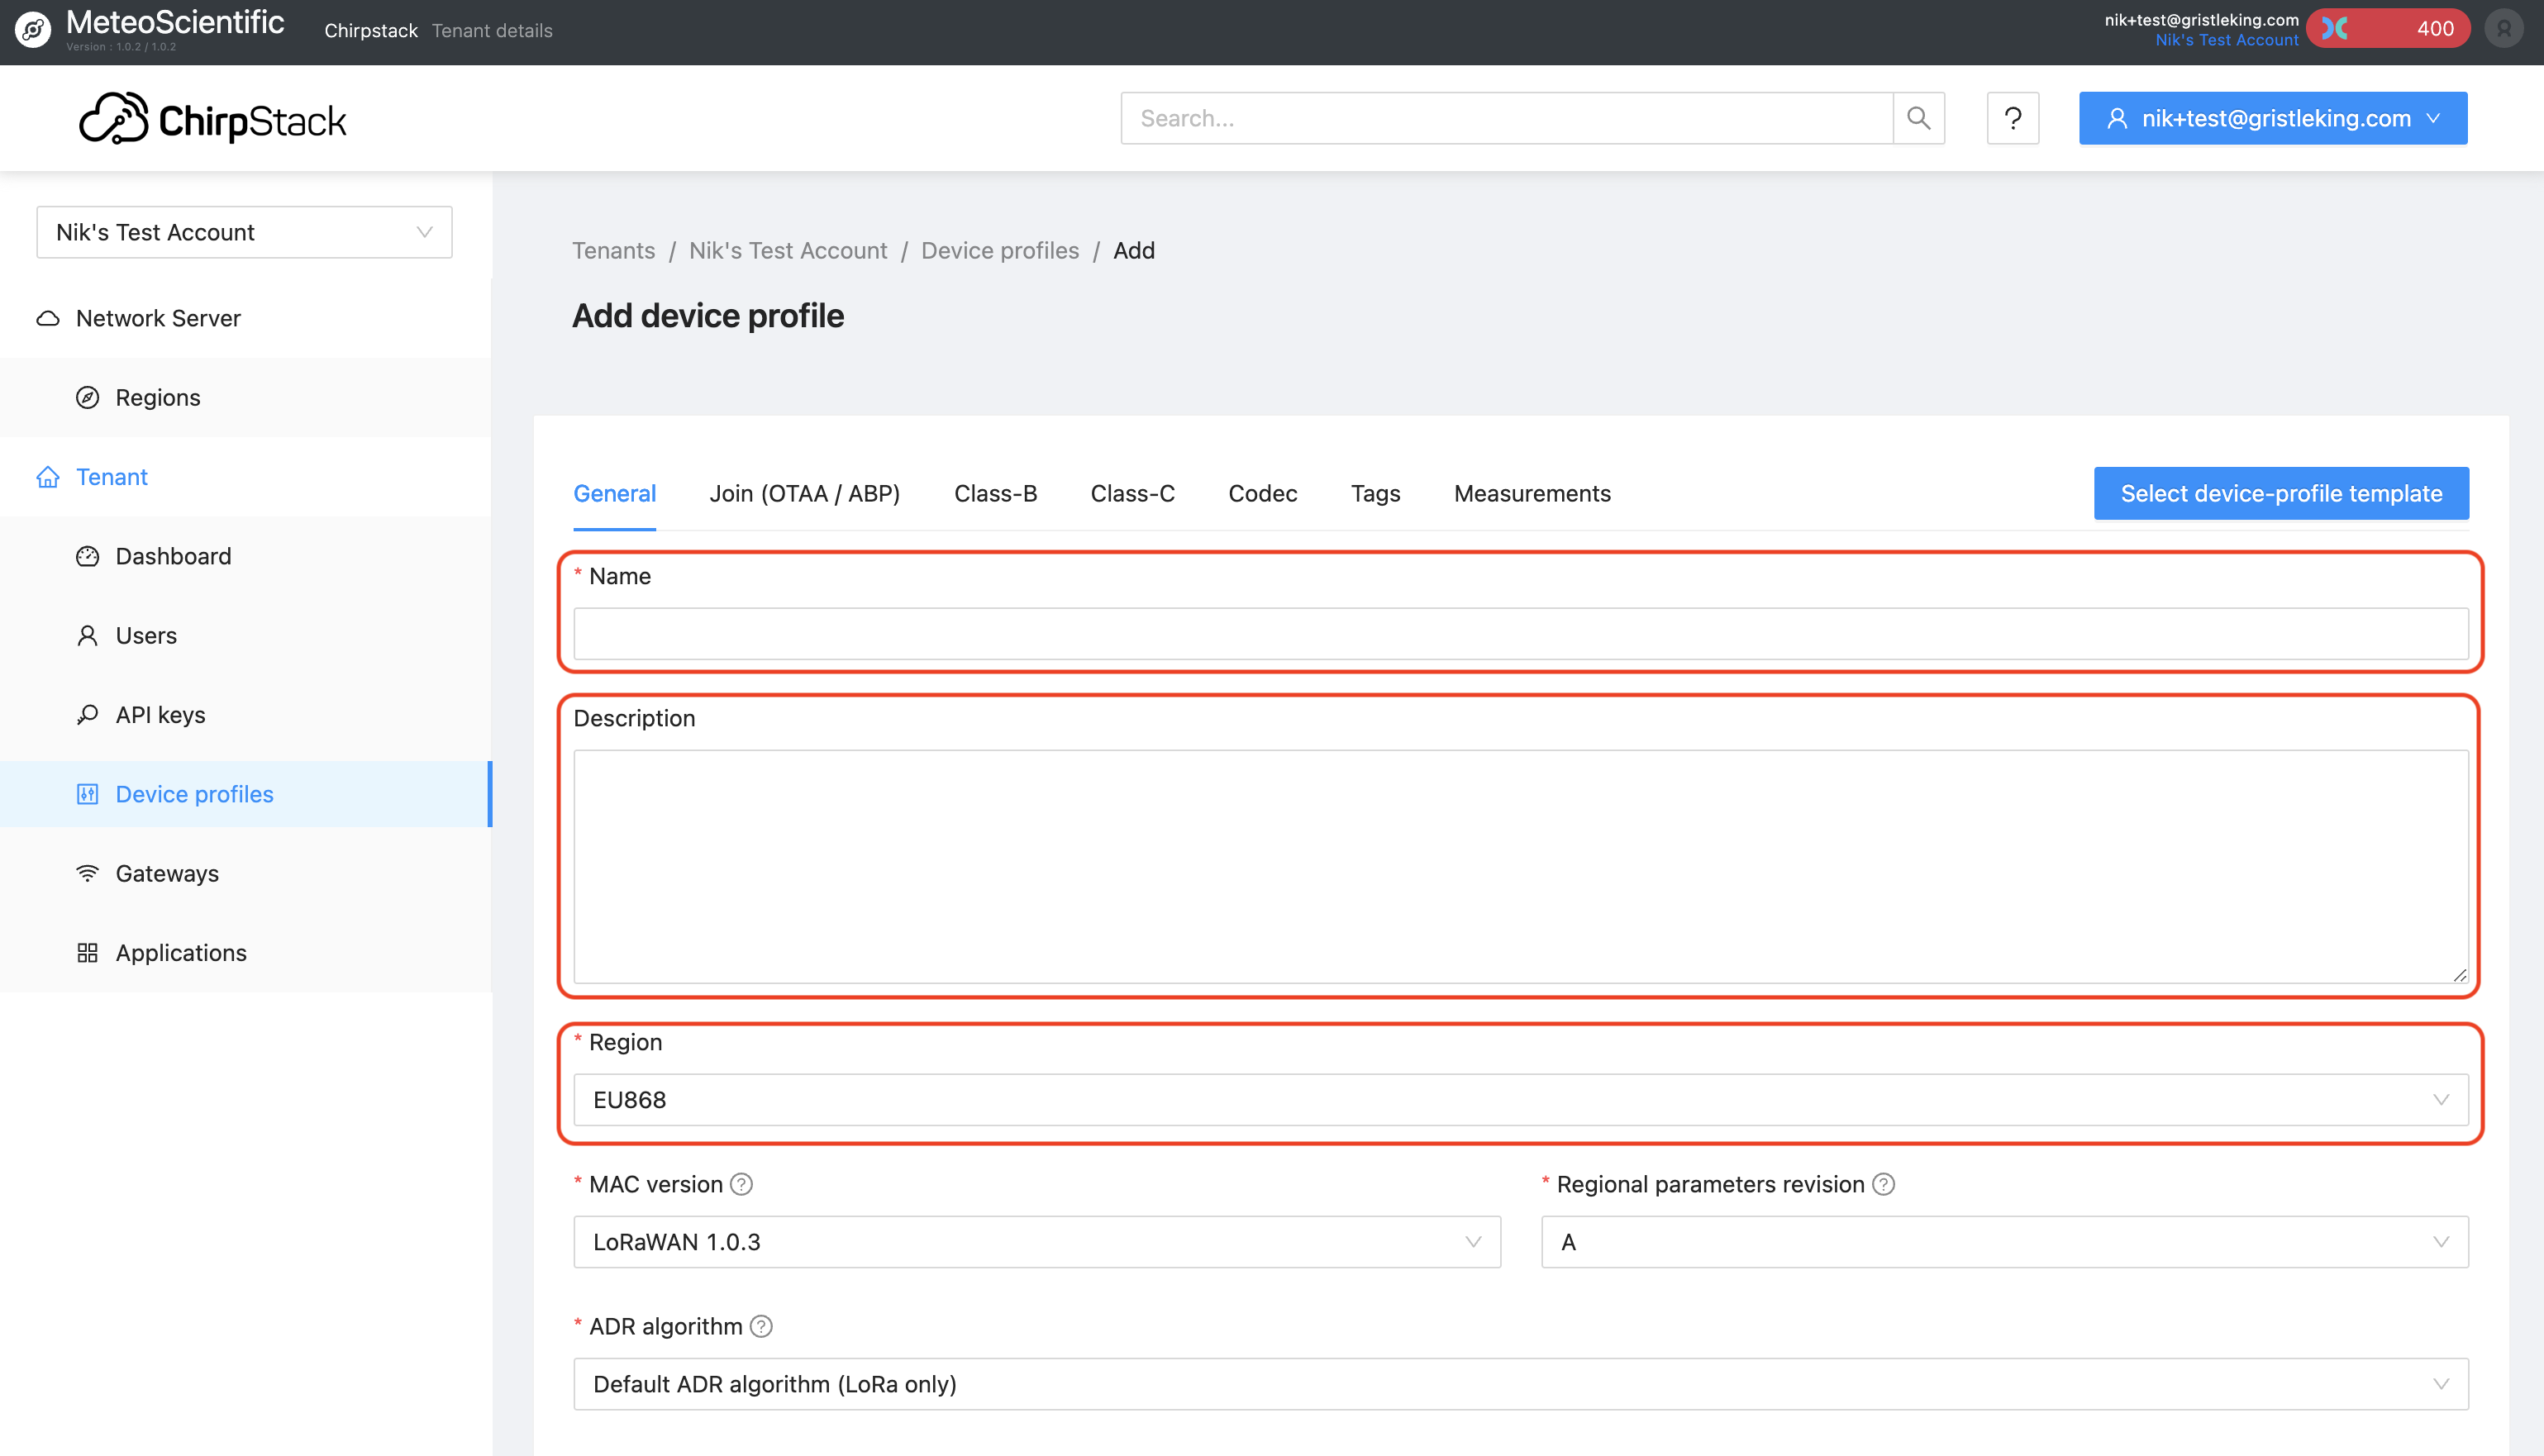
When you hit that "Add device profile" button you'll see a page with a ton of choices, including the "Select device-profile template" blue button. More on that later. Most choices are self-explanatory, some of 'em are new to many of us. If you're onboarding something other than the soil moisture sensor I'm using in my example, I'd suggest leaving the defaults as they are and changing just the Name, Description, and Region to match what you've got:

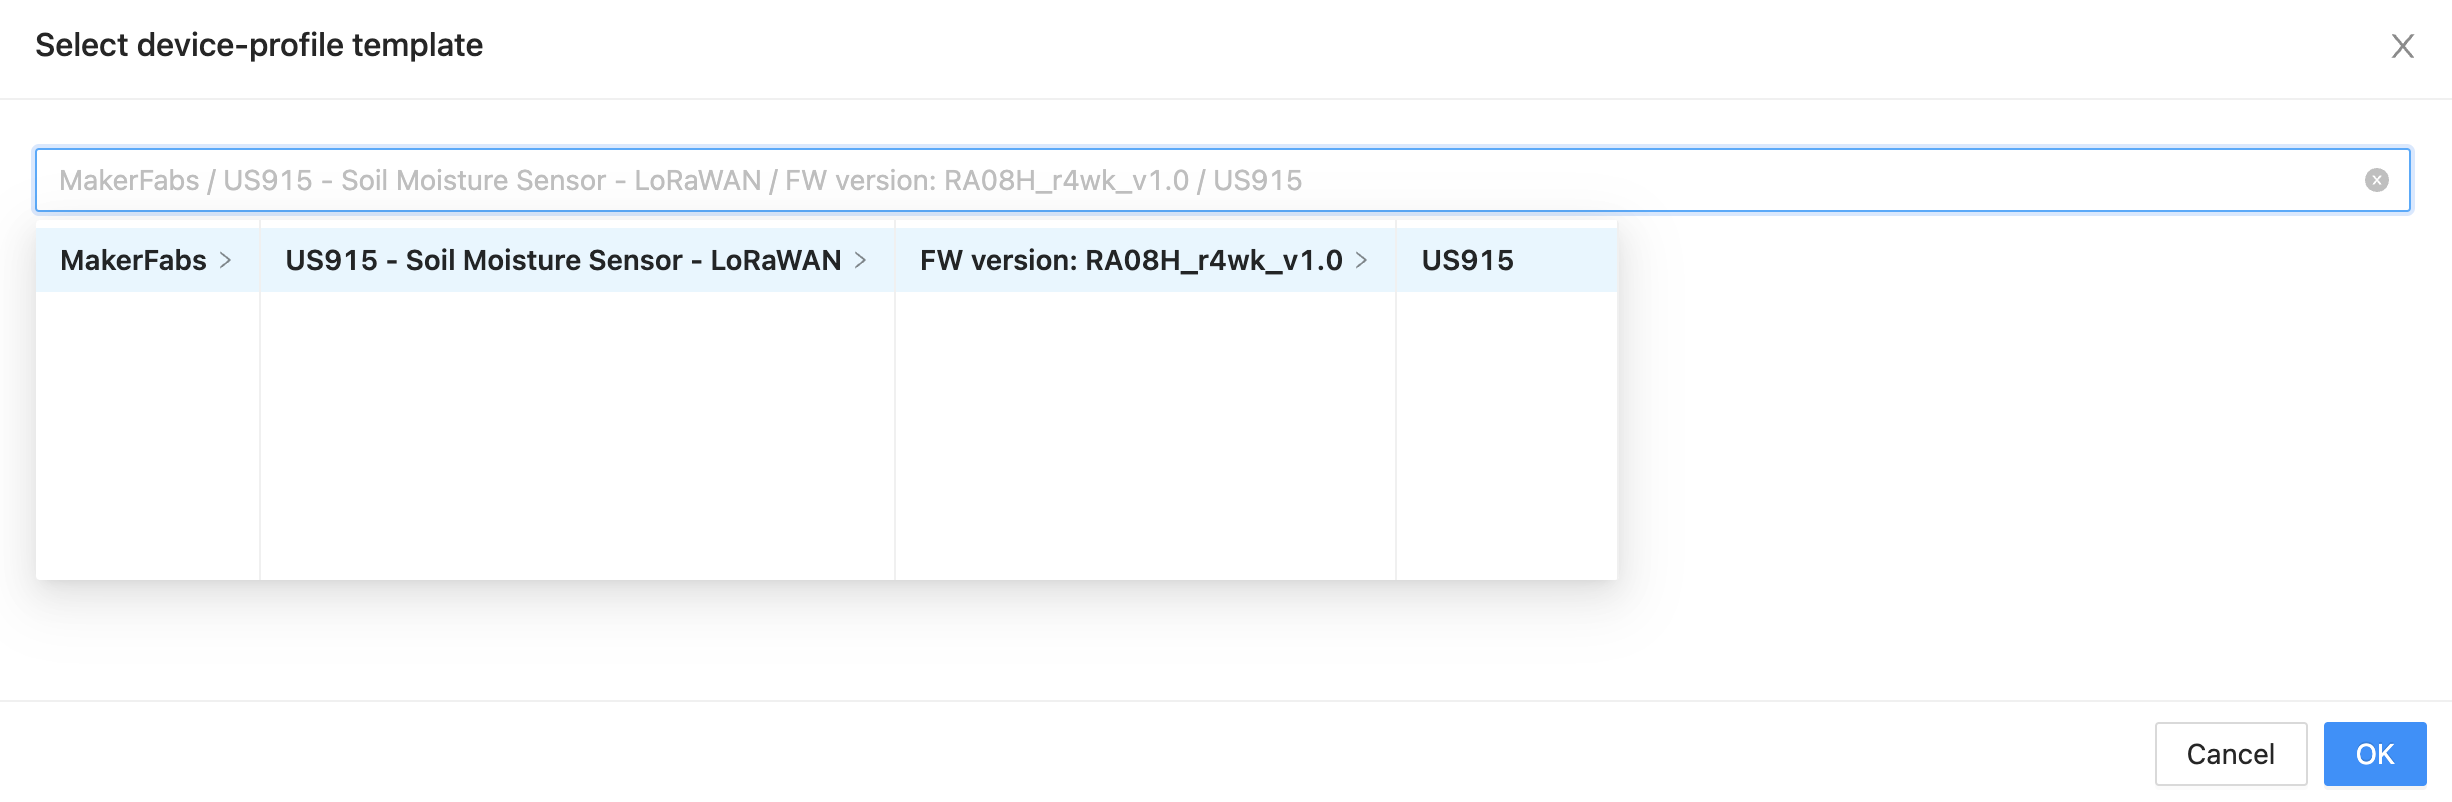
If you're using the soil moisture sensor (and you're in the US915 region), I've made this wicked easy; just hit the "Select device-profile template" button, and look for "MakerFabs", then keep clicking all the obvious choices. That will load up the template for you with a US915 region. Even if you don't have this sensor, feel free to use this as a little reference point on your new Console journey!

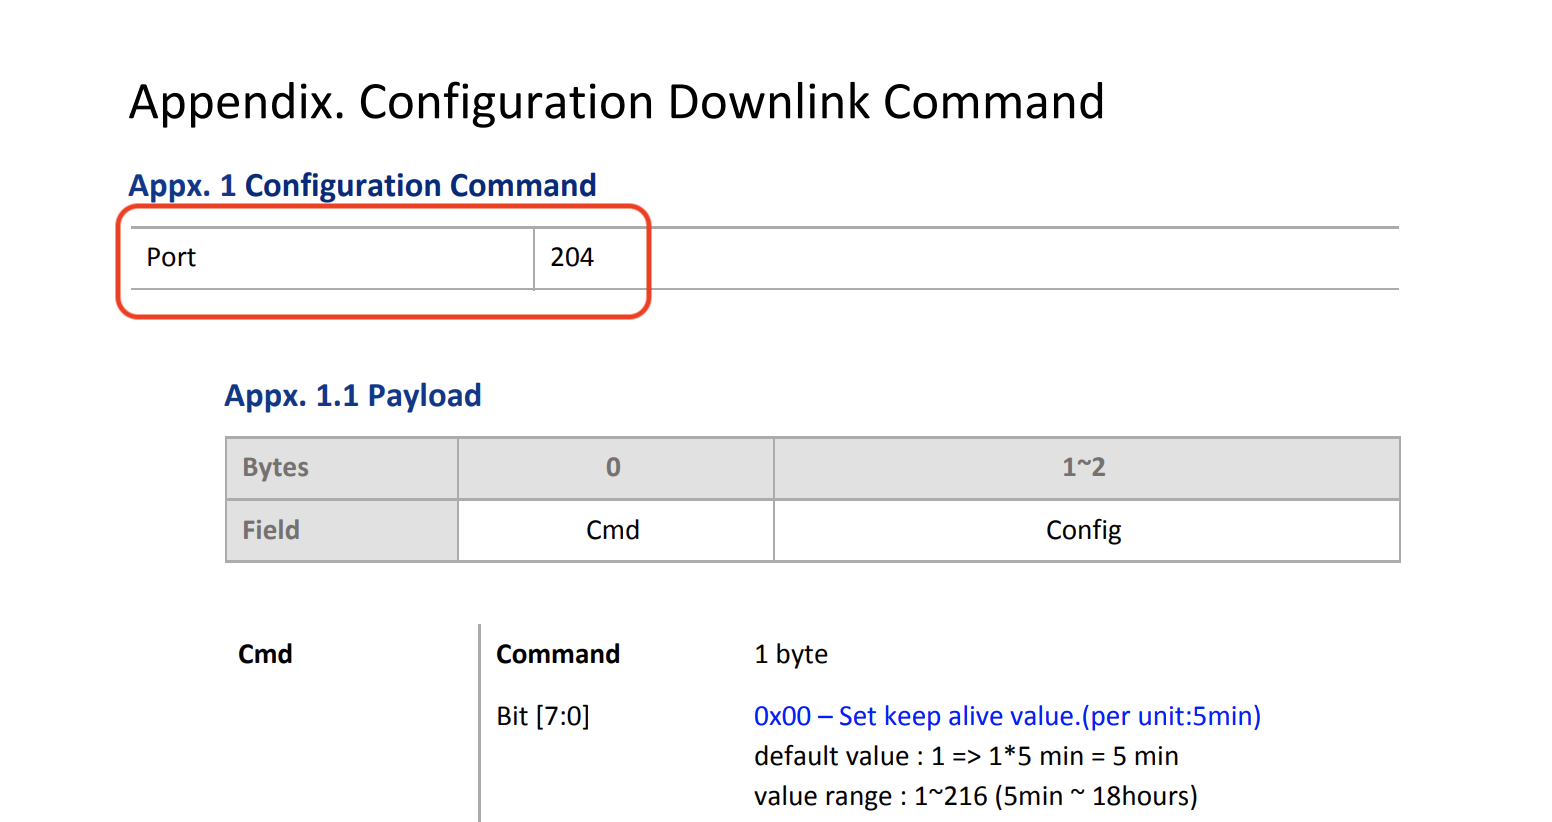
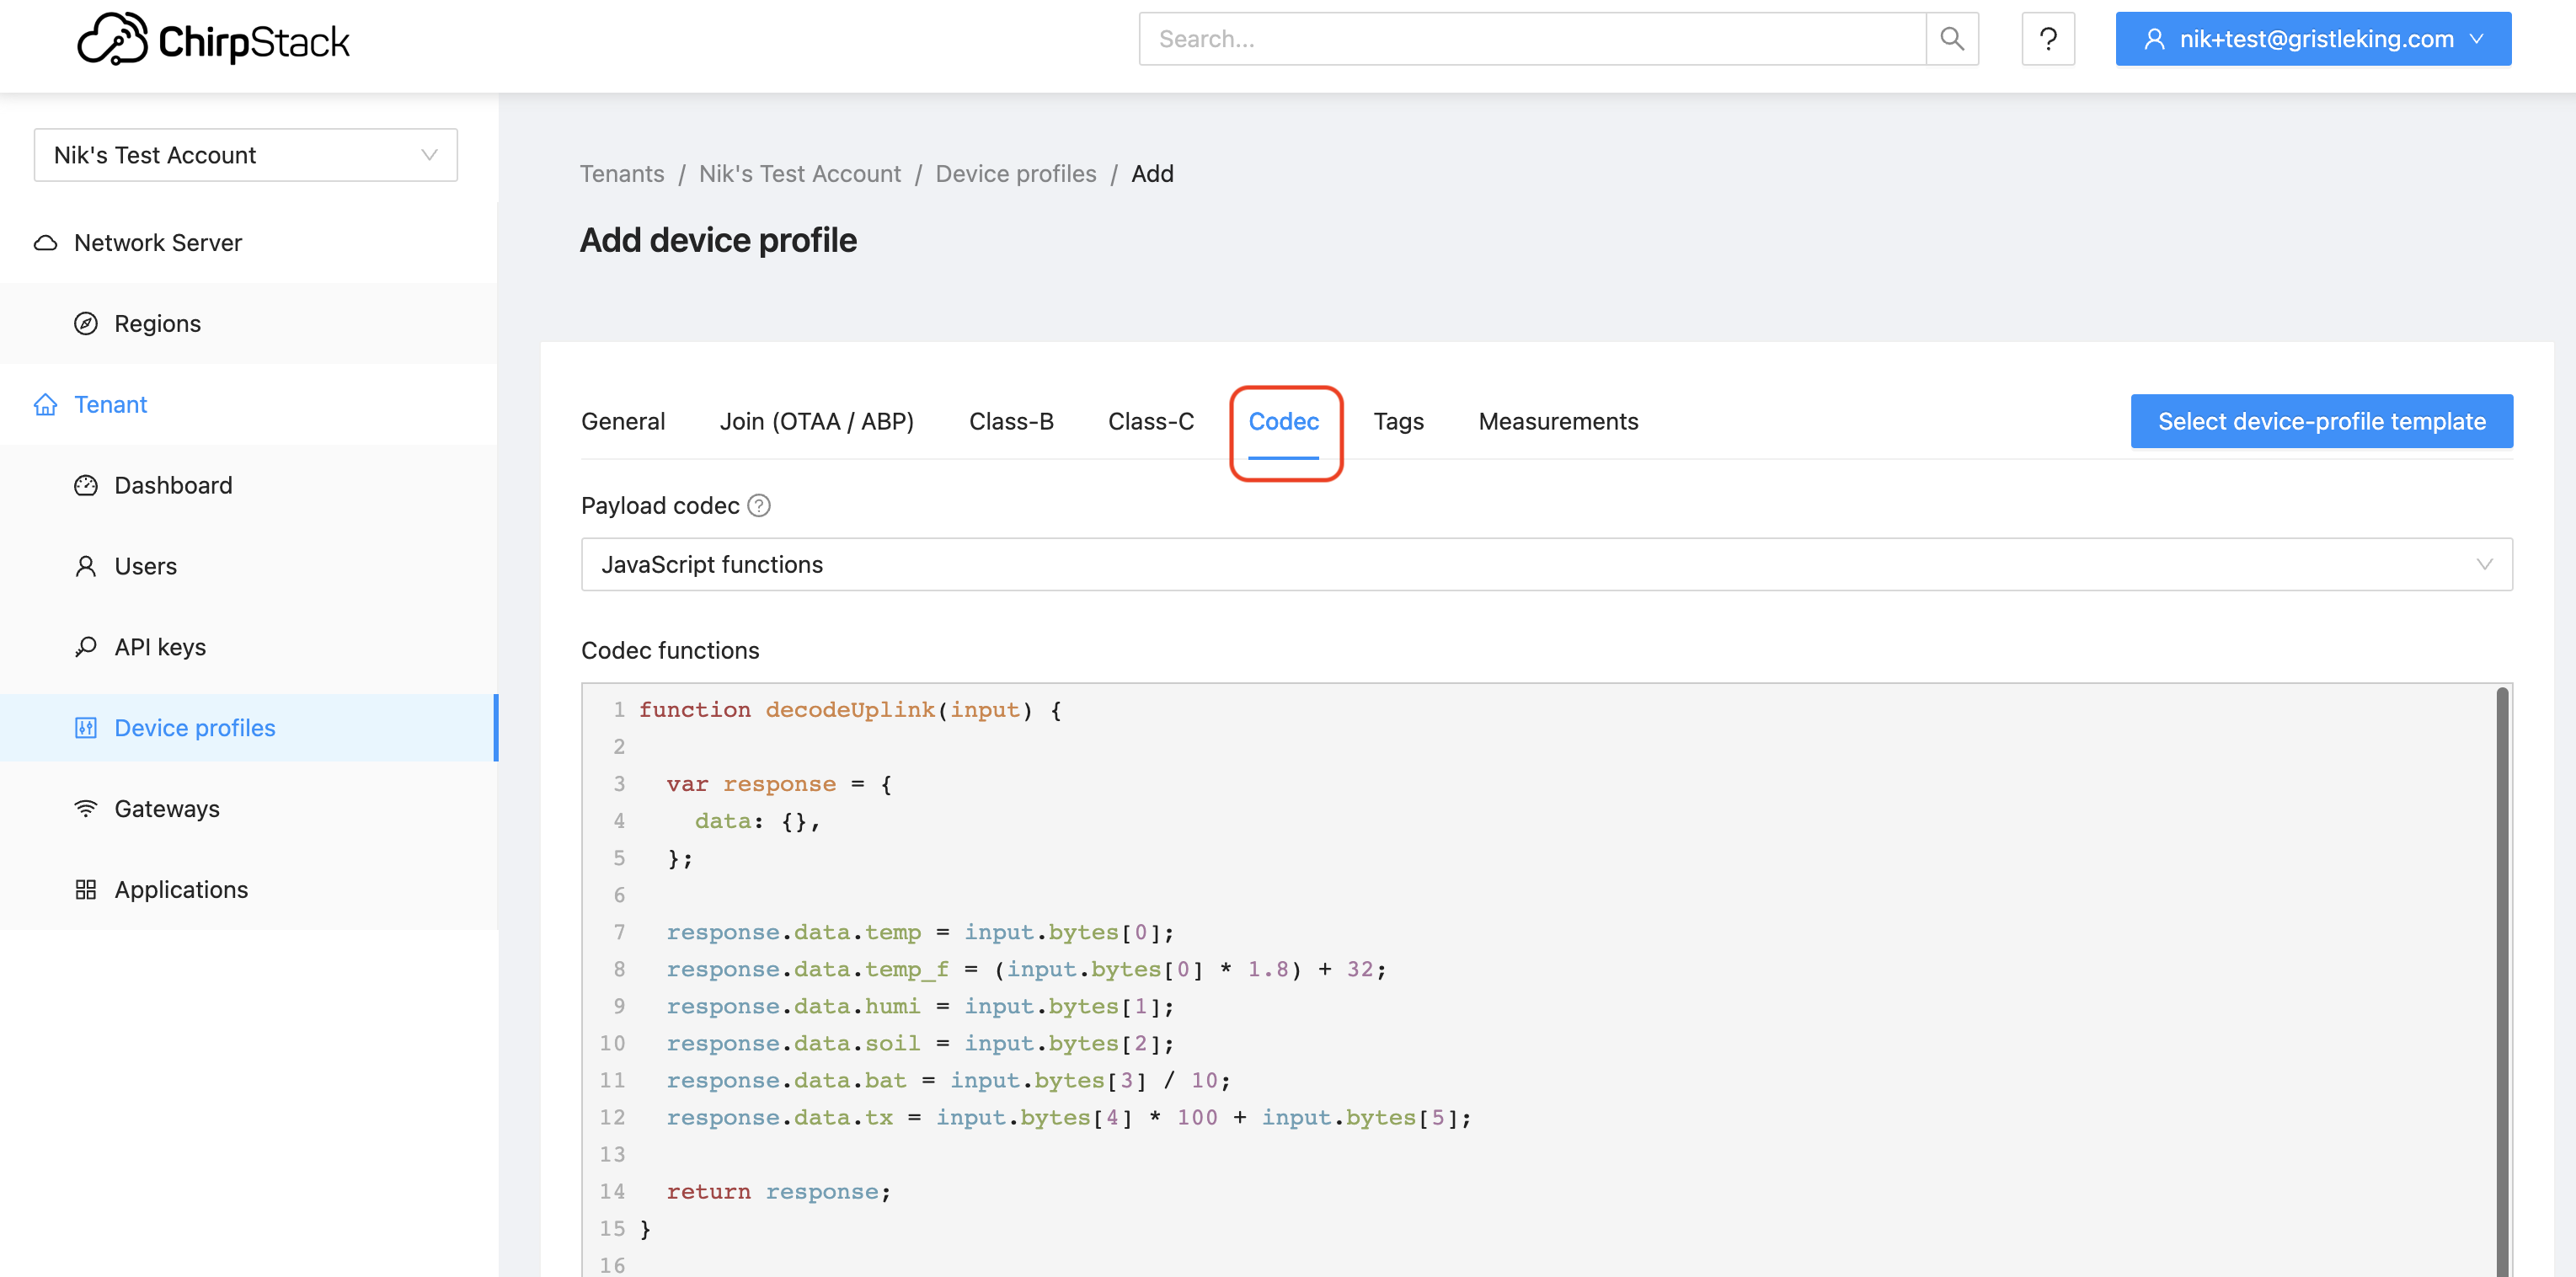
Now, there's an important step if you're using a different device: You'll need to add in the "codec", which we used to call a "decoder". For the SMS (Soil Moisture Sensor) template, it's already loaded in. If you're using something else, make sure you look for the Codec tab and add in a decoder (usually you can find it on the interwebz and copy/paste it in. Remember to "Submit" when you're done making all your edits to the General tab and the Codec. Here's where to find the Codec tab:

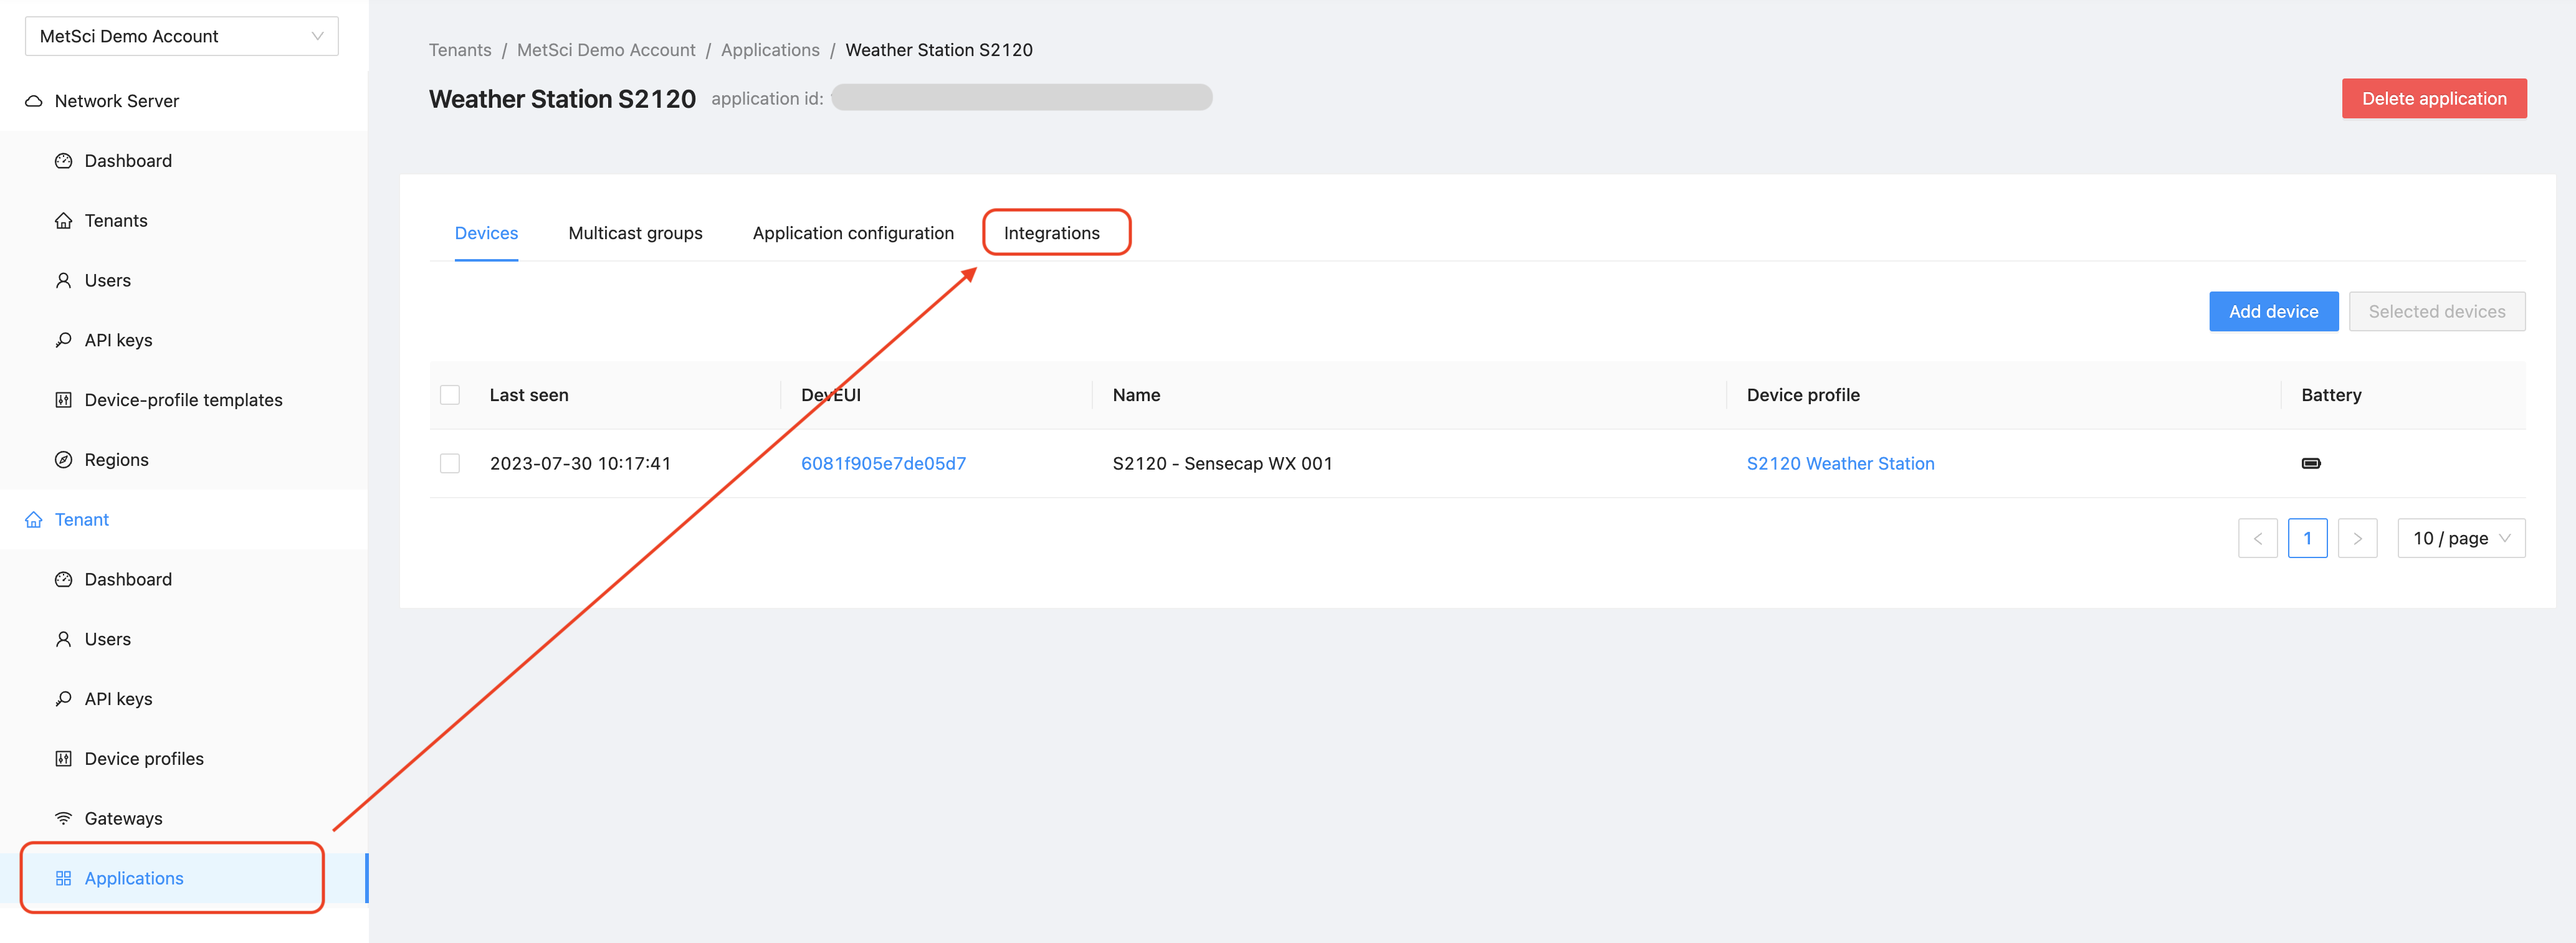
Cool, so now we have a "Device profile" and we've added the codec. What's next? In Helium, we'd add a Device. In Chirpstack, we add an Application.

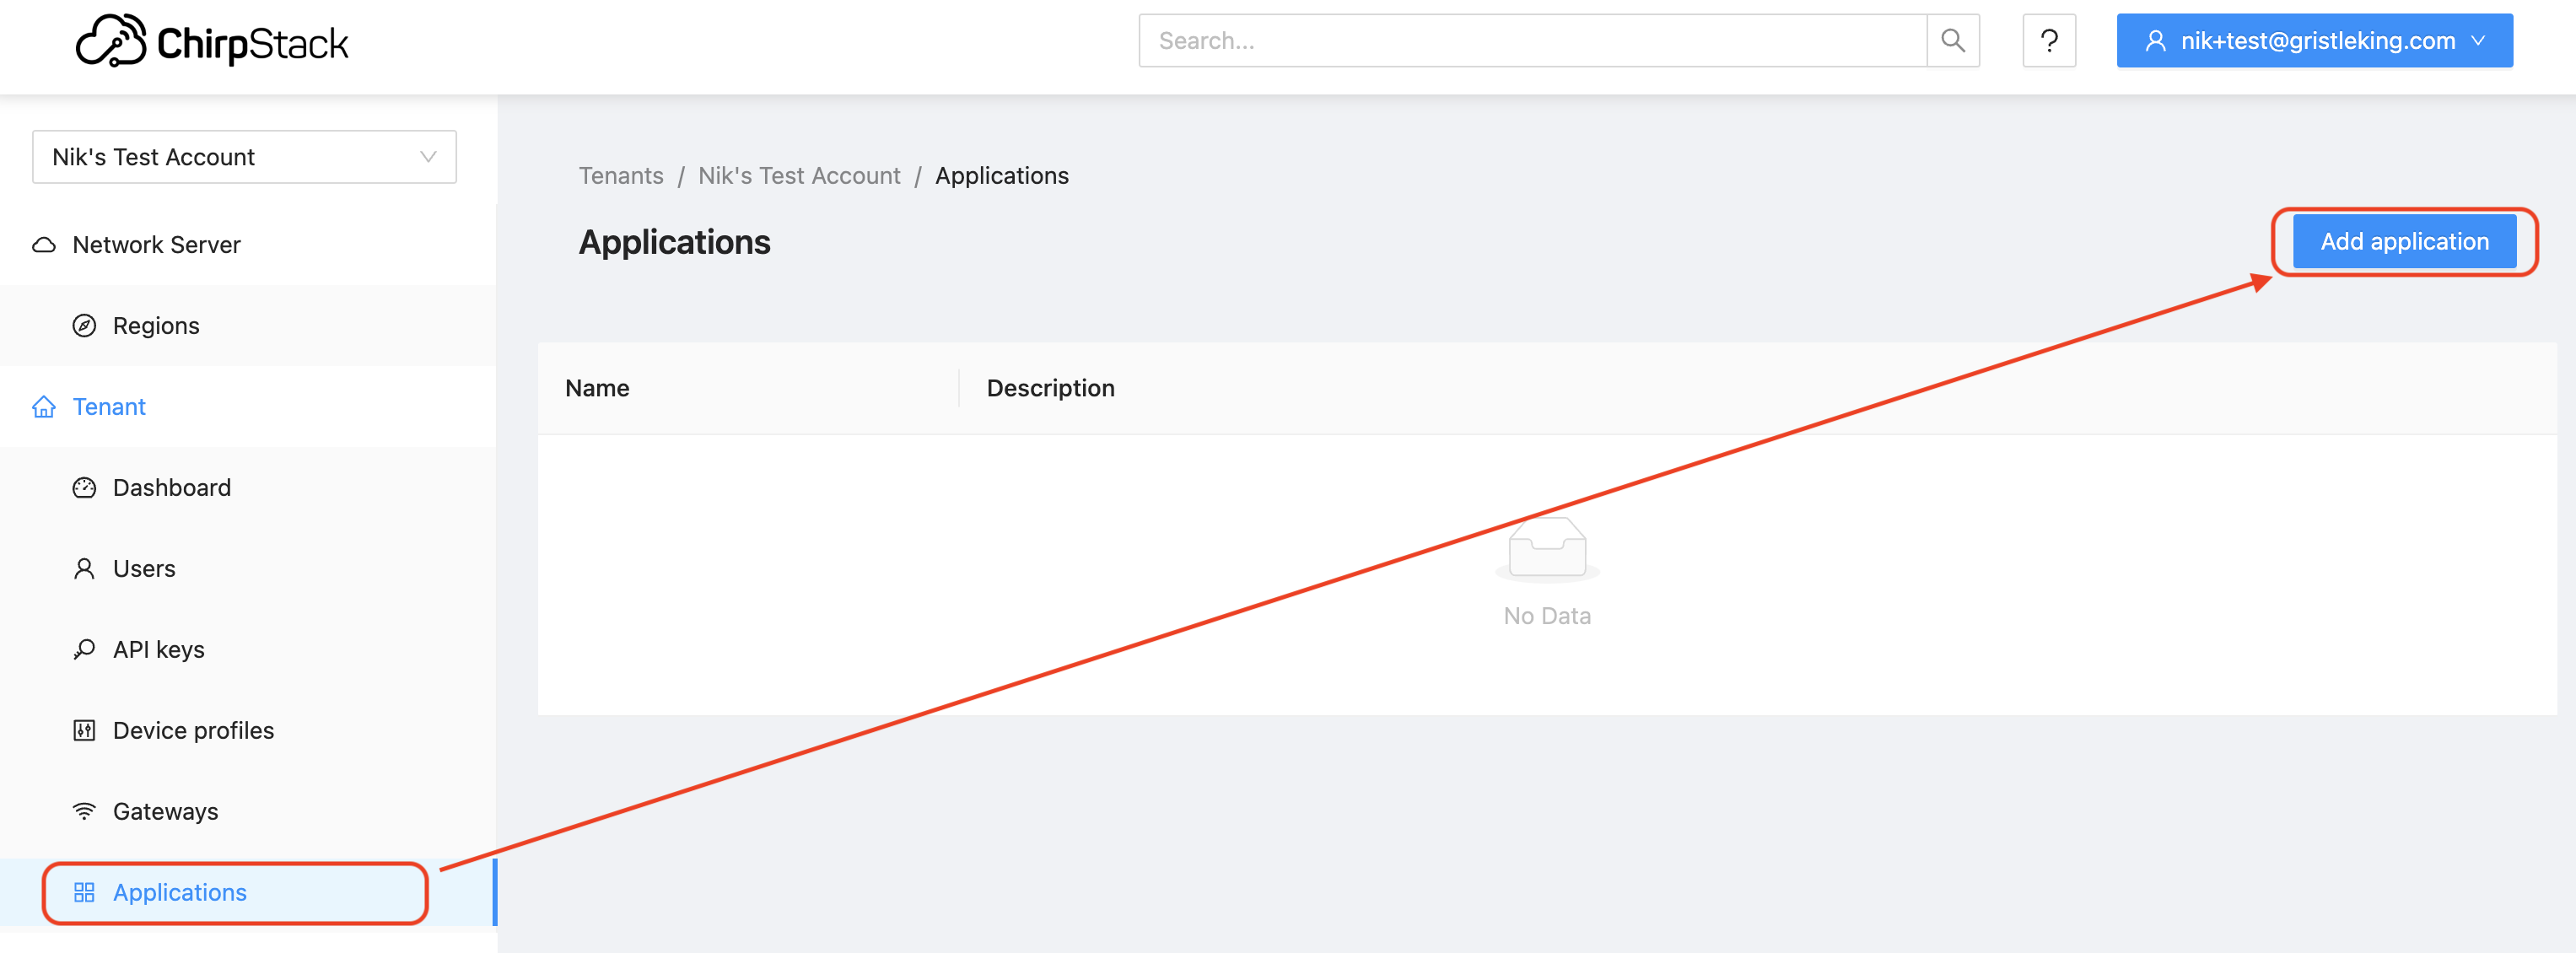
Head down to Applications, and (obviously?) hit the Add application button.

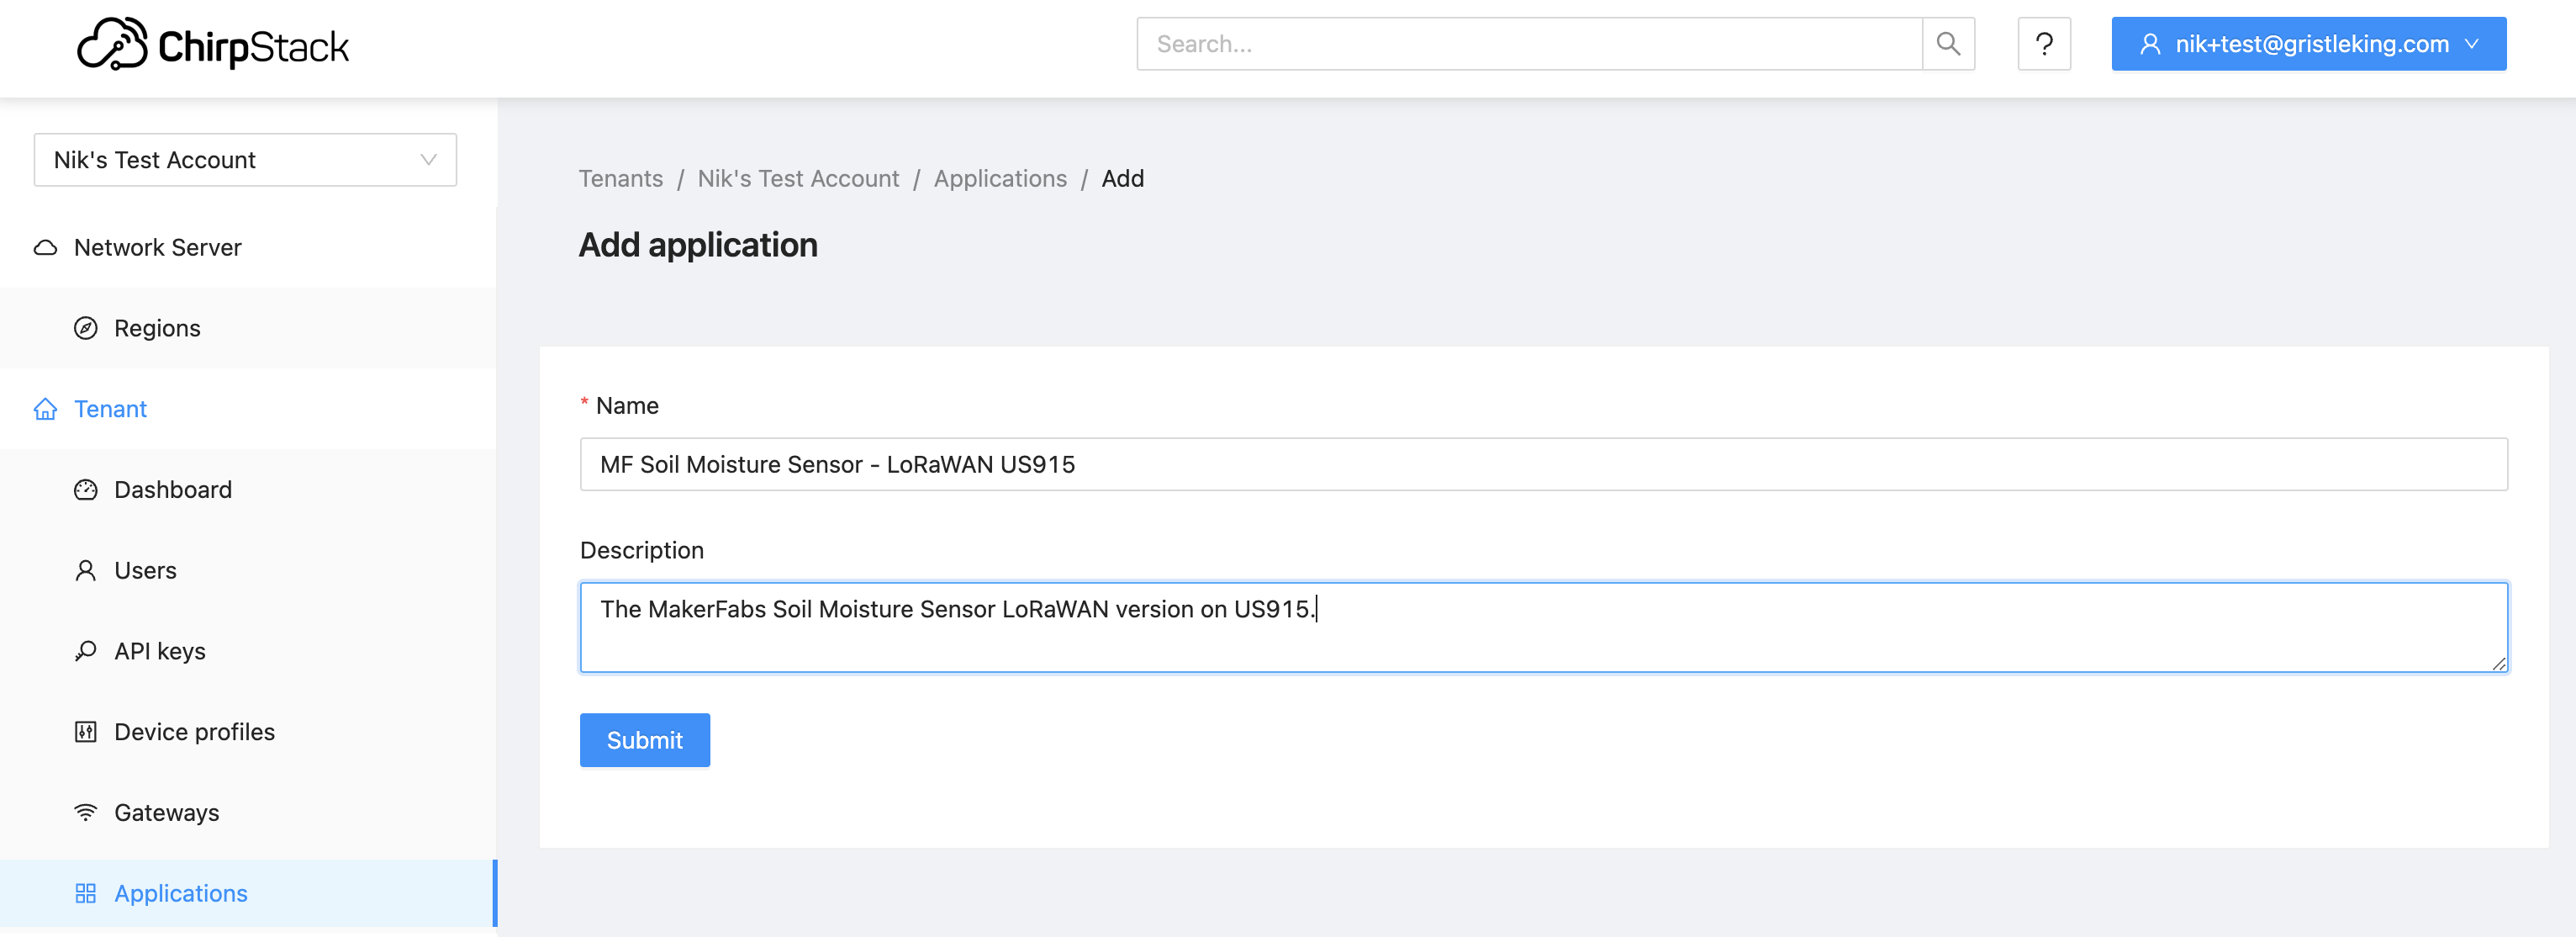
This'll bring up something that seems blindingly obvious and redundant: The "Name" and "Description" of the Application. We're almost there, so bear with this; it'll make more sense when we finish the next step of adding a Device. I know, I know, it's confusing. Just keep going.

Now, one way to use an Application is that you're using 2 sensors that are the same sensor but in different regions (US915 and EU868, one for me, one for my auntie in England's garden), or you might be using them for different properties and so they have different sending requirements (every hour vs once per day). They could pull from the same or different templates, depending on how you want to set them up. For one device it won't make much sense, but Helium ain't about running just one device...

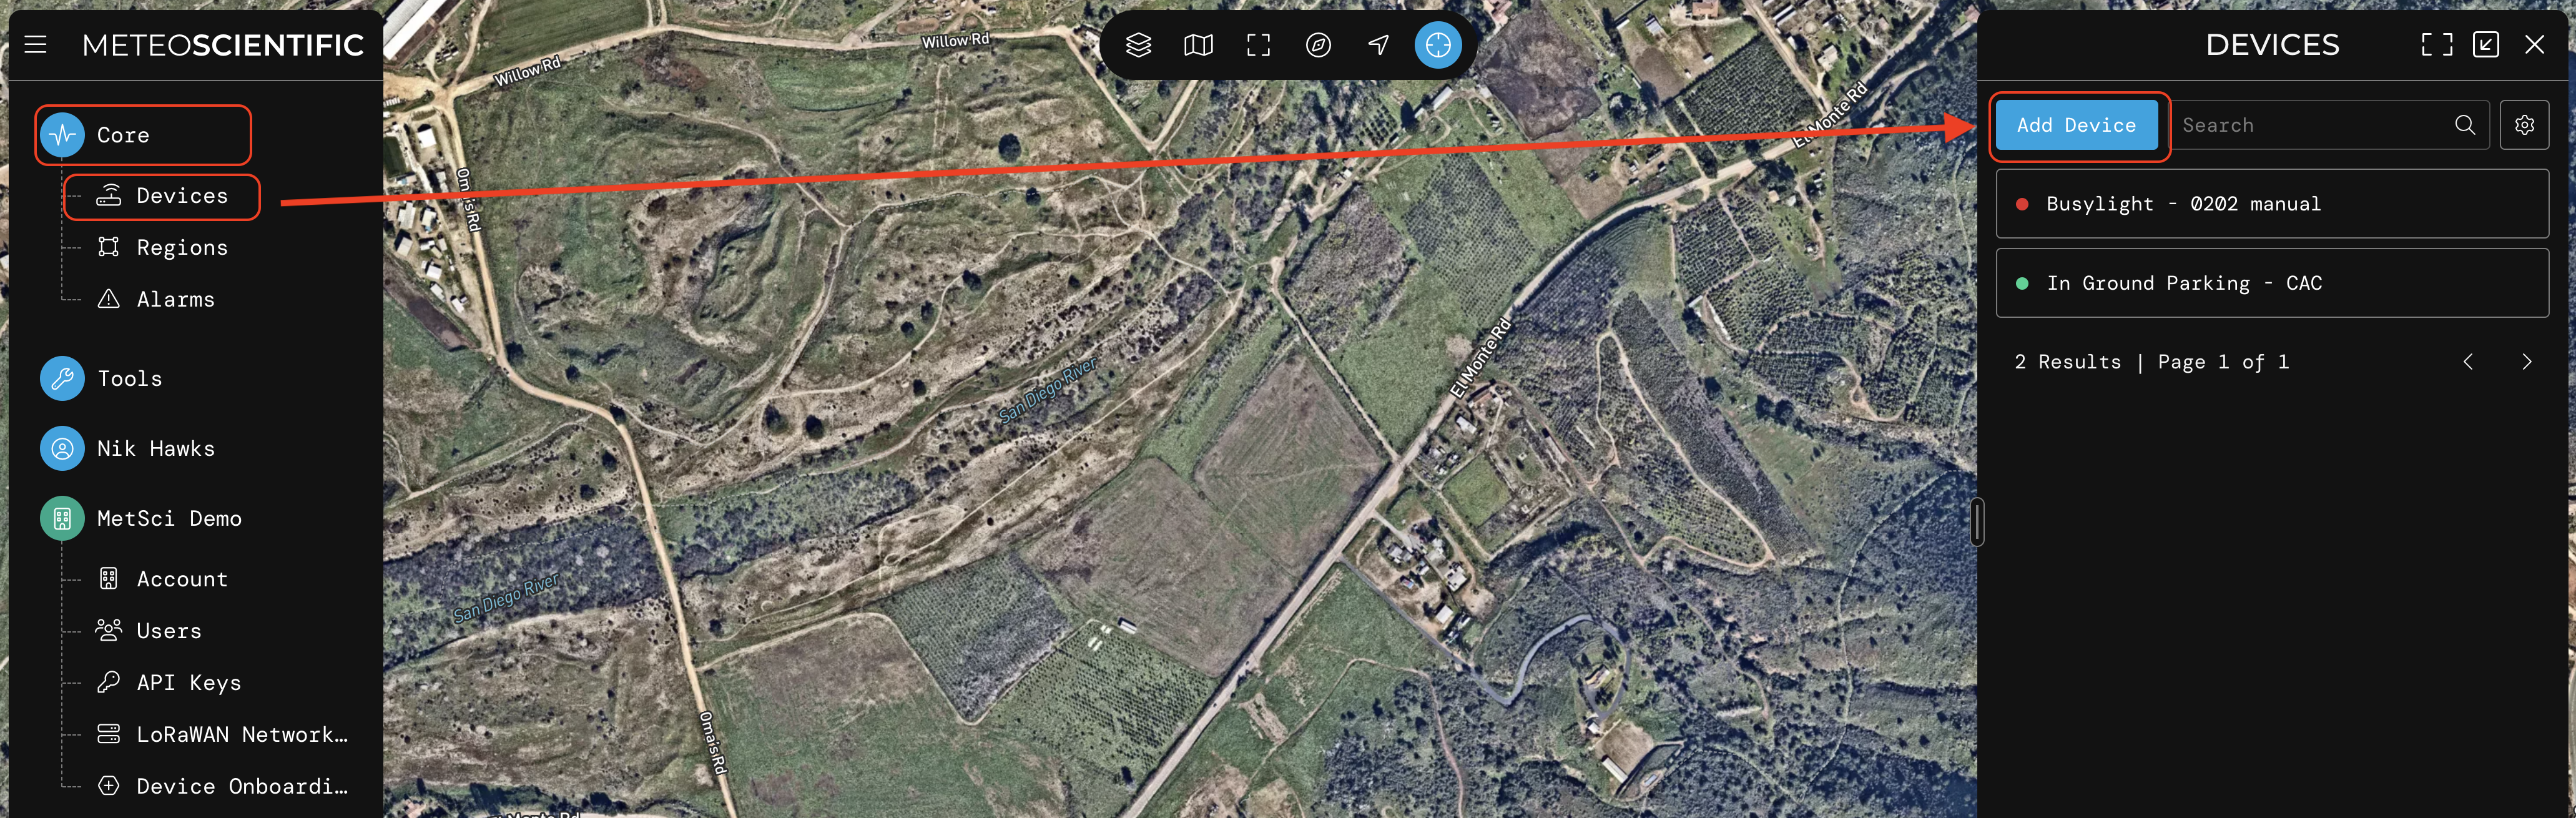
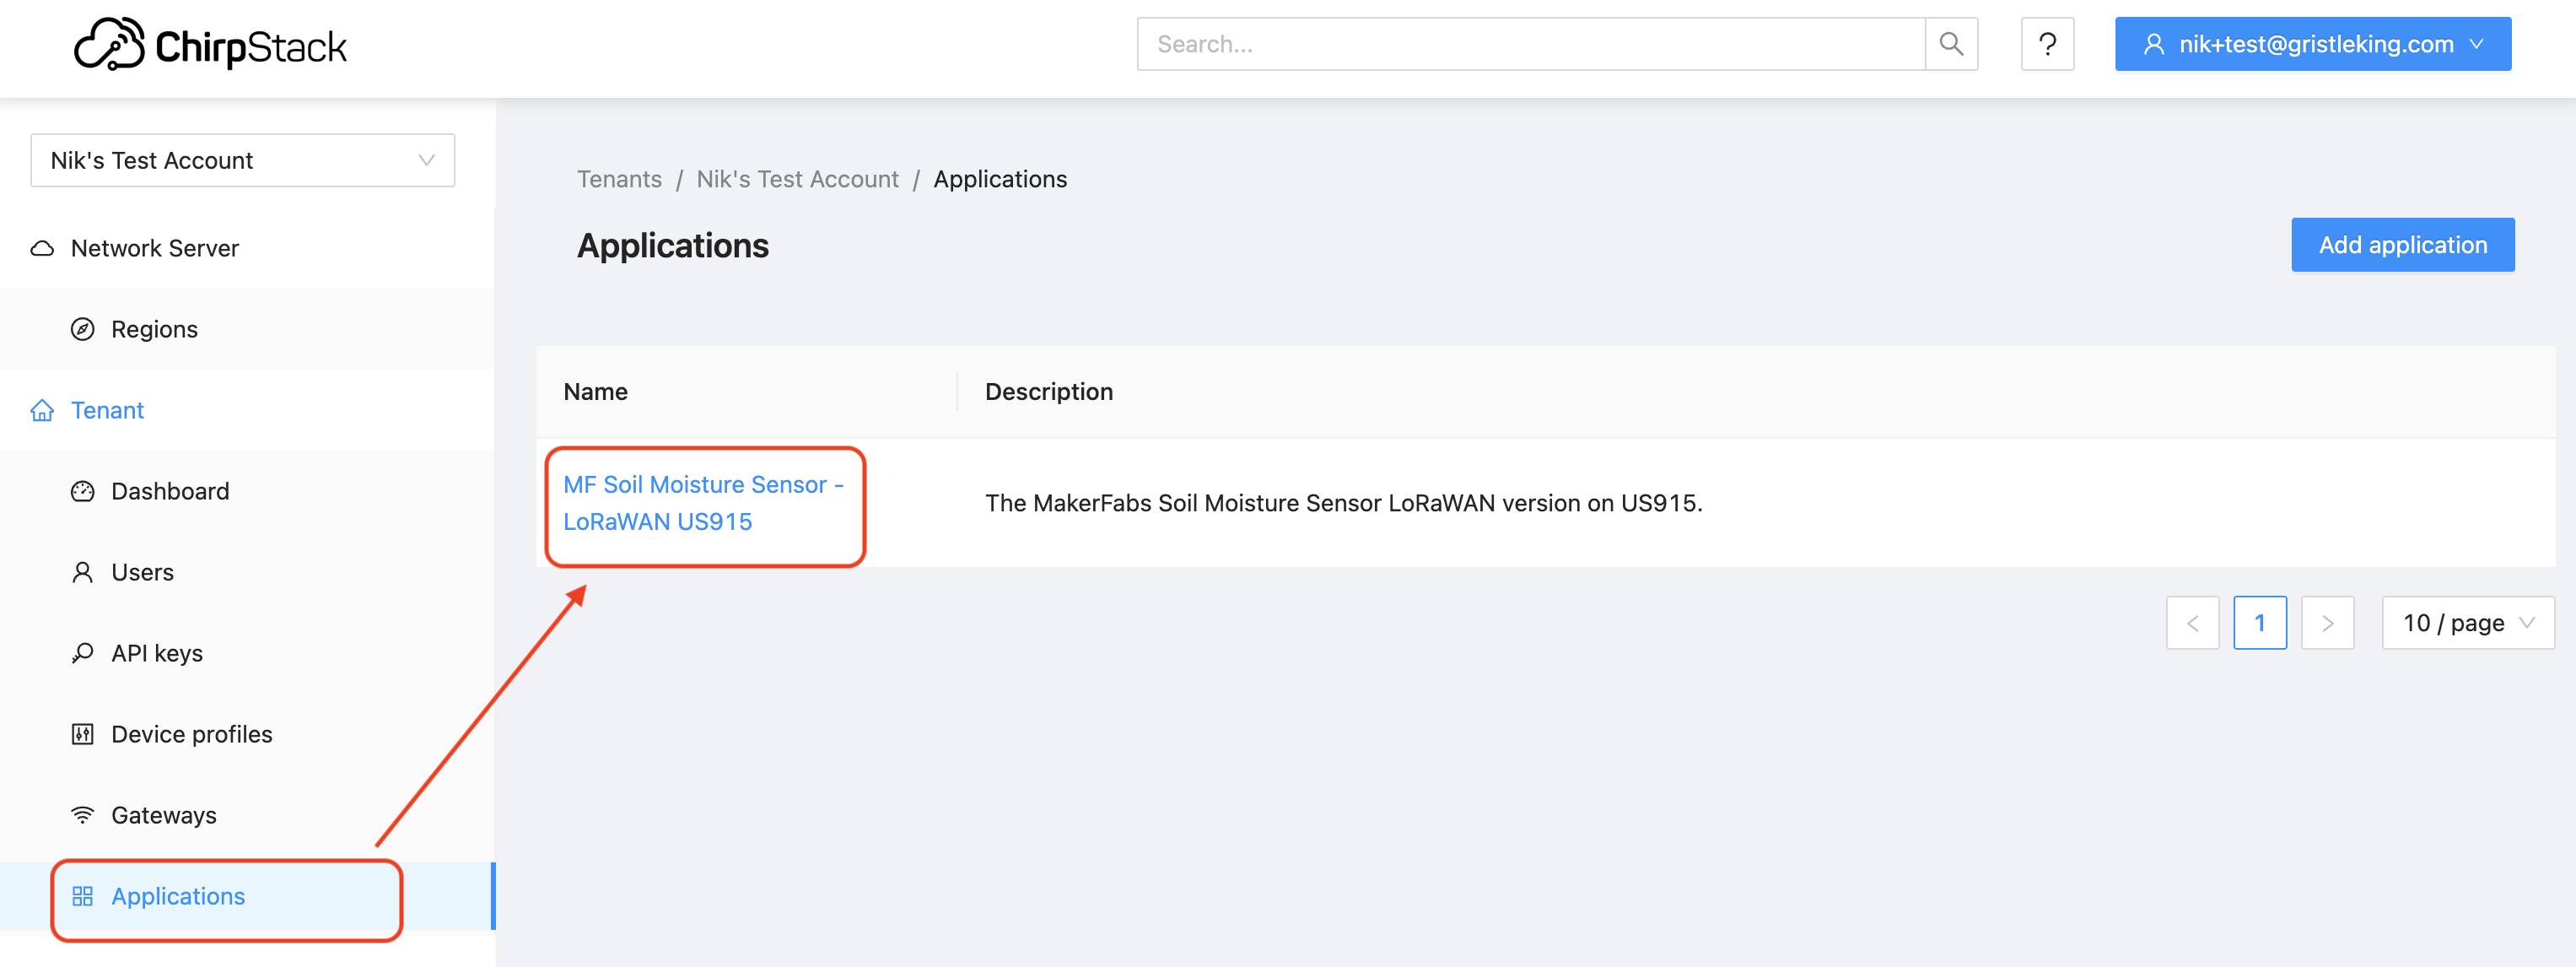
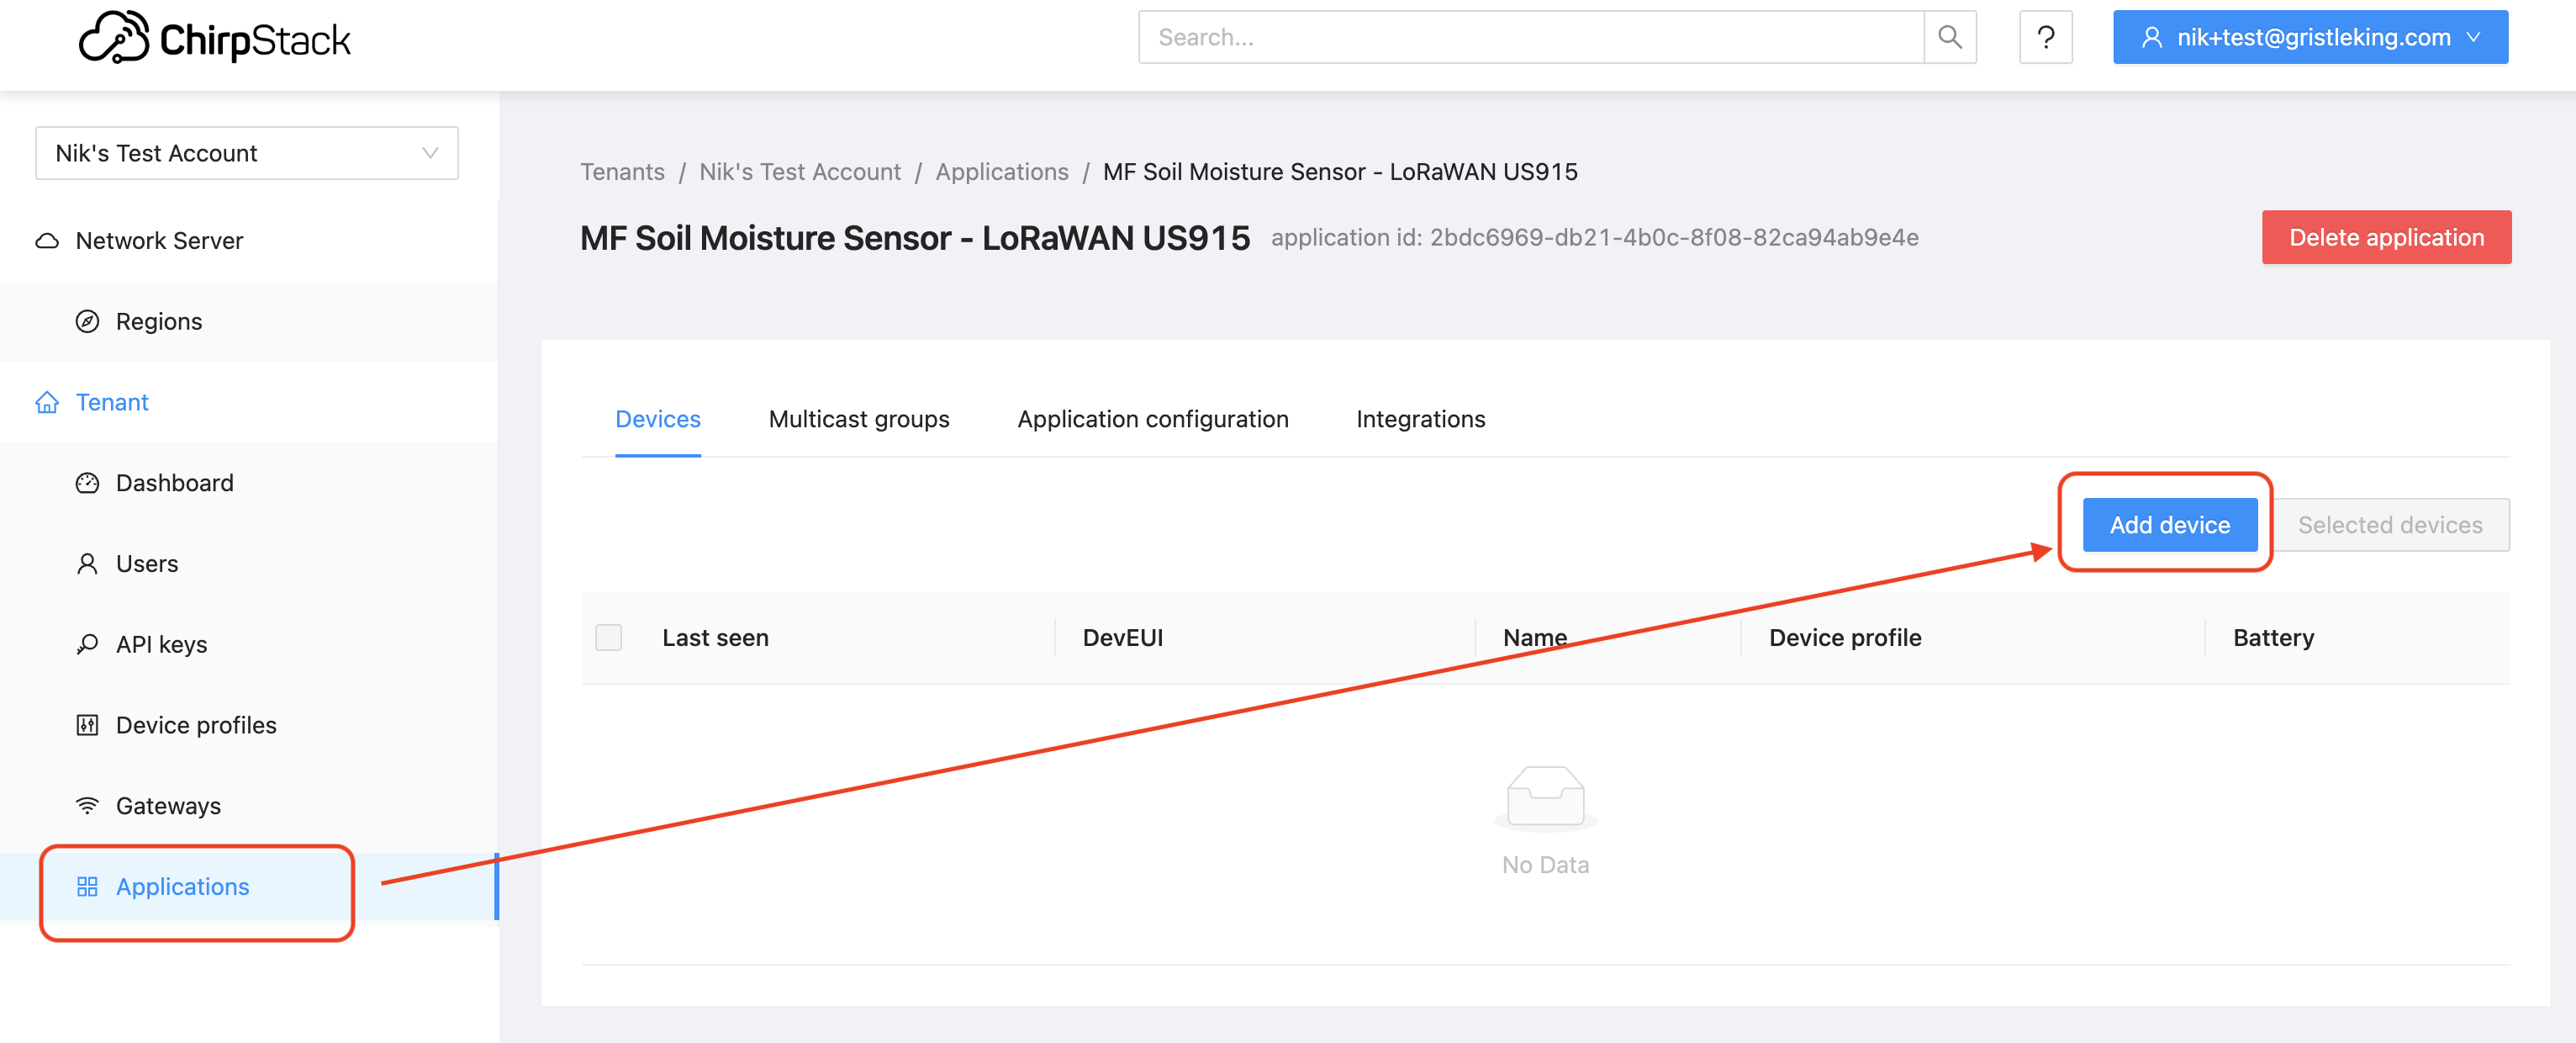
Woohoo, let's add a device! Now that we have an Application, from the Applications tab in the main menu, choose the application you just made:

Then hit the blue "Add device" button.

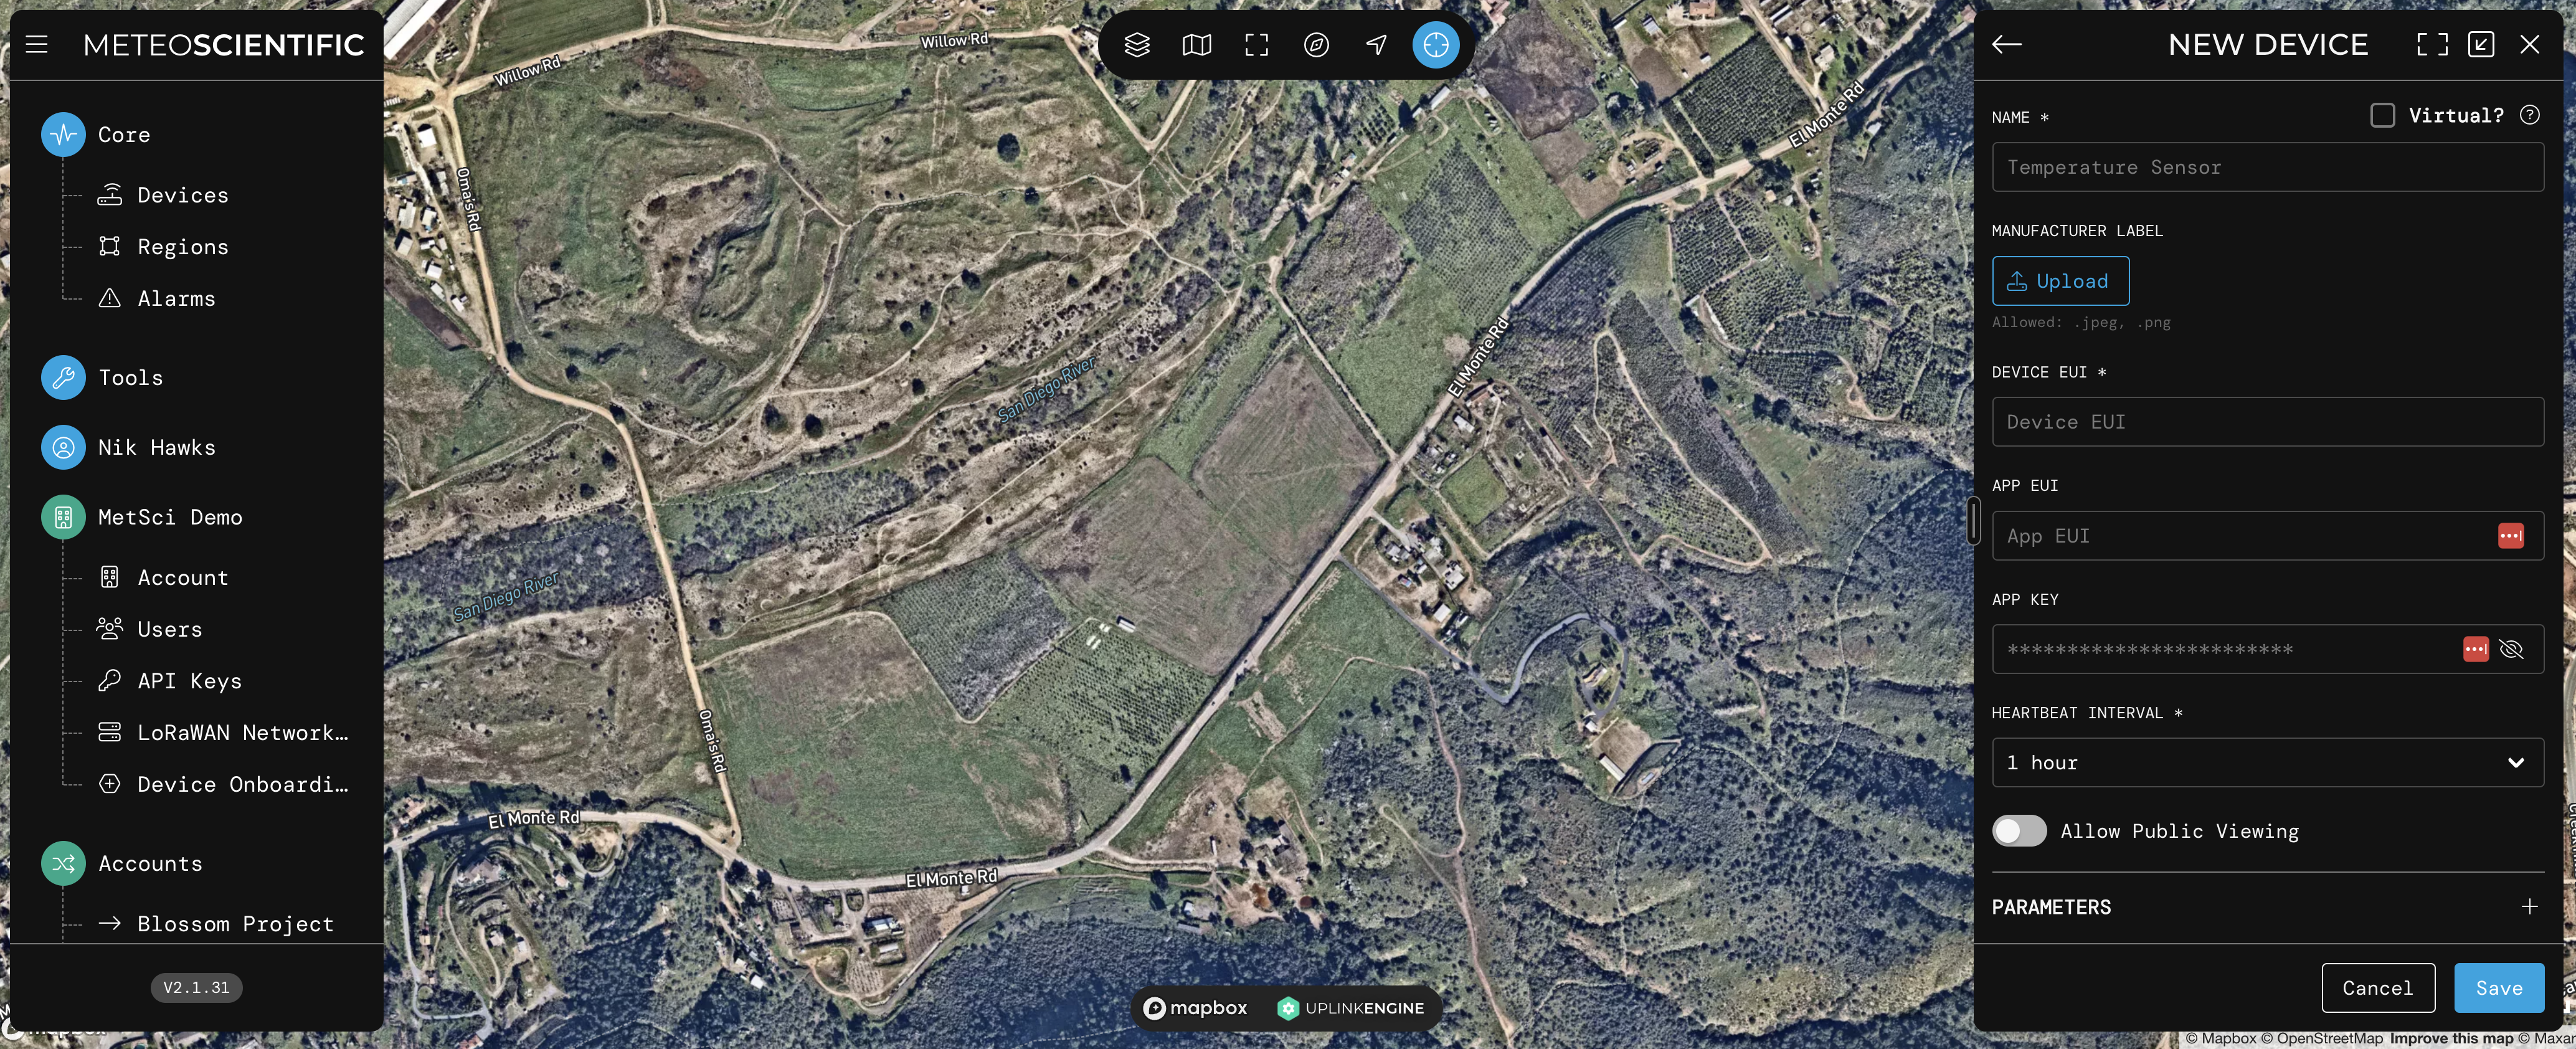
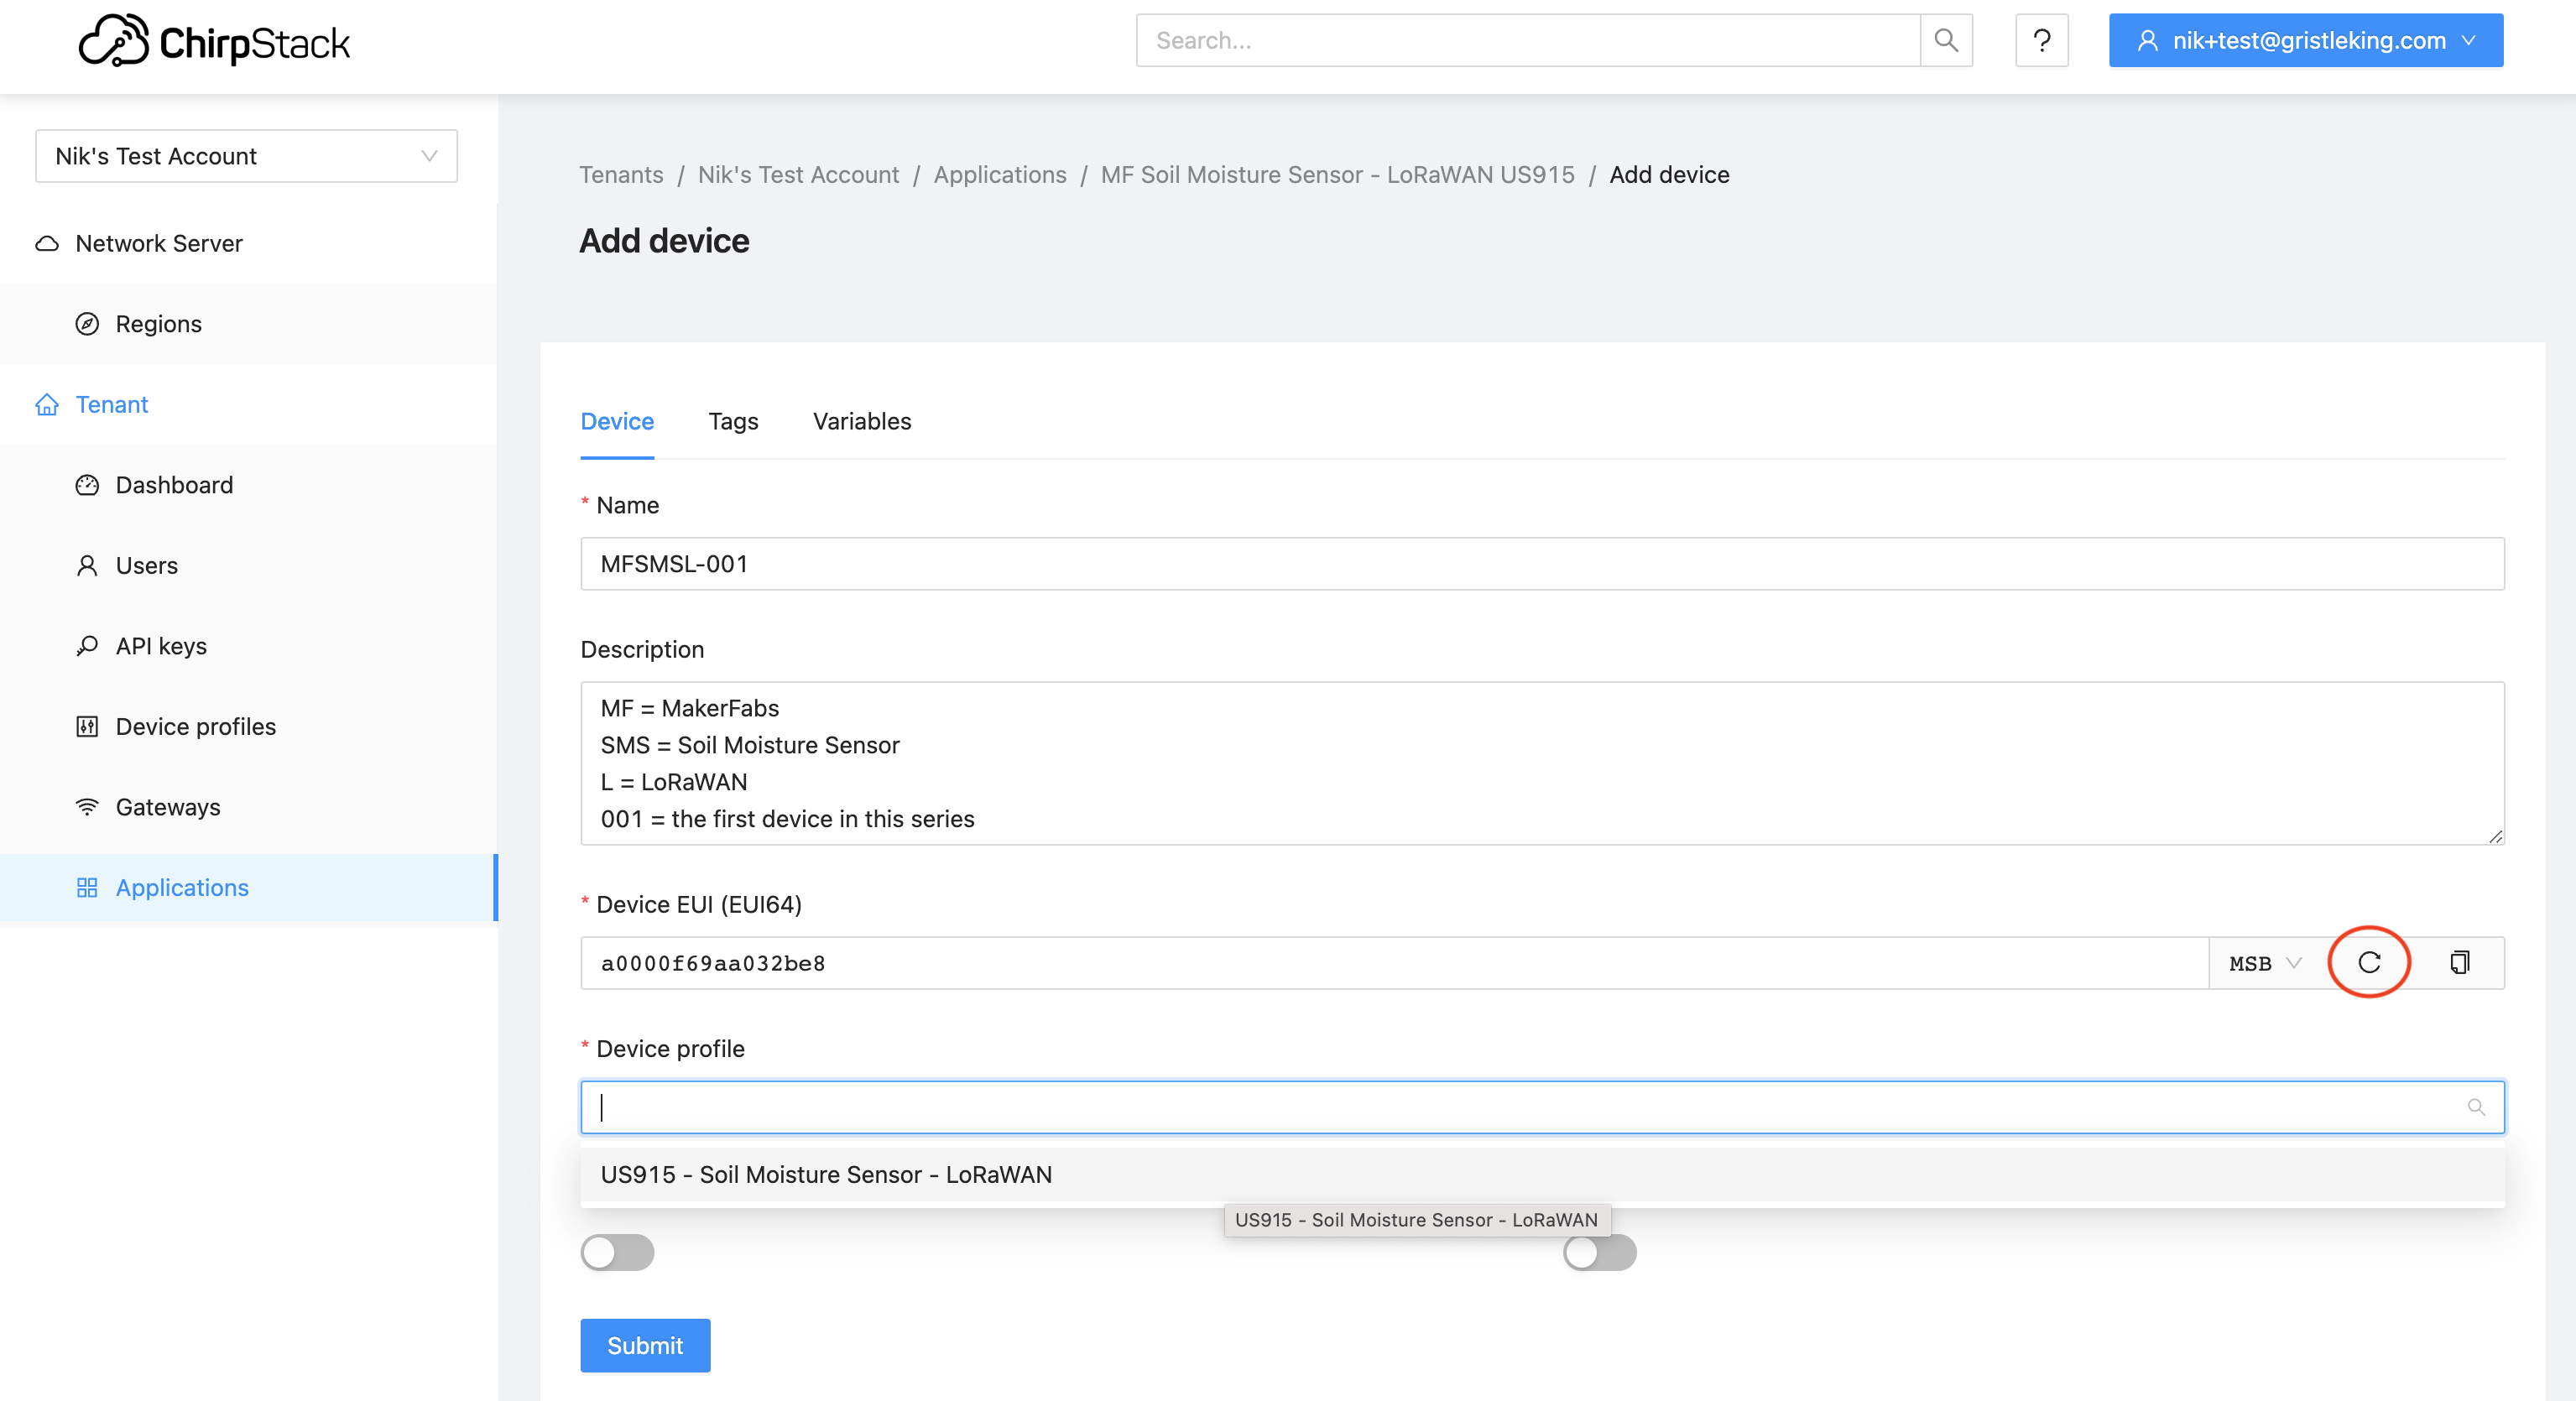
That'll bring you to the device page. I like to fill out the description fully, with a reminder to myself of the naming convention I'm using, although that may only be on the 001 of each device. On the Device EUI you can fill in what you have or have Chirpstack generate a DevEUI for you by hitting the little circle/arrow button. For Device Profile, choose the (only) option

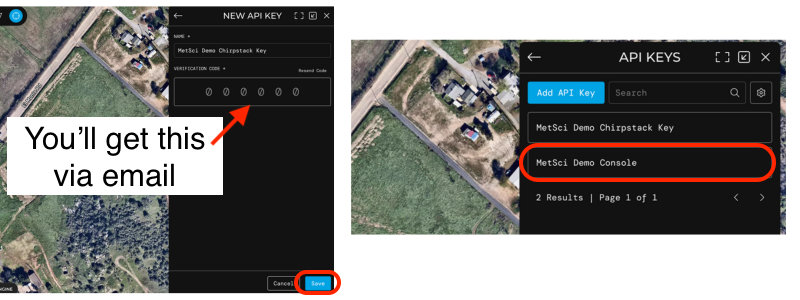
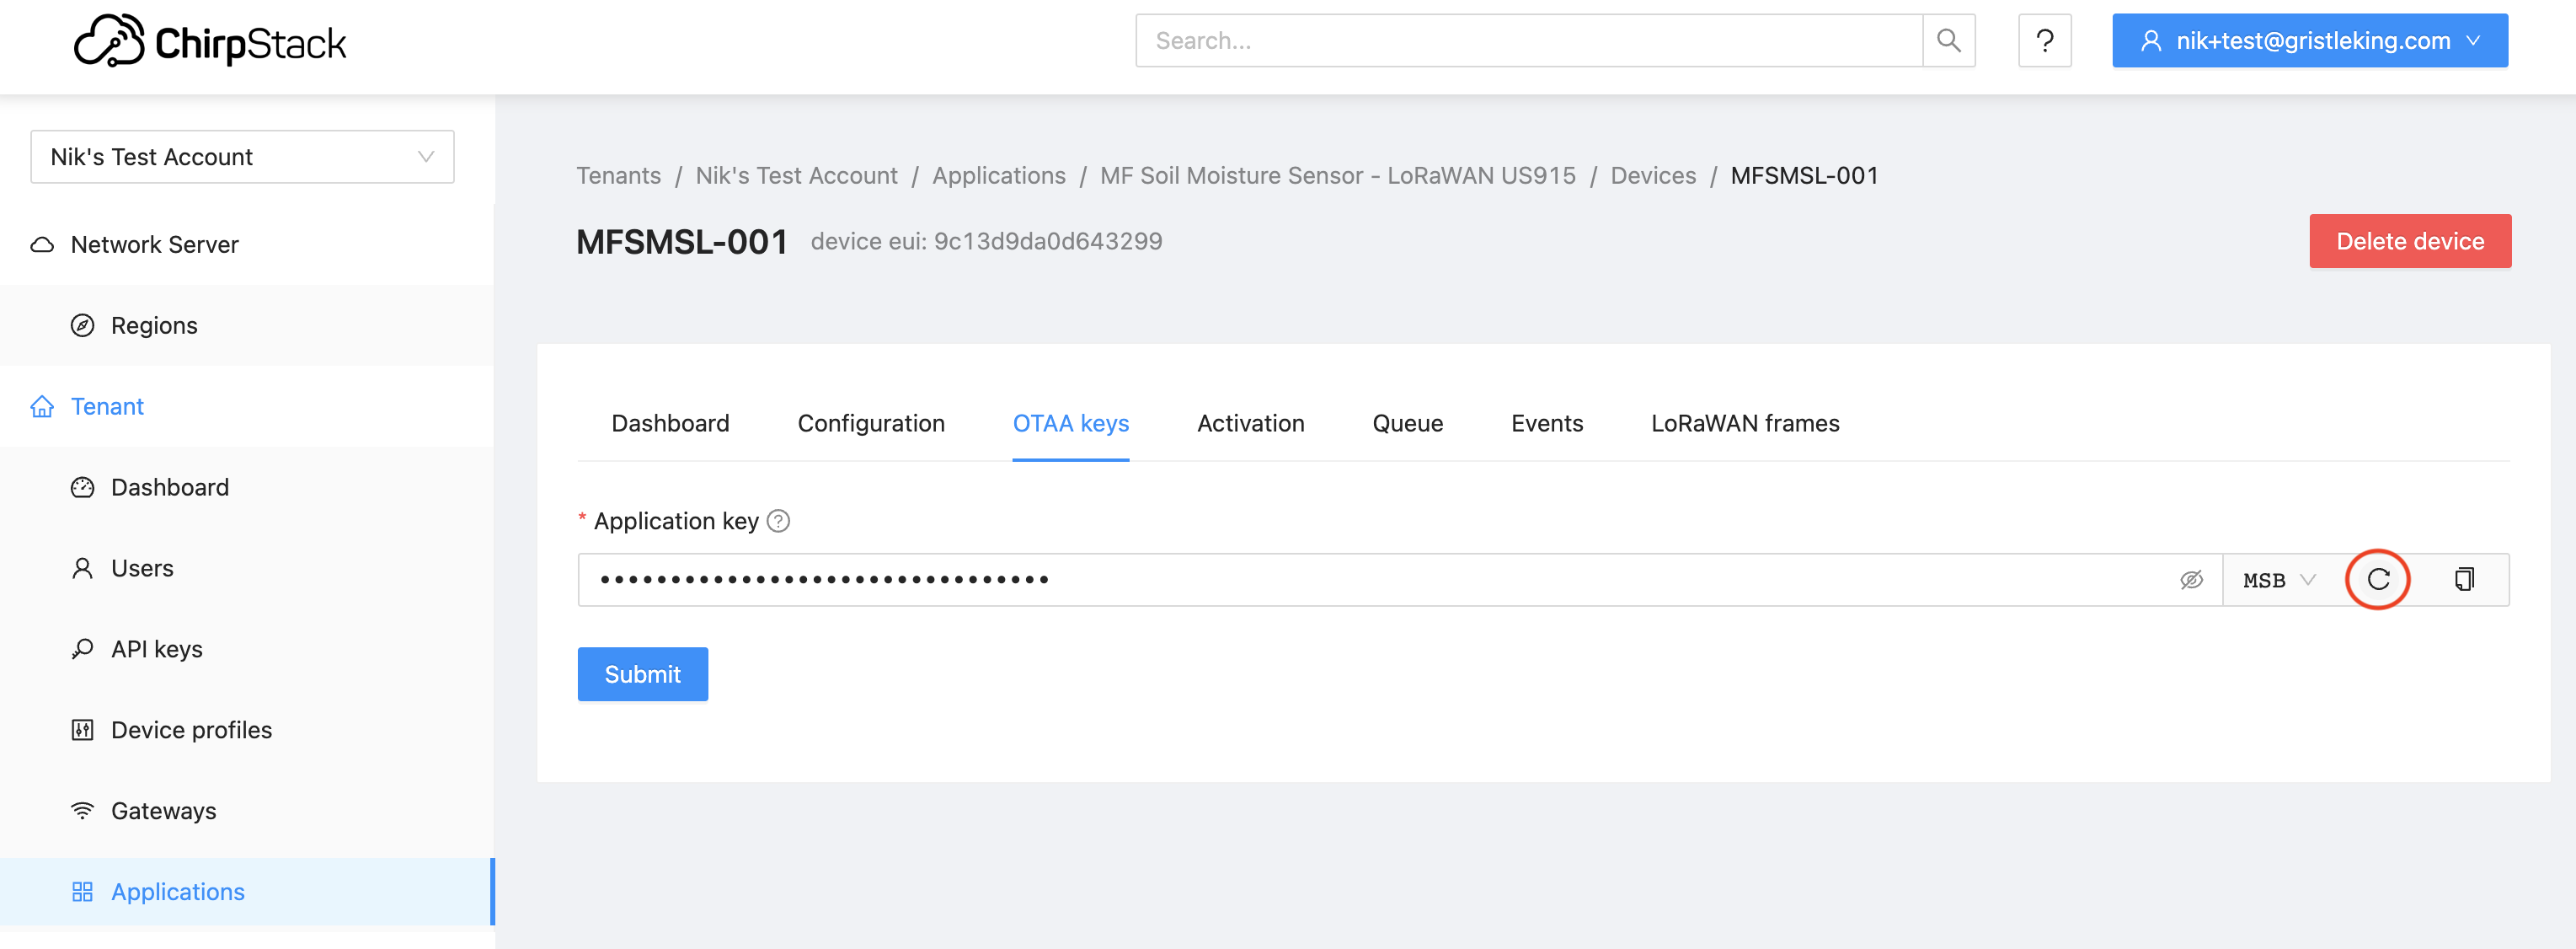
Once you've filled all that in, hit Submit at the bottom, which will take you to the "Application key" tab up in OTAA keys on the Application menu. You can use the same circle/arrow button to generate an App Key (if you're going to load that onto your device), or you can type in the AppKey if one came with the sensor.

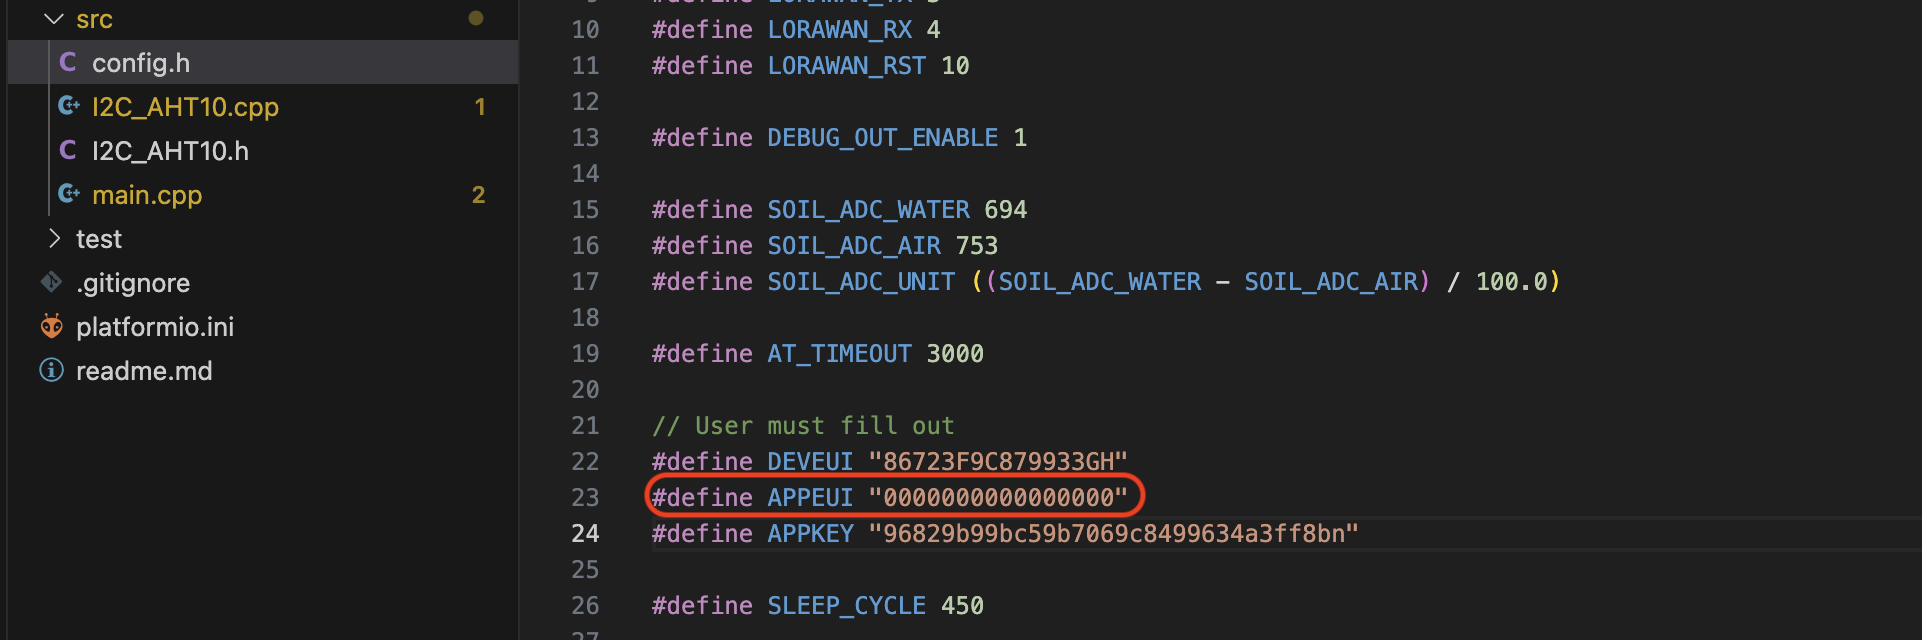
There is no APPEUI in Chirpstack! This can be a bit jarring to you, and in some cases you'll have to enter in all zeros for your AppEUI if you're programming your device (which is what I do for this device in Platformio).

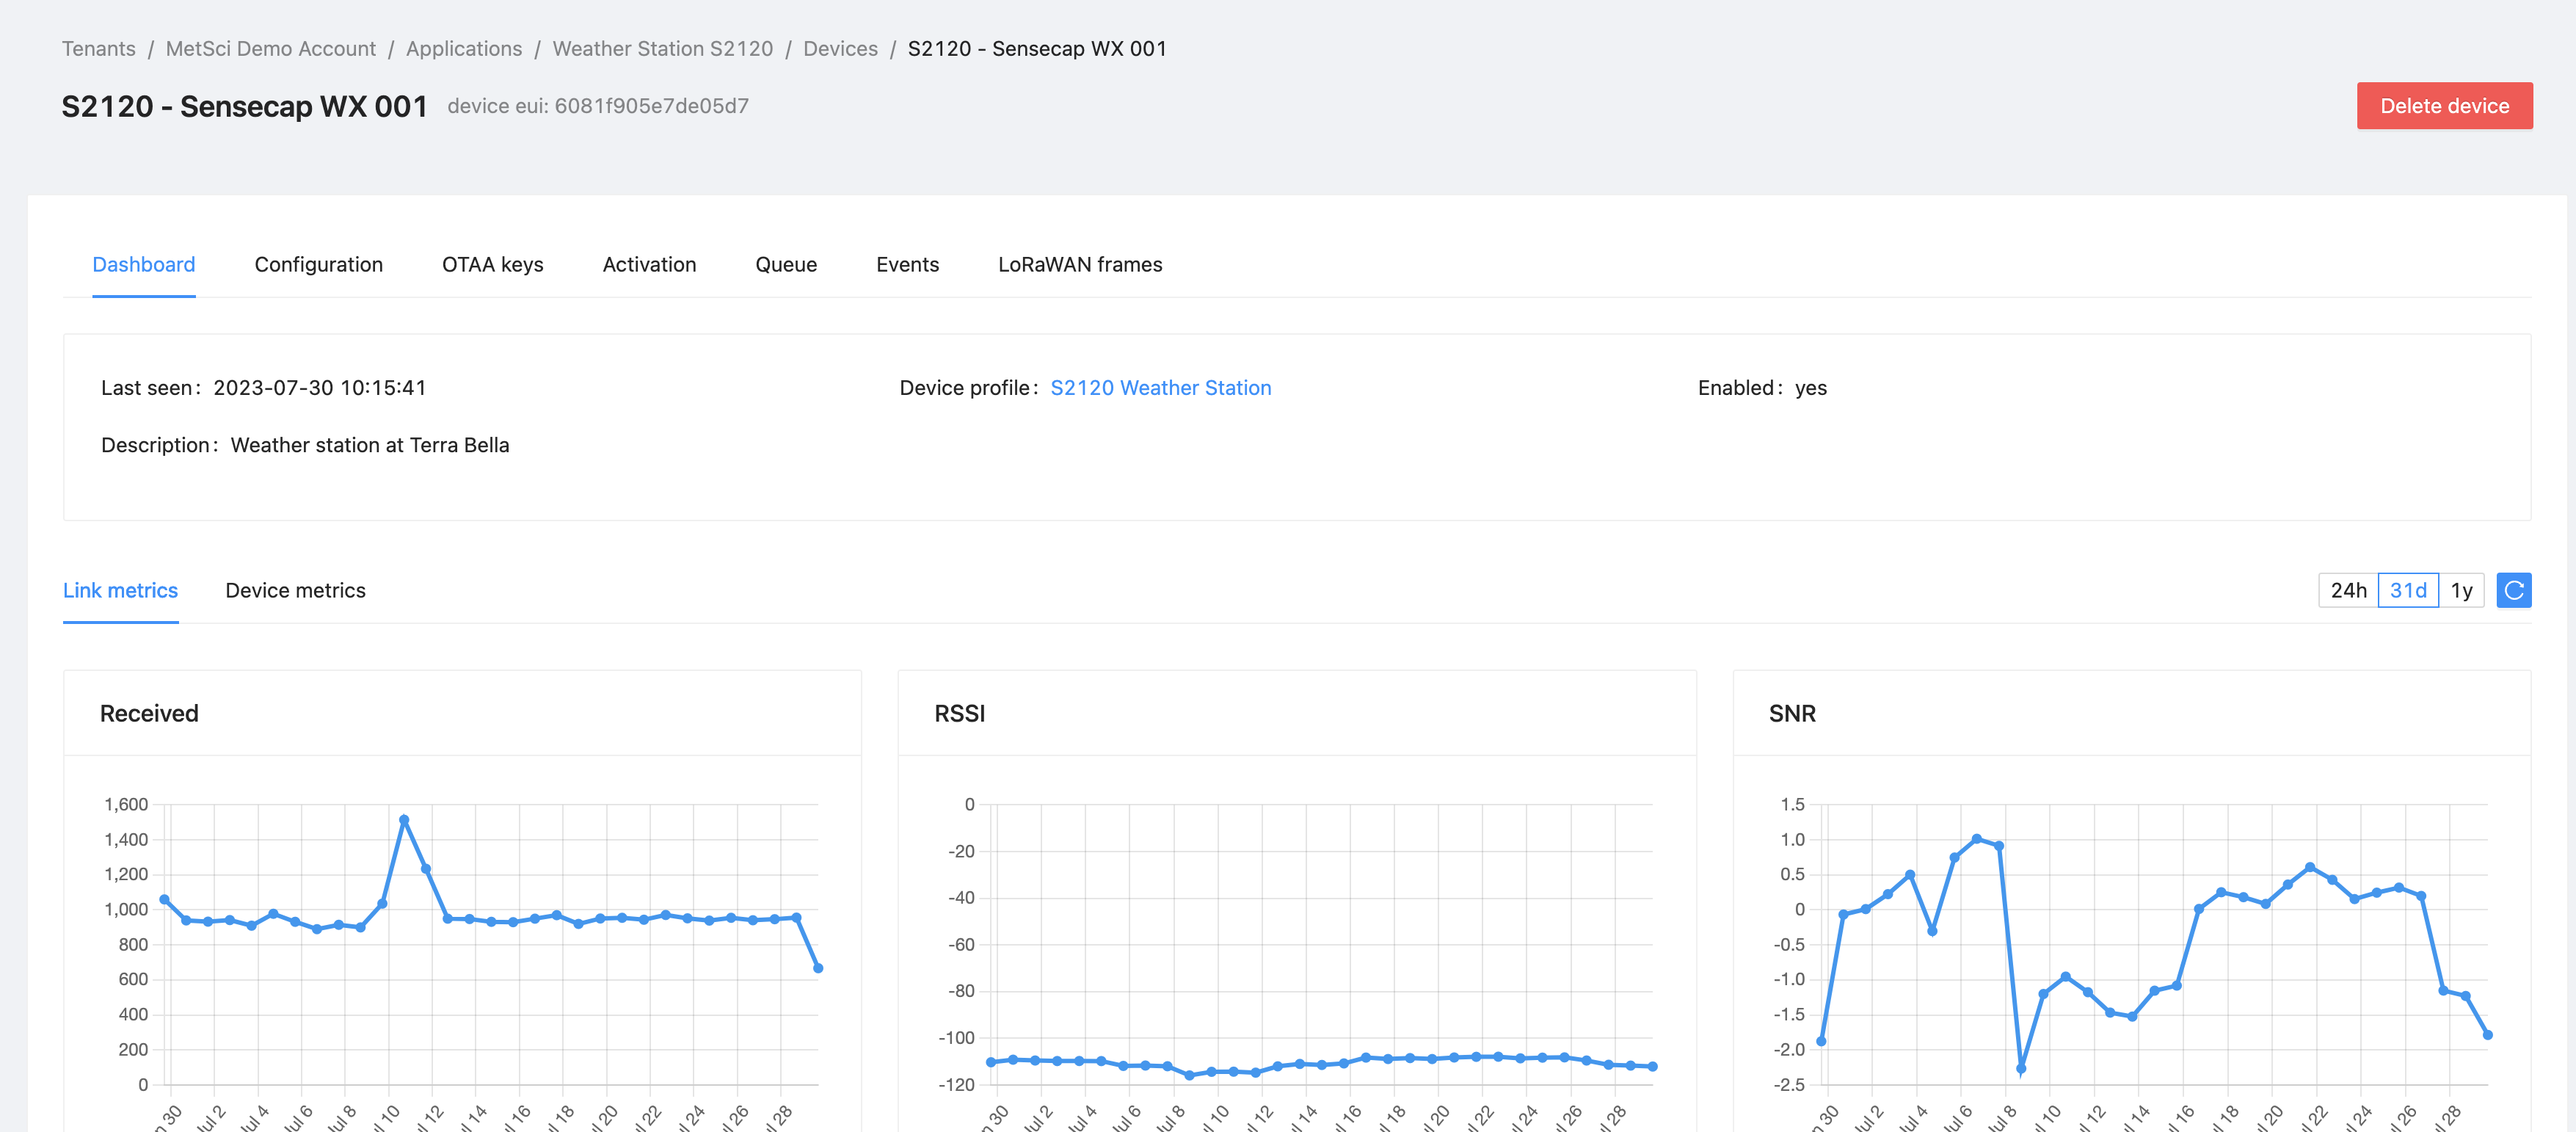
Whew, we've done all the Chirpstack work we need to do! If your device came with pre-programmed keys you'll use, you should add batteries and it *should* fire right up. You'll see that in Applications / [your application] / Devices / [your device].

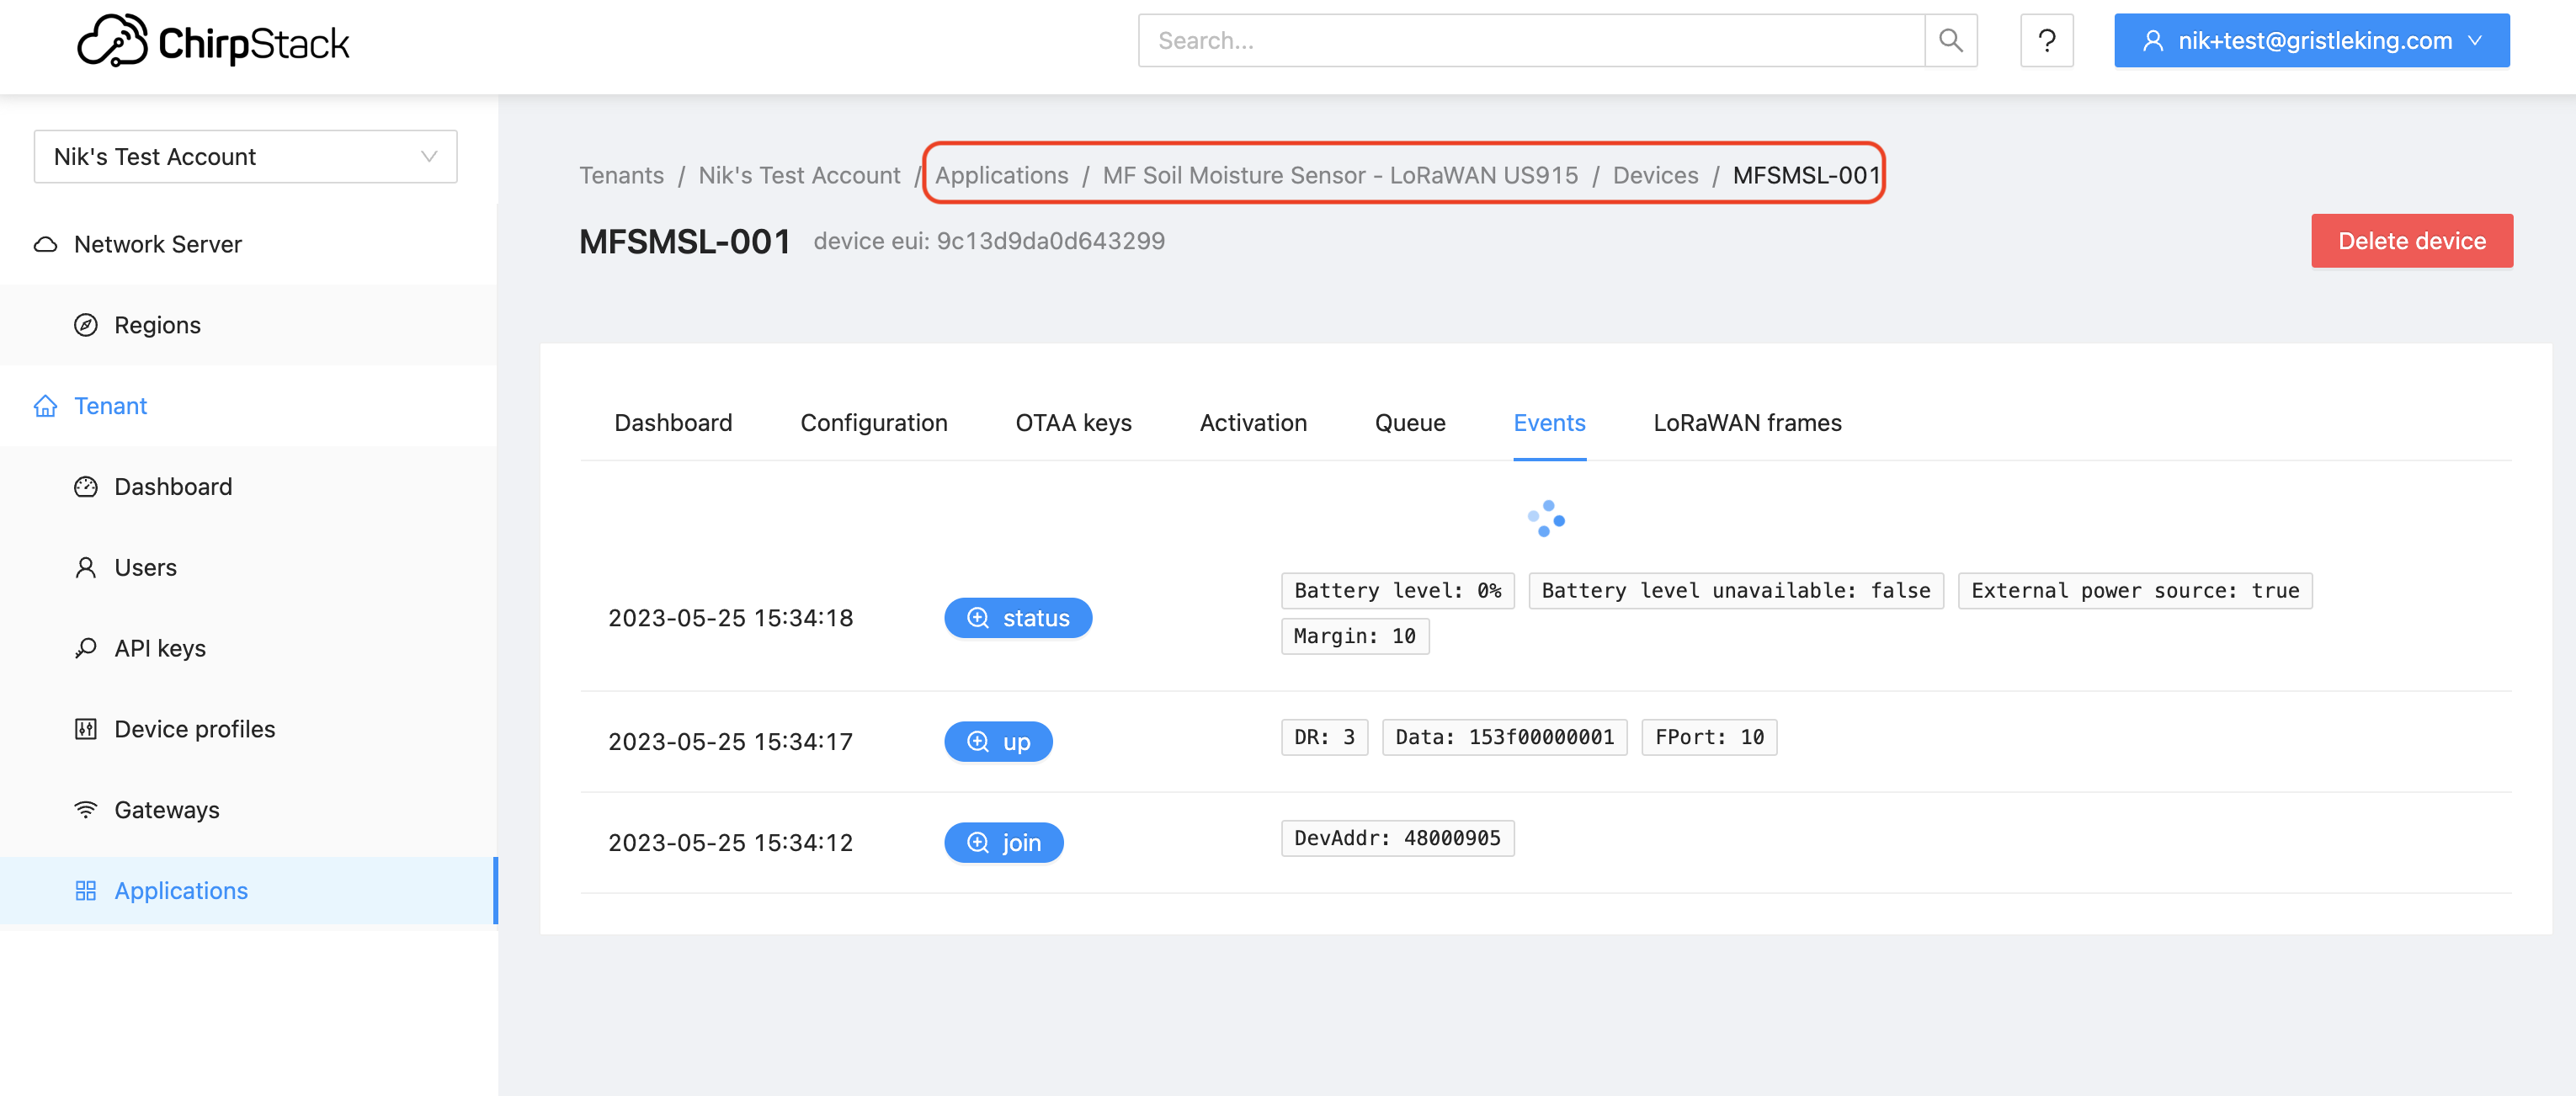
In that case I didn't have any batteries in it, I just used the Upload and Monitor and power from the USB on Platformio. Looks like it's reporting correctly!

Very cool, right? Feel free to try it out, and let us know if you find any bugs; this is still pretty new, so we haven't worked out all the kinks yet. If you want a head start on this rad new world we're heading into with Helium, this is your chance. Rock on!

Archived Comments

Mark Roberts - 10/13/2023

Thanks for this. Trying out MeteoScientific now. You should put a link to this blog on the meteoscientific.com page to help direct people to get started. I have a question... If I want to migrate a device that is currently running on console.helium.com do I delete it and create new DevEUI, etc. or can I just use the DevEUI that Helium provided? Do I leave the device there? -mark.


Mark Roberts - 10/13/2023

Update... I went ahead and reprogrammed my first device with the devEui and appKey generated by Chirpstack, using 0 for the appEui and the device is sending data through helium to meteoscientific now. My next step is to get the data to my MQTT broker, since part of the reason I want to migrate right away is that the MQTT Integration in Helium seems to be very unreliable, throwing an ill-documented, undefined 'failed to publish' error on some but not all devices after running for a while. The problem is that when I go to the integrations tab of my application I see a "Get Certificate" button under MQTT, not a simple + sign. When I click Get Certificate and then Generate Certificate there is an error dialogue: "Error: Read mqtt ca_cert". So I'm stuck. My broker doesn't use SSL, I don't need this feature, just simple authorization with user and password... so how do I get past this? Thanks, -mark.


Nik - 10/14/2023

Hi Mark, thanks for trying it out! If you want to migrate from the Helium Console to MetSci I've got a video on how to do that, here.


Nik - 10/14/2023

Hi Mark, as of 14OCT2023 we don't have a direct MQTT integration, but there is a workaround, using an HTTP-->MQTT. You can find those directions here.


mdroberts1243 - 10/14/2023

Thanks Nik. For now I'm trying to follow the directions you linked. Currently I only see the packets from Helium Console hitting my MQTT broker though. I'll email you a screen shot of the integration settings since I don't think I can post a picture here. Is there a way to debug integrations in Chirpstack? I don't see any events associated with the integration.


chioz - 10/19/2023

Hello there, Got myself some dragino lht65n and want to utilize them for business idea. Seem like it was harder than i thought to get it online on chirpstack and hopefully then on to datacake. Could there be a guide how to onboard them please? I have gotten a heltec cubecell ab02s with your guide that seem to register fine on chirpstack (cannot seem to figure out how to get it onwards to datacake thought) But when trying the Dragino it is registered as "never seen". The Dragino also lights up its red diodes to show it is not connected. The guide from Dragino is also lacking a simple guide for helium usecase.


Nik - 10/19/2023

Hi Chioz, check out the MetSci YouTube channel for help. I'm not sure about why the Dragino isn't being seen, although I've also noted it can take a few tries to get things working.


Chioz - 10/25/2023

Thanks for getting back on this. Tried following the steps in your youtube channel. Same thing happening. Cannot connect to Chirpstack. Tried adding them to console.helium - super easy. So tried to migration video but cannot follow the steps as it is not the same. On "Setup API" Tab, I get "Refused to Connect" when choosing "Vip Console", however "Foundation Console" works so i get to the next step. I then choose "Temp" label defined in the helium console, The "Select Intergration" has no alternative but "none", and the same is true for "Select Function" (No wonder when i just added them to helium console without anything more) The next tab (Setup Chirpstack) has my company name as "Select tenant" - pressing this only gives the message " Invalid chripstack authentication, try to logout / login" Have tried a few refreshes and log out and in on this. I guess i must be doing something wrong here to then :/ Cant we just continue to have the helium console please? (I know, I know ...., it is being cut of eventually...)


fagermo - 11/12/2023

dont know where to ask for help on this, but cant seem to get password recovery working or to make a new account...


Chioz - 11/13/2023

Finally got things set up for the Chirpstack way :D Thanks for the guides and making this. By the way, needed the app_eui to be the correct number for it to register a dragino sensor. May be needing to correct that in the youtube video :D Thanks again


Arm - 11/19/2023

Hello, could someone help me add a Dragino LT-22222 device? I have the keys, DEV EUI, APP EUI and APP KEY. Which of these should I use because it is not clear to me.


Nik - 11/20/2023

Hey Arm, cruise over to the MetSci YouTube videos, they should walk you through the process: https://www.youtube.com/@meteoscientific/videos